5 Assignment: Botanical Illustration
Dr. Jessica Boehman; Amelia Stepnowski; Donivan Bonilla; and Johanna Guzman
Botanical illustration has been a practiced and revered form of illustration for hundreds of years (click here to for databases of historical botanical illustrations). The botanical illustration is not merely observational; it relies on the artist to imagine what various aspects of the plant’s life might look like composed in a single image.
Second, the botanical illustration should keep composition, form, color, line, and texture in mind to make an illustration that is not only informative but beautiful.
This does require close natural observation of the minute details of the plant’s structure but also requires an element of time: what might this plant look like in bud, in flower, or when it is bearing fruit? How does the root structure work? Can we see, in one image, the posterior and the anterior, as well as the various stages of the flower and fruit? The illustrator must act as a researcher in order to be sure that the finished drawing will be as scientifically accurate as possible and show the various states of the flower in a single form.
Learning Objectives
- To mix close observation with research, creating an image not seen in nature
- To learn to accurately reproduce a natural specimen
- To consider line, color, and composition to make this not only a nature study but a work of art
Let’s take a look at an historic example:
Maria Sibylla Merian, Giant Silk Moth (Arsenura armida), larvae of various species, and Purple Coraltree (Erythrina fusca) from Metamorphosis Insectorum Surinamensium, 1705, Germany. Hand-colored engraving. Learn more about Maria Sibylla Merian here.

The artist, German illustrator Maria Sibylla Merian (1747-1717) gives us a lot of information: how the anterior portion of the tree looks in its branches, shoots, and leaves (its lateral organs), and how the flower looks in bud and fully-opened. She has illustrated various types of larvae and moths that could be found on this plant, shown in various positions, and included their furled and unfurled cocoons, and a fully-grown Giant Silk Moth. The colors are vibrant, and the composition is not muddled: it allows us to see all of these pieces. She uses a lighter tone green-blue to show us leaves in the background. The background is a neutral color to allow the focus to be completely on the specimens she presents. Consider how she uses linework (here, in the form of engraving); this delineates the details, form, and volume of the plant and moths. She adds color in watercolor to make this vibrant and naturalistic. You must plan ahead if you choose to use color in a similar way: leave room for the color; too much linework will muddy the color.
Case Study: Botanical Illustration for a College Urban Garden in Queens, New York
Note for professors:
This assignment could easily be modified as “Botanical Illustration in Your Local Environment.” What’s important here is that the illustrator start with real life observation of a plant specimen. A finished class assignment could yield, over time, a fascinating archive of local plants. Students could determine which plants are introduced into the environment, invasive, or native. If this were a repeated yearly assignment, you might note that students cannot pick specimens that have been previously illustrated in your class.
Why this assignment?
There are several reasons I have chosen to start the course with this assignment. The first is that I want you to begin your exploration of the art of illustration in a way that is mostly observational. The rest of the assignments rely almost entirely on your imagination, but this one requires you to hone your close looking skills.
The second reason is that I want you to work directly with a client. Unlike Fine Art, illustration often involves another party: an author, an agent, a client, an art director, or an editor. The needs of these various parties must be taken into consideration. While we will mimic this in the rest of the semester using the professor as a stand-in for these various roles, here we will work with a real client: the students and professors who are farmers at Finca La Florecita, LaGuardia’s Urban Farm. As such, you will be working within the confines of a client’s needs, project specifications, and content.
Thirdly, we are working over time to document the various crops and plants that attract pollinators that are grown in the garden. This farm works to address food injustice in Queens, specifically amongst the student population, and the food will be used to supplement LaGuardia’s food pantry for students in need. The illustrations generated by this assignment will become part of an Open Educational Resource Archive that not only will document what has been grown here, but can also be used by professors in their classes here and in other schools.
Step 1: Choose a plant
Our trip to the Urban Farm will allow us to sketch, photograph, and observe the plant which we will be considering. Make sure to get plenty of photographs and sketches of:
- Each side of the plant (anterior, posterior, and lateral organs)
—anterior: the topmost part of the plant, where the shoot system emerges to create stem, leaves, buds, flowers, and fruits
—posterior: the root system (**this may require some extra research if we are not able to extract a plant)
—lateral organ: branches or shoots that grow out from the main stem
- Any buds or flowers
- Fruit or vegetable (the edible portion)
Be sure to learn and record for your botanical illustration:
Genus (type of plant) and species (specific name of the type of that plant).
For example: an Heirloom tomato would be labeled as such:
Heirloom Tomato
Solanum lycopersicum
(Solanum [genus] lycopersicum [species])
Project Specifications:Assignment: Urban Botanical Illustration
Client: Finca La Florecita
Final Artwork Size: 8.5×11”
Trim size: ½ inch border (trim) on all slides.
Color or black and white: Full color
DPI of scanned work: 300dpi print quality; save a copy as 72dpi for web
File color profile: CMYK for print quality version, RGB for web quality image.
- Before proceeding to your final illustration, I will first look at your sketches, comparing it to reference photos you have taken at the farm and further research you have done (buds, roots, etc.)
- Once you receive the green light from the professor, you may proceed to your final illustration, transferring your final sketch onto a clean sheet of paper.
The final illustration will be done on 8.5×11 paper. Be sure to leave a ½” border on each side of your paper to act as the trim area. This is also a COLOR assignment: you must solve the project using color; you may use whatever medium you choose. If you need to work bigger, please work proportionally bigger. We can scan and scale down the image to add the computer text. Be sure to leave room in your design for labeling of the parts of the plant, the latin designation (genus and species).
1.5x size is 12.75×16.5″.
2x size is 17×22″.
Keep it clean:
Beware eraser marks, clean up any smudges immediately, and spray your drawing with a workable fixative once you are finished in order to keep any friable media from smudging (this applies to color pencil, pencil, chalk pastel, or charcoal). If you are using watercolor or water-soluble ink, DO NOT spray your drawing as it will make it run.
If working digitally, please set your file stats to 300dpi, CMYK color profile for printing. Be sure to leave room in your design for labeling of the parts of the plant, the latin designation (genus and species). Once you are finished, you may copy your image into a new file set at RGB color setting for web use. Web quality resolution is 72dpi.
Be sure to clean up any mistakes and smudges and fix the levels to allow for a white background. (In photoshop: Image→Levels)
Scanning and layout on Photoshop:
Turn on the computer nearest the large scanner and login to Photoshop.
Open the Epson Scan program.
Scan at 300dpi, 48-bit color, highest quality image.
If you need to photomerge a drawing that is bigger than the scanner, you can scan it in pieces; start by scanning all parts of your drawing, making sure all of the drawing have been captured, and then open Photoshop.
Click File–Automate–Photomerge. Add all scans of your drawings in the file box and click ok
Flatten the finished drawing (right click on the layers menu→ flatten) and copy the flattened file into a new document.
New Document:
8.5″x11″ CMYK color profile, 300dpi
Paste your drawing in. If too big, go to EDIT→transform→scale and use the toggle until it is the right size.
Use levels to even out whites.
Clean up with stamp or eraser tools and hit save.
The background should be WHITE and the text should be added with Bodoni 72 Smallcaps in size 24 in black.
Text should give us the English name and then the Latin designation.
Let’s consider a student example from this assignment.
Example 1:
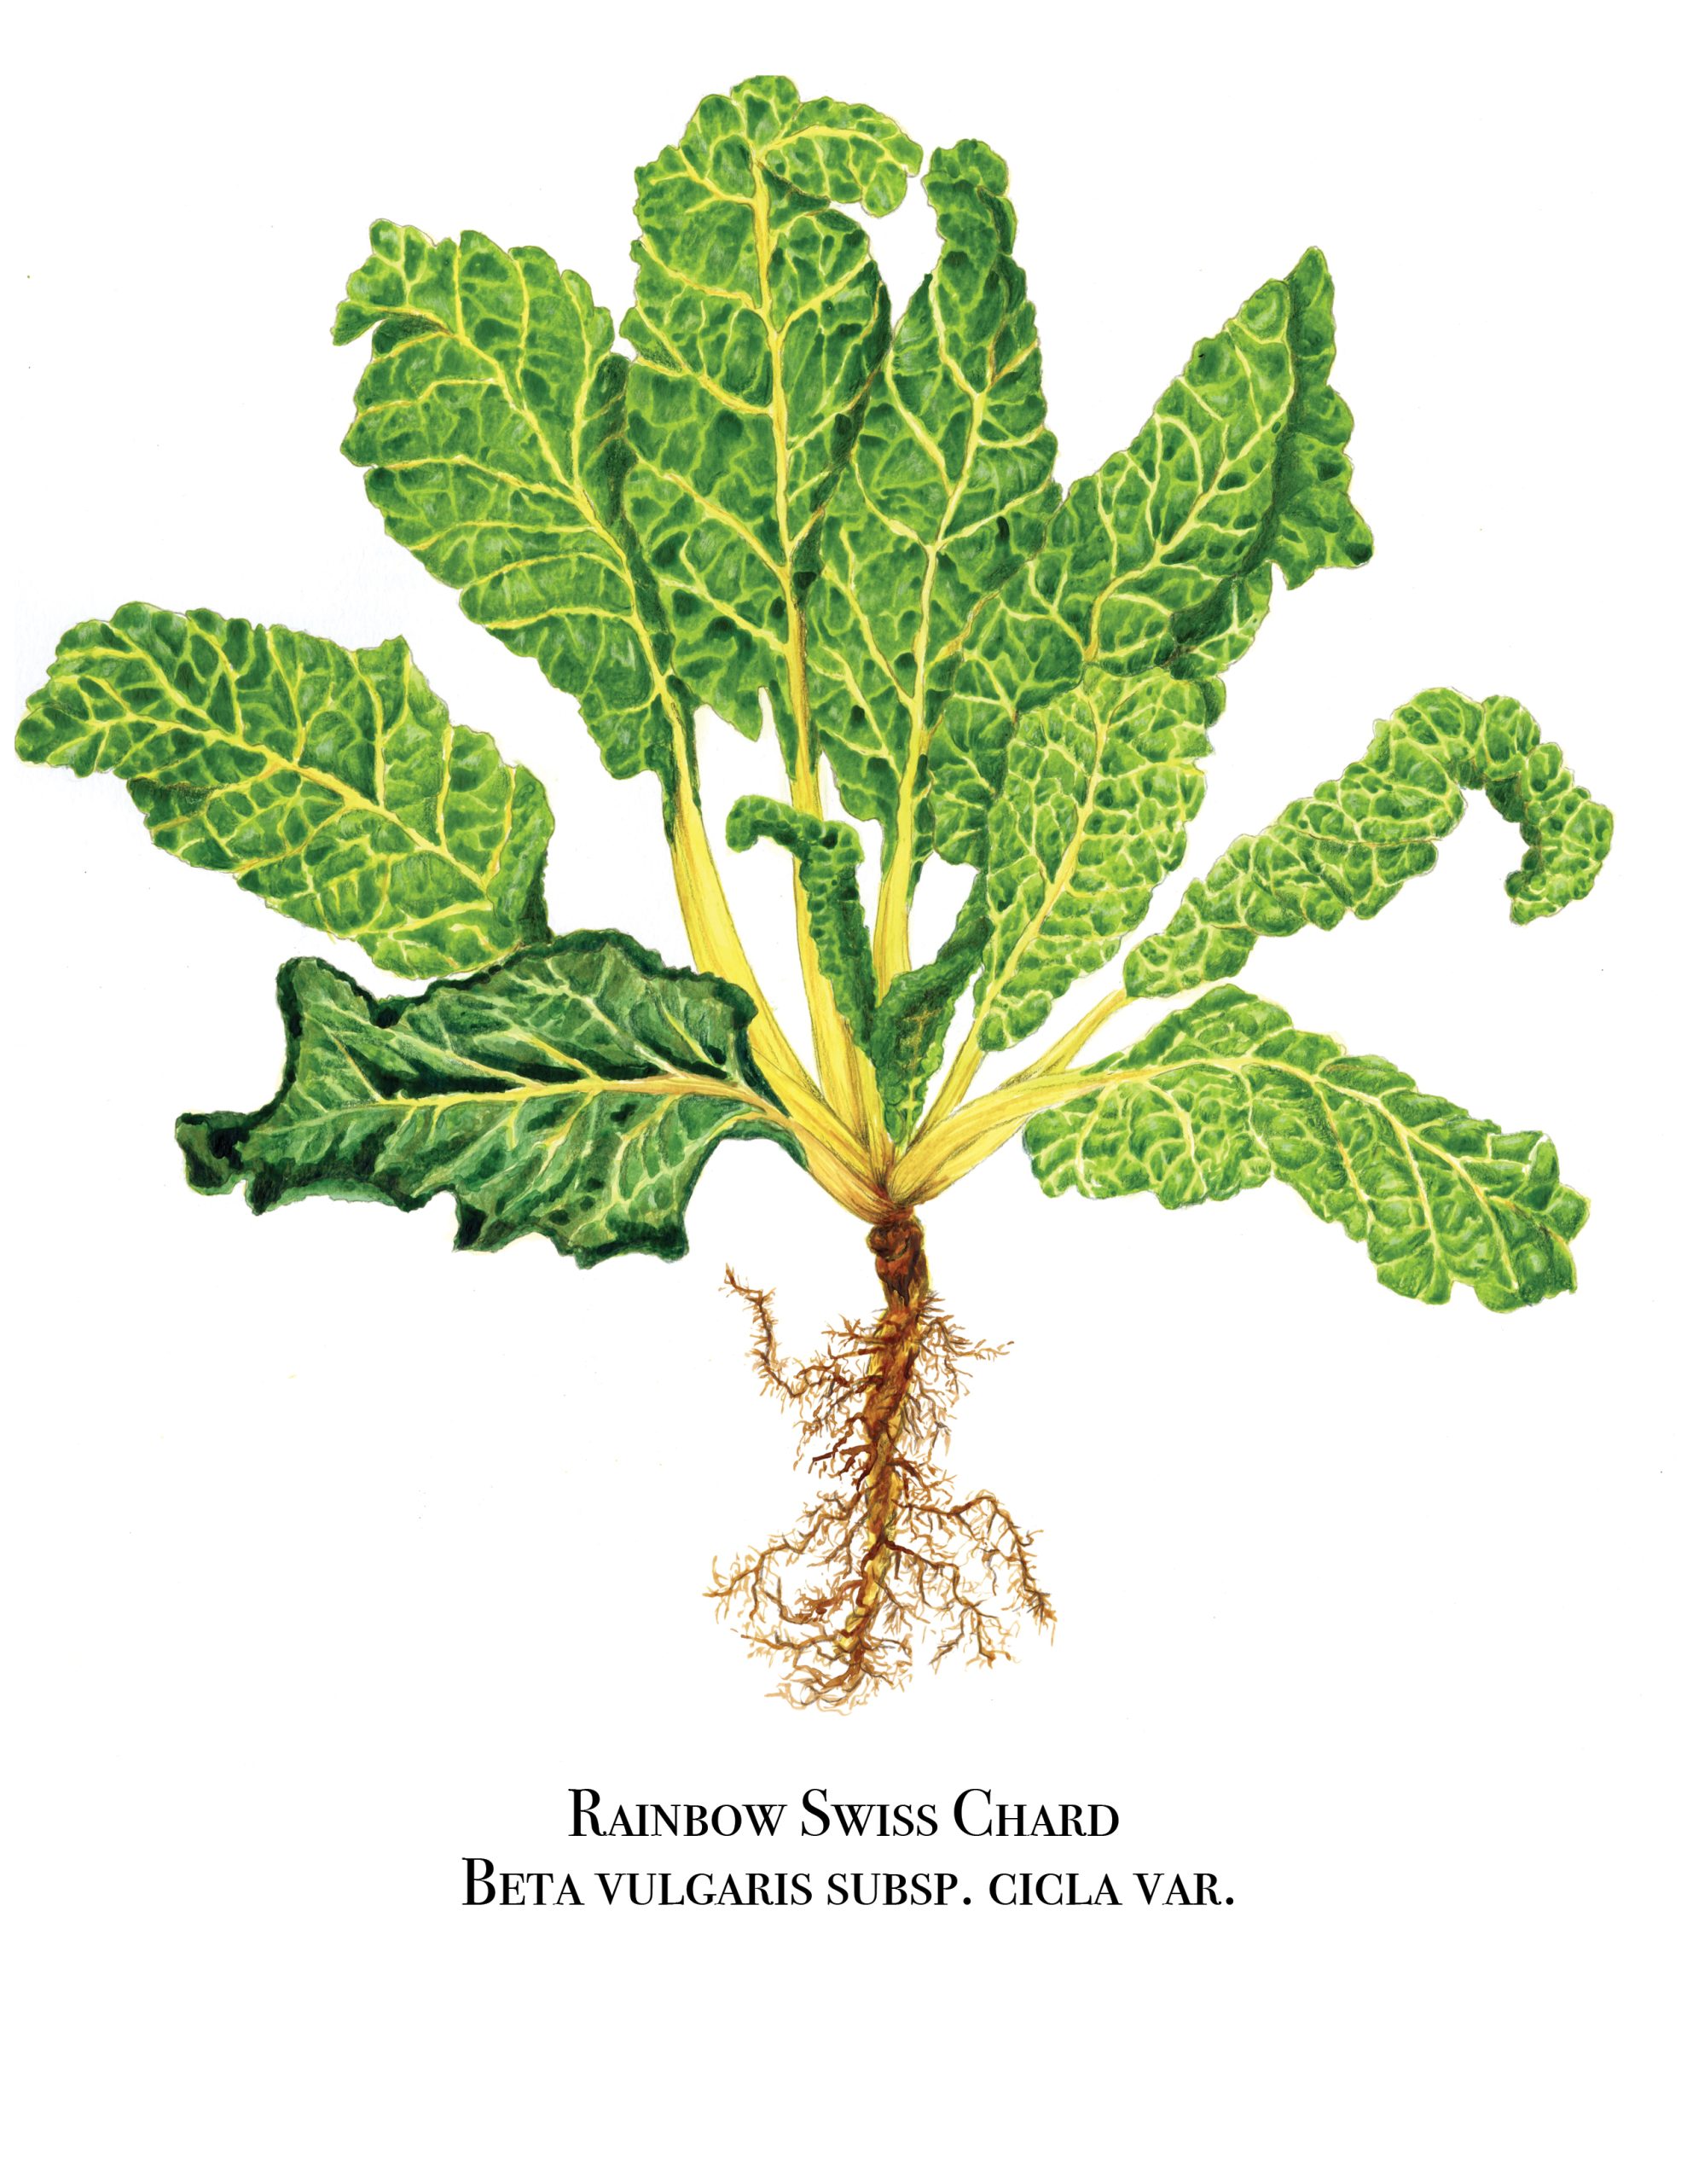
Let’s discuss why this is a good example of a finished work.
What works:
The work is faithful to the original plant in color, texture, and scale. It clearly shows the root system of the plant. It shows the underside and top of the leaves. It is professionally presented according to the assignment prompt, on a clean white background with the proper name and designation in the proper font and size that was requested by the client.
What could be added:
How the plant looks as it develops. This would have required research on the part of the artist beyond what was observable.
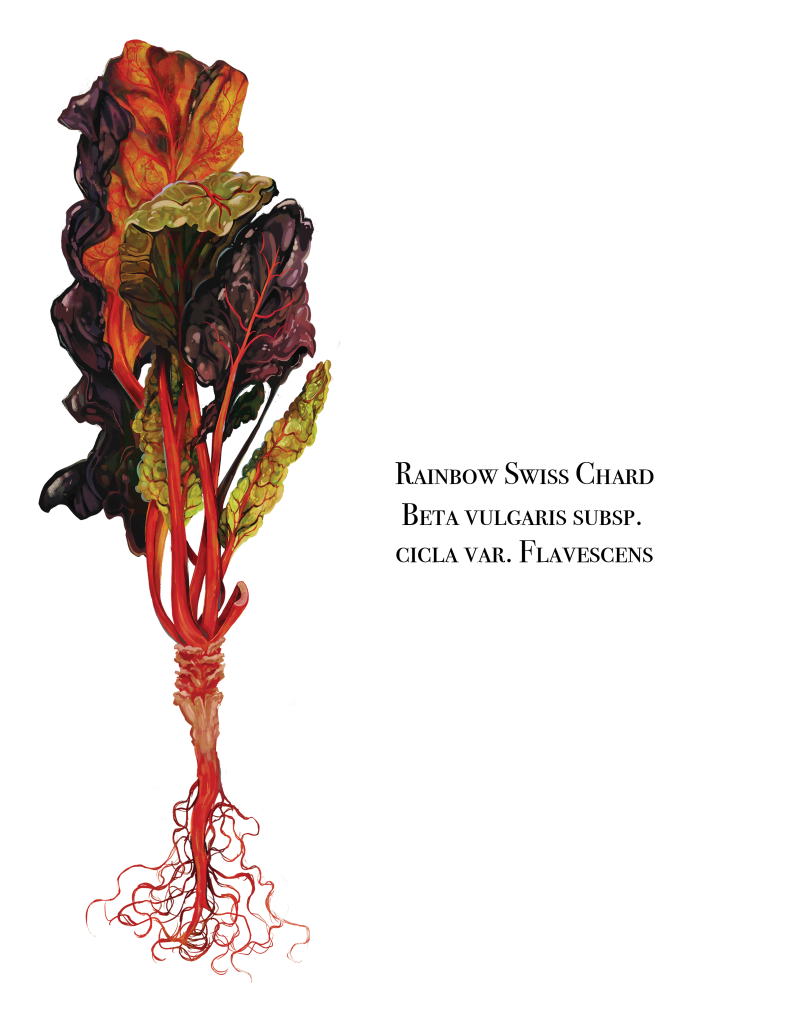
Example 2:
A second student, Donivan Bonilla, also chose the Rainbow Swiss Chard plant, picking a variant that had vibrant red stems. On his trip to the urban farm, Donivan took many reference photos and then, in his subsequent research, labeled the parts of the plant he was able to identify. As part of this assignment is based on research, this helped him to recreate the parts of the plant that he needed to stitch together in the final illustration.


Other shots helped to see the way that the veins shone through the leaf when backed by sunlight:

Or the way the plant changed shape and texture when it emerged from the ground. Since we were unable to pull the plant from the ground, extra research was needed for the roots.

The final image had to incorporate the many aspects of the plant while trying to capture its vibrant coloration. Digital media was a good choice to preserve the vibrancy and to allow for layers of detail and color to capture the crisp waxy color of Rainbow Swiss Chard.
Interview with a Student Illustrator: Amelia Stepnowski’s Giant Heirloom Tomato
Amelia let me interview her regarding her process in approaching this assignment. Read on to get a student’s point of view.
Dr Boehman (JMB) Amelia Stepnowski (AS)
JMB: You had the Giant Heirloom tomato, a Belgium pink, no?
AS: Yes. I did some research, which was easier as it turned out my mom had the same tomato growing in her own garden.
JMB: Oh good. This was the first assignment we did, and I put it at the beginning for a few reasons. 1, I wanted to make sure the gardens still had plants as it was coming toward the end of harvest season. 2, I wanted you to have the experience of working with a client immediately, which, in this case, was LaGuardia Community College’s urban farm, Finca La Florecita (Little Flower Farm after Fiorello H. LaGuardia, fiorello meaning little flower in Italian.) So we had pretty strict limitations on what we could work with: we had to work with plants grown on the urban farm, and the client was looking to have all of the parts of the plant represented (see above), including stages of the plant that were not observable as we were in harvest season, the plant’s end of life. So some information had to come from student research. Did you find this assignment useful?
AS: Yes. I find all of the assignments useful, by the way. I found it useful because I don’t really draw plants a lot, even though they are very interesting in shape, texture, and color. They’re weird, they twist weirdly, they are dirty, and it was fun to try to capture that and to make it feel fresh.
JMB: When we took the field trip out to the farm to see the plants, how did you find that process from an artist’s point of view?
AS: Difficult, because I tried to look at the plants with the abilities I had as an artist. For instance, there was this one really bumpy kale, and I knew that I would have a hard time trying to figure out how to draw that.
JMB: So one of the reasons you chose the plant you did was based on what you thought you could properly achieve?
AS: Yes, especially at the start of the semester.
JMB: That’s fair.
AS: I did try to do something a little more ambitious, come out of my comfort zone a bit. I also tried not to pick a plant no one else picked, as that was one of the rules. Besides, I know tomatoes, I saw them everyday because we have them at home, I ate them. Very delicious, by the way. Homegrown tomatoes. Very delicious.
JMB: What was your process in the sketching and drawing? What medium did you use?
AS: In this case, my process was pretty simple, sketching with pencil. It’s basically still life drawing except technically the plants are alive. I used sketches, photos, and references. I made still life sketches.

The sketching process was figuring out texture and color.
JMB: For your final illustration, you sketched it out in pencil?
AS: Yes.
JMB: And then added watercolor. Anything else?
AS: A little more pencil on top.

JMB: What feedback did you get during this process? I think I did ask you to come back in with some more pencil on top, right?
AS: Yes, some more pencil for shading and tone. It just was a little too vibrant, which is fair enough as tomato plants aren’t that vibrant outside of the fruits and flowers. I could see that all of my shading was color, so I needed a little bit more tone.
JMB: Were you able to observe all of these parts of the plant or was it partially based on research?
AS: Observation and prior observation (in her own garden). You have to watch how plants grow, so I got to see all of these stages in person. I also did the roots from research and observation.
JMB: So you pulled up the plant?
AS: A little, you could see some of the roots. It was hard to find internet references.
JMB: Yes, this was one of the challenges: getting the root system right. In terms of laying it out and scanning it, how did you find that?
AS: I had to plan ahead to leave space for the text labels we needed to add. And then scanning it to digitize it, I increased the size the canvas.
JMB: Was it different working traditionally as opposed to digitally?
AS: Definitely. Working traditionally, you have to watch out in making mistakes. Of course, in pencil, you can erase as long as you do not draw too hard. And watercolor stains the page. I was lucky that I was able to lift the watercolor off in places. And then we edited in Photoshop.

JMB: What advice would you give to a fellow student approaching this assignment?
AS: I personally tried to make it look as accurate as possible within the scope of my abilities. My advice would be to try to do that: you have to try, so you will know what you can do.
JMB: Would you change anything if you could do it again?
AS: Yes, I would mute some of the colors slightly.
JMB: Which colors in particular?
AS: The colors of the leaves and stems.
JMB: So you would add red to tone down the green?
AS: Maybe darken it a bit because in reality the leaves are much greyer.
JMB: Getting greens right is always a challenge, especially working with paints out of the tube, there’s a lot of mixing needed to get the hue right.
AS: But I am proud of the accuracy of the colors of the tomatoes themselves. They are very bright and saturated.
Key Takeaways
- The illustrator has practiced observational drawing combined with research
- They have practiced working in color
- They have practiced utilizing composition to create a compelling work of art
- They have started working to a client’s project specifications
Extra Resources for Botanical Illustration
See the resources below for open access images and information
-
Elizabeth Blackwell, A curious herbal (NYPL)- a collection of 500 botanical illustrations
- Georgio Bonelli, Hortus Romanus juxta systems Tournefortianum paulo (NYPL), 1772
- La botanique mise à la porteé de tout le monde, Paris 1774 (NYPL)
- Pierre-Joseph Redouté, Les liliacées, Paris 1805
- Georg Dionysius Ehret, Hortvs, nitidissimis omnem per annvm svperbiens floribvs : sive, Amoenissimorvm florvm imagines… 1768 (NYPL)
- Giorgio Gallesio, Pomona Italiana, Italy, 1814 (NYPL)
Media Attributions
- Maria_Merian_Metamorphosis_Insectorum_Surinamensium_MIA_P18717 © Maria Sibylla Merian is licensed under a Public Domain license
- JohnanaGuzman-botanical © Johanna Guzman is licensed under a CC BY (Attribution) license
- Swiss Chard from Finca La Florecita © Donivan Bonilla is licensed under a CC BY-NC-ND (Attribution NonCommercial NoDerivatives) license
- Rainbow Swiss Chard Leaf. © Donivan Bonilla is licensed under a CC BY-NC-ND (Attribution NonCommercial NoDerivatives) license
- Rainbow Swiss Chard: Veins © Donivan Bonilla is licensed under a CC BY-NC-ND (Attribution NonCommercial NoDerivatives) license
- Rainbow Swiss Chard Stem. © Donivan Bonilla. is licensed under a CC BY-NC-ND (Attribution NonCommercial NoDerivatives) license
- Rainbow Swiss Chard © Donivan Bonilla is licensed under a CC BY-NC-ND (Attribution NonCommercial NoDerivatives) license
- Giant Belgium Pink Heirloom Tomato © Amelia Stepnowski is licensed under a CC BY-NC-ND (Attribution NonCommercial NoDerivatives) license
- Giant Heirloom Tomato, Amelia Stepnowski © Amelia Stepnowski is licensed under a CC BY-NC-ND (Attribution NonCommercial NoDerivatives) license
- Heirloom Tomato (Final) © Amelia Stepnowski is licensed under a CC BY-NC-SA (Attribution NonCommercial ShareAlike) license
the root system of a plant
the topmost part of the plant, where the shoot system emerges to create stem, leaves, buds, flowers, and fruits
branches or shoots that grow out from the main stem
type of plant, ie. Heirloom tomato
specific name of the type of plant, often given in a Latin designation
A medium that crumbles easily and so tends to smear on your support easily, like charcoal, pencil, or chalk pastels.
Cyan Magenta Yellow and Key (Black); a color profile often used for printing as it matches the primary colors of ink
Red/Green/Blue; the colors of light. This is a color profile used for web applications.
the amount of information in a digital file per square inch.
