122 How to Wrap a Bouquet A Florist s Guide to Using Tissue Paper
Whether you’re preparing a bouquet for a special occasion or simply want to brighten someone’s day, presenting flowers with care and creativity can make a world of difference. Flowers are a universal symbol of affection, joy, and sympathy, and how they are presented can significantly enhance their impact. One of the most versatile and charming materials for wrapping bouquets is tissue paper. This guide will walk you through the process of wrapping a bouquet using tissue paper, offering tips and ideas to make your floral presentation as beautiful as the blooms themselves.
Tissue paper, with its delicate texture and vibrant colors, can transform any bouquet into a piece of art. Understanding the nuances of wrapping with tissue paper can elevate your floral arrangements from simple to stunning. Whether you’re a professional florist or an enthusiastic amateur, mastering this art will surely impress your recipients and make every bouquet memorable.
 Why Use Tissue Paper for Bouquet Wrapping?
Tissue paper is an excellent choice for wrapping flowers for several reasons. It is lightweight, easy to manipulate, and comes in a vast array of colors and patterns. This makes it ideal for creating a unique and personalized presentation. Moreover, tissue paper can enhance the aesthetic appeal of the bouquet, adding a touch of elegance and sophistication.
Tissue paper’s delicate and soft texture complements the fragile beauty of flowers, allowing for a harmonious combination that enhances the overall visual appeal. Its versatility extends to its ability to be easily layered, folded, or crumpled to create different textures and shapes, thus providing endless possibilities for creativity. Furthermore, tissue paper is environmentally friendly, often made from recycled materials, which aligns with the growing trend towards sustainable gift wrapping.
Benefits of Using Tissue Paper
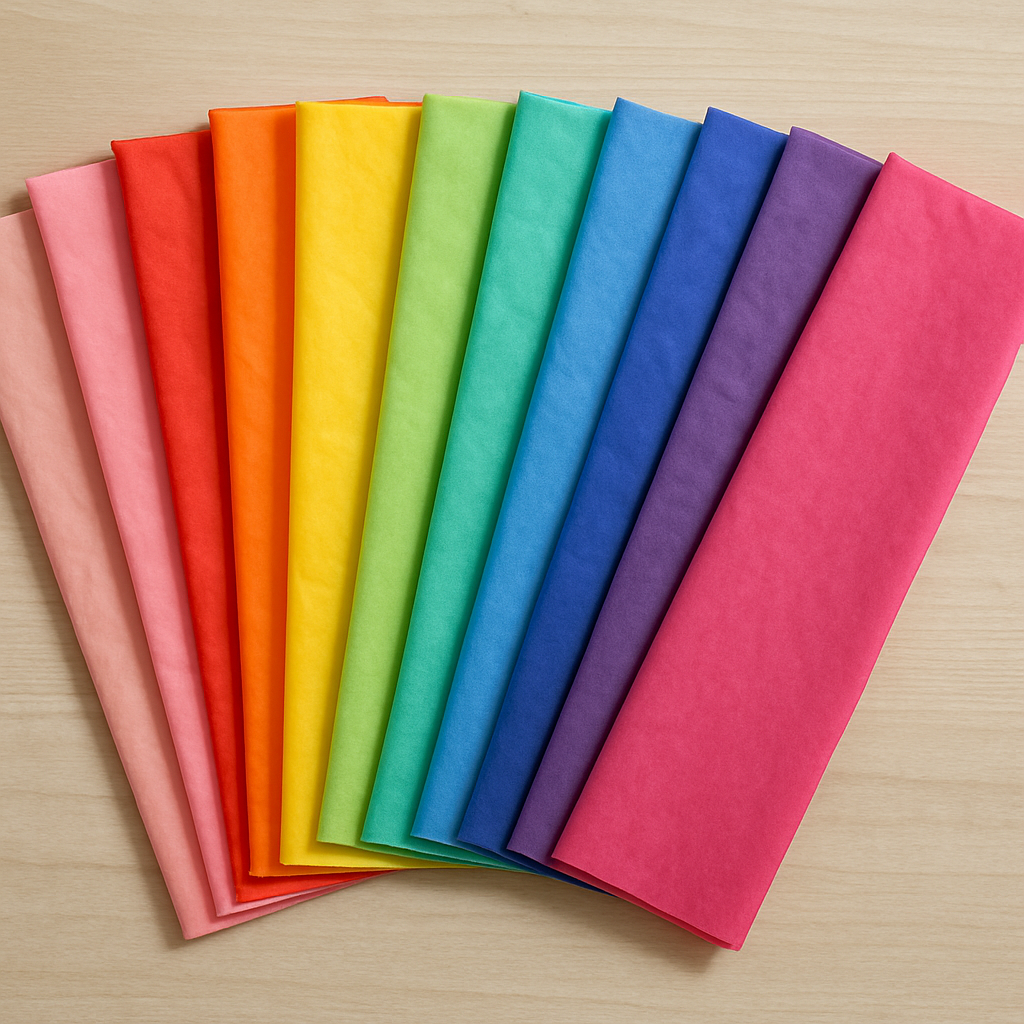
- Variety of Options: With countless colors and patterns available, you can tailor the wrapping to suit any occasion or personal taste. Whether it’s a romantic red for Valentine’s Day or a soft pastel for a spring gathering, the options are endless.
- Easy to Use: Tissue paper is flexible and easy to fold, allowing you to create intricate designs with minimal effort. Even if you’re new to bouquet wrapping, the simplicity of tissue paper makes it forgiving to beginners.
- Cost-Effective: Compared to other wrapping materials, tissue paper is affordable, making it a great choice for both personal and professional use. Its affordability does not compromise its quality, allowing you to achieve a high-end look without breaking the bank.
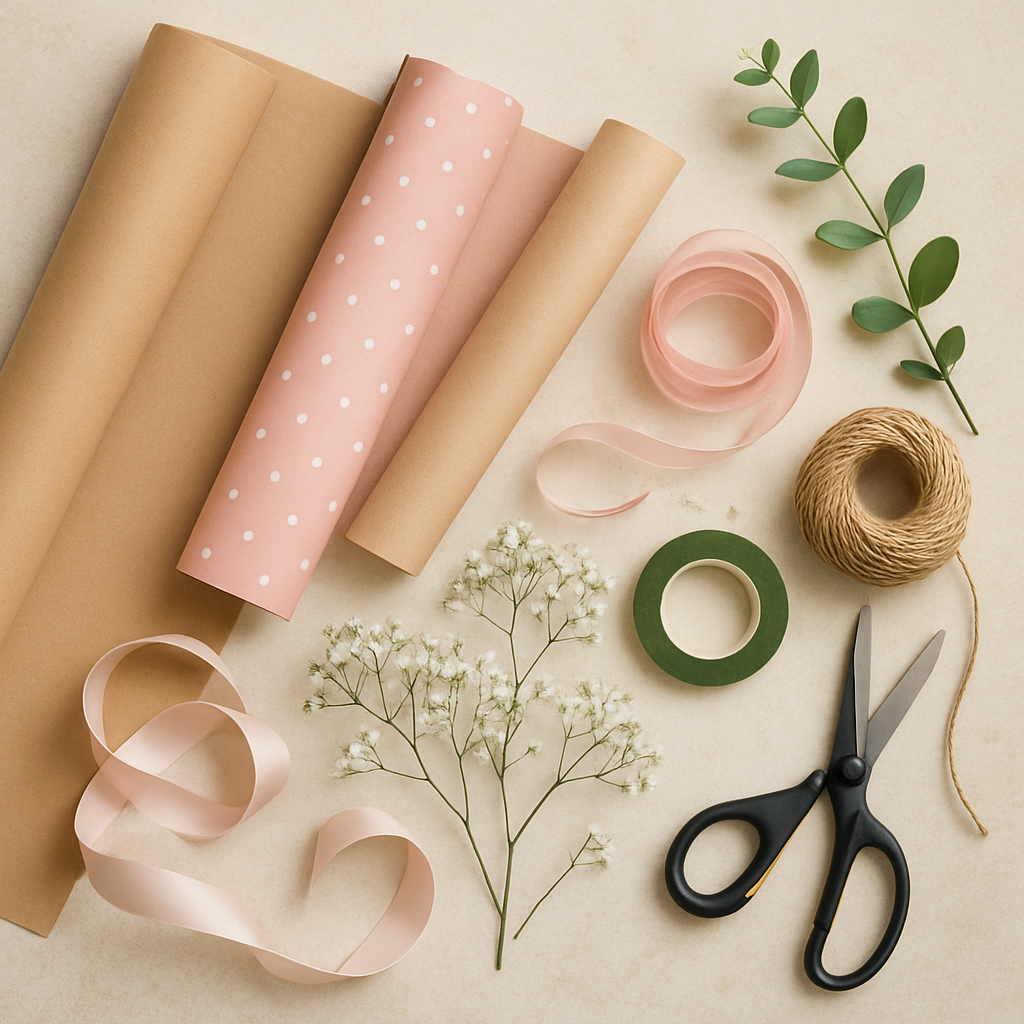
Essential Supplies for Wrapping Bouquets
Before you begin wrapping, gather the necessary supplies. Having everything at hand will streamline the process and ensure a smooth experience. Preparing your materials ahead of time will not only save you time but also help you focus on the creative aspects of bouquet wrapping.
Materials Needed
- Tissue Paper: Choose colors and patterns that complement your flowers and the occasion. Opt for high-quality tissue paper that won’t tear easily during the wrapping process.
- Clear Cellophane: Optional, but adds a protective layer and a glossy finish. It can also help preserve the freshness of the flowers by reducing moisture loss.
- Ribbon or Twine: For securing the wrap and adding decorative flair. Choose a material and color that complements the overall theme of the bouquet.
- Scissors: For cutting paper and ribbon. Ensure they’re sharp enough to make clean cuts without fraying the edges.
- Tape: To secure the tissue paper and cellophane. Double-sided tape can be particularly useful for a seamless look.
 Step-by-Step Guide to Wrapping a Bouquet with Tissue Paper
Now that you have your materials, let’s dive into the process of wrapping your bouquet with tissue paper. Each step is crucial in ensuring that your final presentation is both beautiful and practical.
Step 1: Prepare Your Flowers
Begin by trimming any excess leaves and thorns from the flower stems. Ensure all the stems are of similar length for a neat and balanced bouquet. This will make wrapping easier and the final presentation more appealing. Taking the time to prepare your flowers properly will not only make the wrapping process smoother but will also ensure that the bouquet remains fresh and visually pleasing.
Step 2: Choose and Prepare Tissue Paper
Select tissue paper colors that complement your flowers. You can use a single color for a classic look or mix multiple colors for a vibrant, playful effect. If you’re using patterned tissue paper, consider pairing it with a solid color to avoid overwhelming the bouquet.
Lay the tissue paper flat on a clean surface. If you’re using more than one sheet, layer them at slight angles to create a visually interesting base. This layering technique not only adds depth but also provides additional support to the bouquet, ensuring it holds its shape.
Step 3: Position the Flowers
Place the prepared flowers at the center of the tissue paper. Ensure the blooms are evenly distributed and facing outward. Adjust the stems so they fan out slightly, giving the bouquet a full and balanced appearance.
Positioning the flowers correctly is key to achieving a professional look. Take your time to arrange them until you’re satisfied with the overall shape and distribution. This step allows the flowers to be the focal point of the bouquet, with the tissue paper serving as a beautiful backdrop.
Step 4: Wrap the Tissue Paper
Gently gather the edges of the tissue paper around the stems. Start from the bottom and work your way up, ensuring the flowers are snug but not too tight, as this could damage the blooms. Wrapping too tightly can also restrict airflow, potentially shortening the life of the flowers.
If you’re using clear cellophane, wrap it around the tissue paper at this stage. The cellophane adds a layer of protection and gives the bouquet a polished look. It can also enhance the colors of the tissue paper and flowers by providing a reflective surface.
Step 5: Secure the Wrap
With the tissue paper and cellophane (if used) gathered around the stems, secure the wrap with a piece of tape. Then, tie a ribbon or twine around the bouquet. This not only keeps the wrap in place but also adds a decorative touch. Opt for a simple bow or a more elaborate knot, depending on your preference.
The finishing touches can make a significant difference. A well-tied ribbon or twine can add a touch of elegance and complete the look of the bouquet. Consider adding a small embellishment, like a charm or a sprig of greenery, to personalize the final presentation.

Creative Bouquet Wrapping Ideas
Enhance your bouquet wrapping with these creative ideas. These suggestions are designed to inspire you and encourage you to think outside the box when it comes to floral presentation.
Add Personal Touches
- Handwritten Notes: Include a small card or note tucked into the ribbon for a personal message. This adds a heartfelt touch that shows thoughtfulness and care.
- Dried Flowers: Incorporate dried flowers or herbs for added texture and fragrance. They can add a rustic charm and a unique element to your bouquet.
- Themed Colors: Match tissue paper colors to seasonal or event themes, like pastels for spring or bold hues for a festive occasion. This creates a cohesive look that ties the bouquet to the event or season.
Experiment with Patterns
- Mix and Match: Combine different patterns and colors of tissue paper for a unique look. This technique can create a dynamic and eye-catching presentation that stands out.
- Layering: Use layers of tissue paper to add depth and dimension to the wrap. Layering not only enhances the visual appeal but also provides additional structural support to the bouquet.
Tips for Perfect Flower Wrapping
- Be Gentle: Handle both the flowers and tissue paper with care to avoid damage. Delicate handling ensures that the flowers remain in top condition and the tissue paper retains its crisp appearance.
- Practice Makes Perfect: If you’re new to bouquet wrapping, practice with inexpensive flowers and tissue paper to hone your skills. This will build your confidence and allow you to experiment with different techniques.
- Stay Inspired: Look for inspiration in magazines, online, or by visiting local florists to keep your wrapping ideas fresh and exciting. The world of floral design is vast, and there’s always something new to learn and try.
Conclusion
Wrapping a bouquet with tissue paper is an art that combines creativity and practicality. With the right materials and a little bit of practice, you can create stunning floral presentations that elevate your gift-giving. Whether it’s a simple bouquet for a friend or an elaborate arrangement for a special event, using tissue paper allows you to add a personal touch that will be remembered and appreciated.
By following these steps and incorporating your own creative flair, you can transform a simple bouquet into a memorable gift that reflects your thoughtfulness and style. Happy wrapping! Remember, the effort you put into wrapping a bouquet is a reflection of the care and affection you have for the recipient, making the gesture all the more meaningful.