Week 3, Part 2: Bacteria
Objectives
- Identify and define common bacterial shapes and features, including: cocci, bacilli, spirilli, pili, capsule, spore, fimbriae, flagella, plasmid, Gram-positive cell wall, Gram-negative cell wall.
- Describe various bacterial metabolic processes, including: photosynthesis, chemosynthesis, methanogenesis, nitrogen fixation.
- Identify and describe at least three vital roles that bacteria play in their ecosystems, such as primary production, decomposition, nitrogen fixation, and disease.
This lab includes an introduction to microscopy followed by observations of bacteria.
- I. The Three-Domain System
- II. Overview of Bacteria
- III. Intro to Microscopy
- IV. Prokaryotic Survey
- V. Post-lab Questions
This lab includes the following diagrams to be printed out and labeled.
I. The Three-Domain System
In a previous lab exercise, you learned about phylogenetics and the classification of organisms. In this laboratory, we will dive deeper into the phylogenetic tree, depicted below in Figure 1, and learn about some of the organisms from the three Domains of Life. In 1760, Carolus Linnaeus grouped all living organisms into plants (non-motile) and animals (motile). It took almost two centuries to develop the more appropriate five-kingdom classification proposed by Whittaker and Lynn Margulis in 1968. The kingdoms proposed were Monera (unicellular prokaryotes including bacteria and cyanobacteria), Protista (unicellular eukaryotes including protozoa and unicellular algae, which will be discussed in a future lab), Fungi (saprotrophs, which will be discussed in a future lab), Plantae (autotrophs, which will be discussed in future labs), and Animalia (heterotrophs, which will be discussed in future labs). With modern DNA-based technology such as PCR and rDNA (ribosomal DNA) sequence analyses the living world is currently classified as a three-domain system with Bacteria, Archaea, and Eukarya; described by Carl Woese in 1990.

II. Overview of Bacteria
The bacteria comprise one of the three domains of life and were among the first life on Earth. In this lab activity, you will learn more about this fascinating group, without which no other life on Earth would likely exist.
Before proceeding, you need to review the major concepts from this week relating to bacteria. First, watch the entertaining and informative video from the Amoeba Sisters below and read the short article “What are bacteria and what do they do?” These two resources will give you an excellent overview of the concepts you will need for this lab activity. You may also find the definitions below useful.
Key Terms
| Term | Definition |
| Prokaryote | Cells that lack a nucleus and membranous organelles |
| Bacteria | Prokaryotes of the domain Bacteria (distinct from Archaea) |
| Peptidoglycan | A macromolecule found in the cell walls of bacteria |
| Gram stain | A staining technique that distinguishes between bacteria with different types of cell walls |
| Capsule | A layer of linked polysaccharides surrounding the cell wall in certain bacteria |
| Pili | Hairlike structures on the surface of some bacteria; used for attachment and adhesion |
| Fimbriae | Similar to pili in structure and function, but often more numerous and shorter |
| Flagella | Taillike structures on some bacteria that are used for locomotion |
| Bacterial spore | A dormant, protective structure formed by some bacteria under adverse environmental conditions |
| Plasmid | A small, circular strand of DNA exists outside the main chromosome in some bacteria and replicates independently of the main bacterial chromosome. |
| Extremophile | Any organism that can survive in extreme conditions such as high temperature or low pH that would kill most other cells |
| Chemosynthesis | The metabolic production of carbohydrates by some prokaryotes, using the energy from spontaneous chemical reactions of inorganic compounds, typically in the absence of sunlight. Compare to photosynthesis. |
| Methanogenesis | The metabolic production of methane by some prokaryotes (methanogens). This is one type of anaerobic respiration. |
| Nitrogen fixation | The conversion of atmospheric nitrogen (N2) to ammonia (NH3) or other forms of nitrogen that is usable by most cells. Accomplished only by certain bacteria. |
Photosynthetic Bacteria
Cyanobacteria have their ecological importance in the global carbon, oxygen, and nitrogen cycles, as well as their evolutionary significance in their relationship to plants. Chloroplasts (plastids) are formed by the symbiogenesis of cyanobacteria in plants: land plants, green algae (e.g., Chlamydomonas), and red algae. Of the 5 major groups of photosynthetic bacteria, only cyanobacteria are oxygenic during photosynthesis. They are often called blue-green algae, even though not all members are blue-green in color. Most cyanobacteria have a slimy sheath, or coating, which is often deeply pigmented, particularly in species that occur in terrestrial habitats. Cyanobacteria utilize chlorophyll a, which is responsible for their green coloration. In addition, they have unusual accessory pigments called phycobilins, which absorb wavelengths of light for photosynthesis that are missed by chlorophyll and the carotenoids, thus giving blue-green or reddish color to cyanobacteria.
Most cyanobacteria have a Gram-negative type cell wall that consists of an outer membrane component, even though they may show a distant phylogenetic relationship with certain Gram-positive bacteria.
III. Intro to Microscopy
Your lab instructor will demonstrate on how to properly carry and use the light microscope. First, it is important to carry the microscope with both hands. Use the microscope that is numbered according to your seat number only. Make sure to place the microscope on the table away from the table edge. Prior to any microscopy experiments, please, examine your microscope for any visible damage. Next, make sure to wipe both ocular lenses (eyepiece) and objective lenses with lens paper only. And, at the end of each laboratory period, please, make sure to wipe all traces of immersion oil from the 100X immersion lens using lens paper only. Any oil, water, or other residue must be wiped from the microscope stage with a paper towel. When using the microscope always begin focusing at the lowest magnification and work your way up to higher magnification. Never use the coarse focus when under 40x or 100x magnification. When returning the microscope to the cabinet make sure the objective is in the lowest magnification position, and the stage is adjusted down to a low position. Wrap the cord in place around the microscope arm. Please, make sure that you do not leave slides or specimens on stage when putting away the microscope. Points will be deducted by your lab instructor if you do not follow the microscopy rules.
How to Properly Use the Following Microscopes Found in the Lab
Dissecting and compound light microscopes are both optical microscopes. Both use visible light to observe a specimen. Both types of microscopes magnify an object by focusing light through prisms and lenses by capturing and redirecting light reflected and refracted from a specimen.
Dissecting microscopes are used for viewing the phenotypes of a specimen, and compound microscopes are used for looking through a specimen.
Before the lab meeting, please review the YouTube video “How to use the dissecting microscope” and the videos embedded below on how to use a compound and dissecting microscope.
Videos from Kingsborough Community College
Videos from outside Kingsborough Community College
Dissecting Microscope
The dissecting microscope, also known as a stereomicroscope, is used to view larger specimens, with a maximum magnification of 100x. This type of microscope might be used to study external features (hence: phenotypes) of organisms that can not be easily placed onto microscope slides.
Identifying the parts of a dissecting microscope
Download and print out a copy of the following pictures (A, B, C, and D) and then, using the numbers provided below, label the parts on a dissecting microscope.
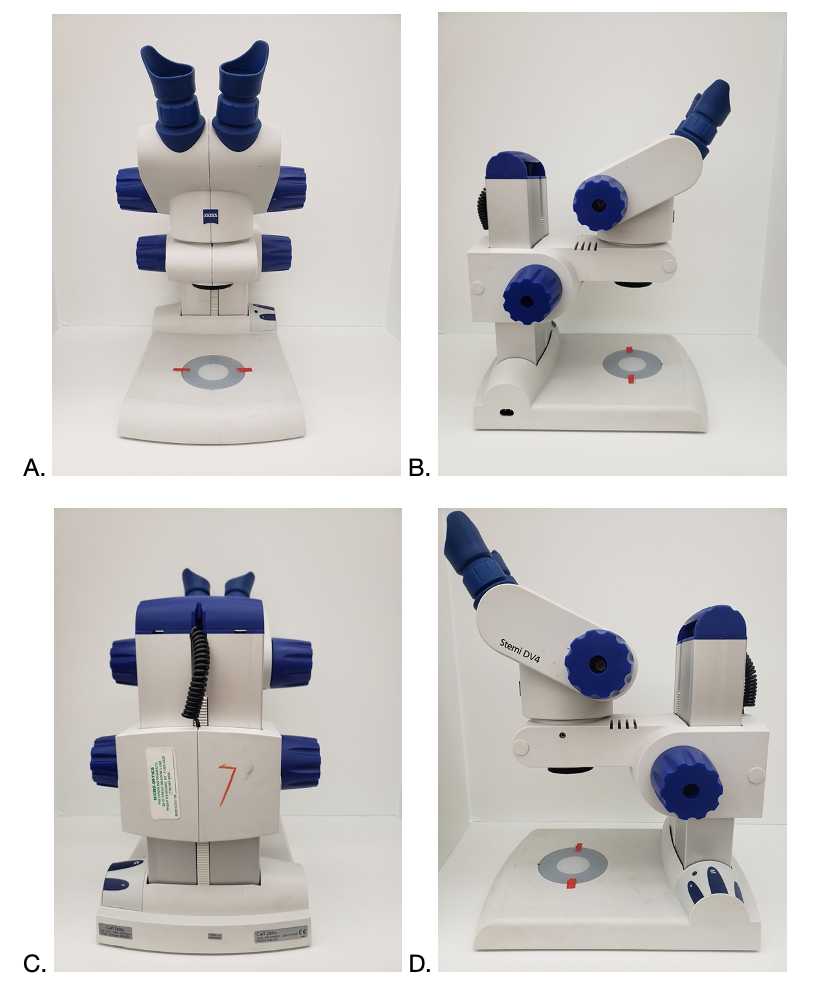
- Eyepiece
- Diopter
- Base Illuminator
- Top Illuminator
- Arm
- Objective
- Focus knob adjustment
- Brightness adjustment
Dissecting microscope: Procedure
1. Begin by placing your specimen directly on the microscope stage with the sample facing up or by pacing your sample onto the Petri dish and then placing it on the microscope stage.
2. When using the microscope always begin focusing at the lowest magnification and work your way up to higher magnification.
Compound Light Binocular Microscope
Compound light microscopes are used to view specimens that are too small to view under the dissecting microscopes. In contrast to a dissecting microscope, this type of microscope contains a turret that houses several objective lenses with different magnifications and it relies on light shining from beneath the specimen. This requires that a specimen be very thin, sectioned, and placed on a glass slide for viewing. A compound microscope can magnify up to 1,000 times and provide the ability to see the greater details of a specimen. The working distance varies from 0.14 mm to 3 cm.
Identifying the parts of a compound light microscope
Download and print out a copy of the following pictures (A, B, C, and D) and then, using the numbers provided below, label the parts on a compound light microscope.
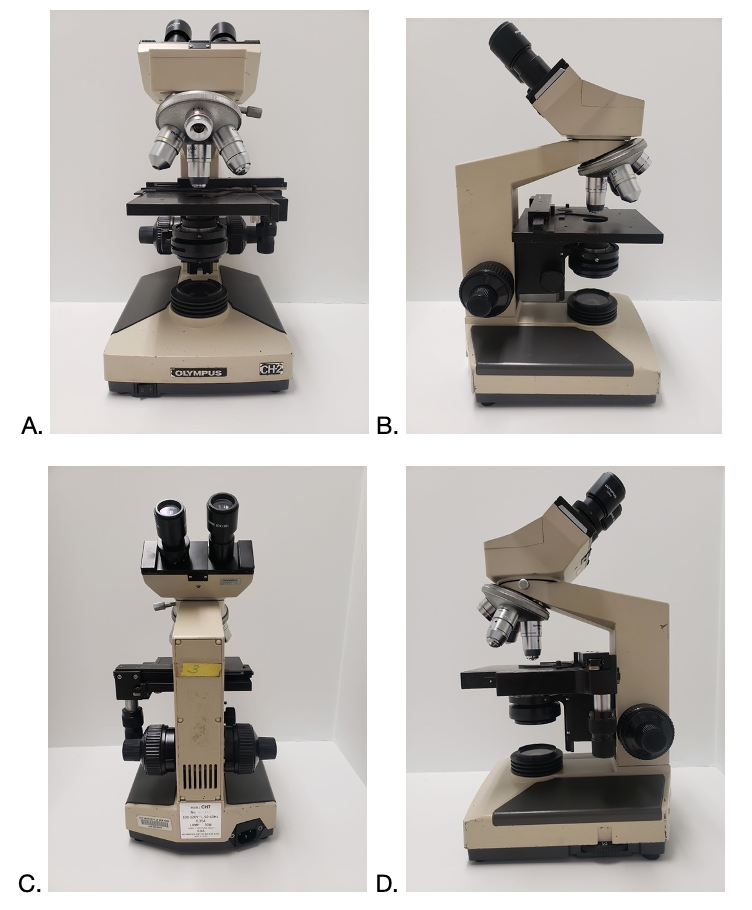
- Eyepiece
- Diopter
- Objective lenses
- Stage holder clamp
- Mechanical stage
- Condenser
- Illuminator
- Base
- Arm
- Turret
- Objectives
- Fine adjustment
- Coarse adjustment
- Brightness adjustment
Compound light binocular microscope: Procedure
1. Begin by placing your slide on the microscope stage with the sample facing up.
2. When using the microscope always begin focusing at the lowest magnification and work your way up to higher magnification.
-
-
- Use the lowest power objective (4x) to look for your specimen.
-
3. Use the coarse focus knob to bring the specimen into focus.
-
-
- The sample might look a bit colored, but you will not be able to see individual cells at this magnification.
- It is important to note at this point that the low power objective lens (4x) is not close to the slide on the stage. The focal distance at low magnification is relatively large, a few centimeters. As you go up in magnification the focal distance will decrease and the objective lens will come closer to the sample on the slide.
- At 10x you will still have more than a centimeter distance between the lens and the slide, but at 40x and 100x, the objective lens will be just a few millimeters or less from the sample on the slide.
-
Never use the coarse focus at 40x or 100x because it is too easy to make the stage move too close, which will smash the lens into the slide, and that will dirty or damage the lens.
Note: To make sure you are looking at something on the slide and not a piece of dirt on the microscope lens, move the stage slightly—if what you are seeing moves with the stage then it is likely to be something on the slide. If what you are looking at does not move with the stage then it is likely to be something on the microscope lens.
4. You will need to adjust the light using the diaphragm condenser and the intensity knob/dial.
-
-
- You will need to increase the light intensity as you go up in magnification.
- Take a few seconds to optimize the lighting at each magnification as you work your way up in magnification.
- You should also use the condenser height adjustment to make sure that the condenser is in the right position – generally you will want to bring it up as close to the bottom of the stage as it will go.
-
5. Rotate the objective lens turret to bring the 10x objective in line.
6. Re-focus and adjust the light under the 10x objective.
-
-
- You should still see your sample but you will not be able to make out individual bacteria (although you should be able to see individual cells if they are larger, like yeast and algae).
-
7. Rotate the objective lens turret to bring the 40x objective in line.
8. Re-focus and adjust the light under the 40x objective.
-
-
- At this point, you should be able to see individual bacterial cells.
- The bacterial cells will be small and of uniform shape and size, without any jagged edges or protrusions. If you are seeing something non-uniform it is probably a speck of dust or dirt. If you are seeing bright perfectly round things that are not stained with dye, you are probably looking at air or water bubbles. Once you have found your cells, record what you see (shape, size, grouping, color, and any other distinguishing characteristic).
-
REMEMBER! Never use the coarse focus at 40x or 100x—use only the fine focus adjustment.
9. Now, moving to 100x magnification, first rotate the objective lens turret so it is between the 40x and 100x objectives.
10. Use your lens oil dropper to place a small drop of oil directly on your sample.
-
-
- You MUST use oil with the 100x objective lens.
-
11. Rotate in the 100x objective lens.
-
-
- The lens should be so close to the stage that it touches the oil drop (but does not touch the slide itself). You can check by leaning down and looking for a little “flash” when the 100x lens touches the oil droplet.
-
12. Adjust the fine focus knob and the light until you can see your cells clearly. Record what you see if you did not already do so at 40x. You may be able to improve your description when you are looking at 100x magnification.
Important notes
- The 100x objective is the only oil immersion lens—no other objectives should be used with oil or allowed to contact oil on the slide.
- You cannot go back to re-focus on 40x if you have oil on your slide, although you can carefully re-focus with the 4x and 10x objectives.
- If you get oil on any other lens wipe it off immediately with lens cleaner and lens paper.
- Wipe all traces of immersion oil from the 100x immersion lens using lens cleaner and lens tissue.
- Oil, once it has dried, is almost impossible to remove from a lens!
Storage
- Any oil, water, or other residues must be wiped from the microscope stage.
- Put the 4x objective in position and the stage down.
- Wrap the cord in place around the cord cleat and return the microscope to its designated spot in the cabinet.
Microscope Rules
- Always carry the microscope with two hands.
- Use the microscope that is numbered according to your station/bench number.
- Always clean lenses with lens paper after use—only use lens cleaner and lens paper. DO NOT use bibulous paper or paper of any other kind.
- Store with the stage completely lowered and the lowest objective lens in place.
- Never leave slides on stage when putting away the microscope.
How to Calculate Total Magnification
Total magnification (TM) can be calculated from the following formula:
TM = (Ocular lens magnification x) x (Specific objective magnification x).
For example:
TM = (10x) x (4x) = 40x
Thus, the total magnification of a specimen observed under the 4x objective is 40x.
Question
If you are using a 10x objective lens to observe an organism, how many times is that organism magnified from its true size? (Hint: you are looking for the total magnification.)
Bonus questions
1. If you wanted to view an organism 100x its true size what objective lens would you use?
2. When working with the 40x or 100x objective lens, which focus knobs can you use safely?
IV. Prokaryotic Survey
The following activities are designed to familiarize you with different types of bacteria. You will examine several important genera of bacteria both in the lab and by the library and/or online survey.
You will examine gram-positive, gram-negative, and photosynthetic cyanobacteria for structural and functional organization. Details of the Gram stain are explained below. Your instructor will demonstrate how to use the light microscope and project images on the screen on your behalf.
Activity 1: Making and Viewing Slides of Bacteria
Before making any slides of live bacteria, it’s important to have some background information. Your instructor may ask you to complete some or all of these activities (adapted from “2.1: Microbiology and Protista Lab” by Lynette Hauser, licensed CC BY 4.0).
Procedure
- If assigned by your instructor, review “Reading: Prokaryotes.”
- We will not be using any live bacterial specimens other than the non-pathogenic cyanobacteria. However, it is important to learn how to handle potentially pathogenic bacteria. Watch the following YouTube video about the aseptic technique, which is important to avoid microorganism contamination.
Questions
Answer the following questions based on the video.
- What two tools are most commonly used to transfer bacteria?
- With the Bunsen burner, what color is the hottest flame?
- How are the inoculation tools sterilized?
- When transferring bacteria from liquid culture to a Petri plate, why do you turn the plate while spreading the bacteria?
- When transferring bacteria from a Petri plate to a stab culture, how many times should you stab the needle?
- When transferring bacteria into a liquid tube do you flame the mouth of the tube before inoculation, after inoculation, or both
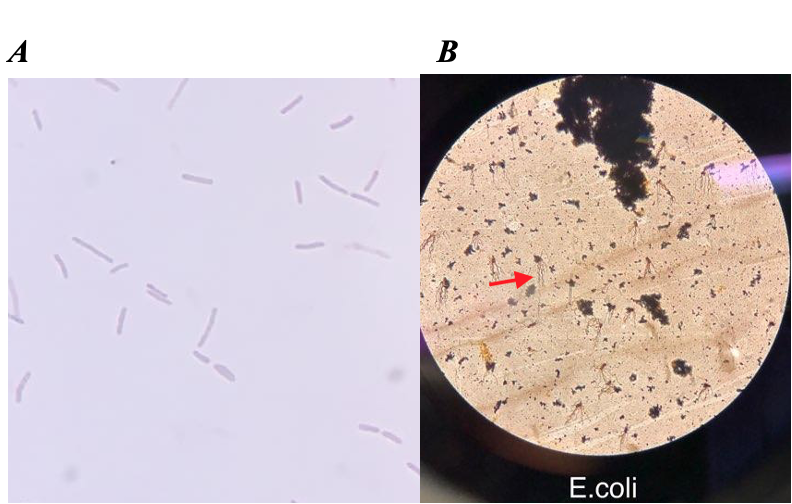
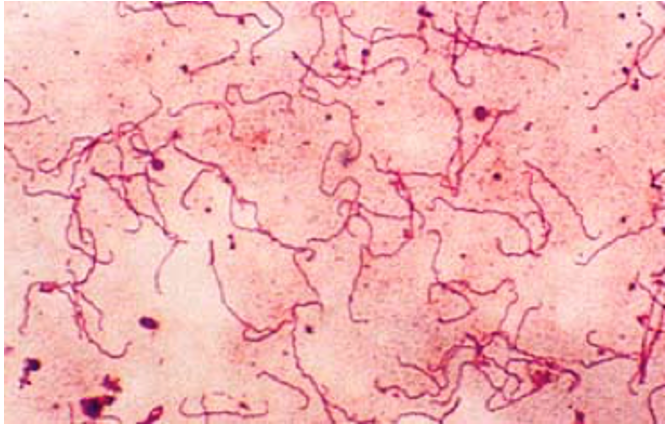
View the prepared slides of bacterial shapes available in the laboratory.
- Draw a picture of the coccus shaped bacteria.
- Draw a picture of the bacillus shaped bacteria.
- Draw a picture of the spirillum shaped bacteria.
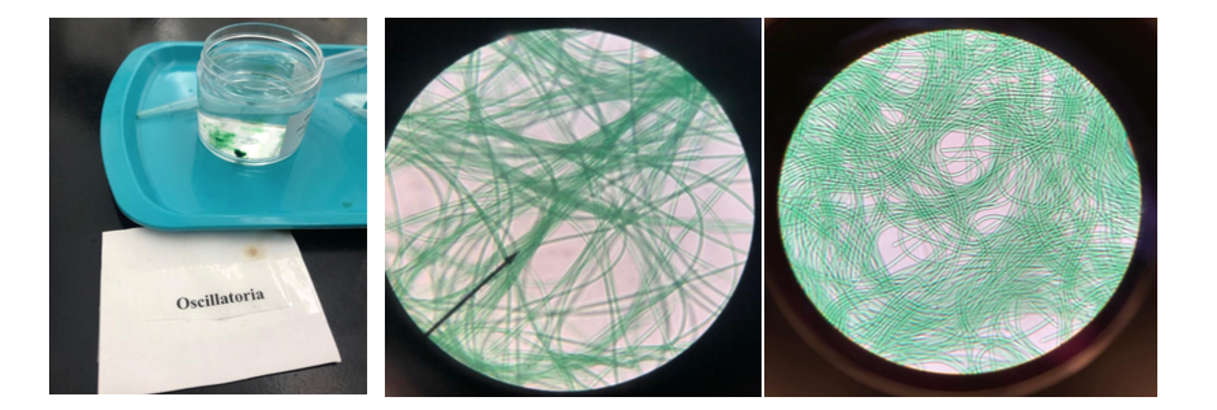
View the prepared slides of cyanobacteria available in the laboratory (or make your own wet mount slides as described below). Although they are single celled note how they form colonies and attach to one another
- What is the function of the heterocycst in the Anabaena?
- If the Oscillatoria is moving, describe the movement quality below.
- Which cyanobacteria species form chains? Which cyanobacteria species form clumps?
Activity 2: Wet-Mount Preparation Procedure
Make a wet-mount slide of the cyanobacteria samples available in the lab (e.g. Oscillatoria and Anabaena). Your observations should be similar to the images provided in figure 2. The usual wet mount can be performed by putting a small drop of sample onto the clean slide in the center of a waxed circle using a Pasteur pipette. Spread the drop evenly and place the coverslip gently over the drop avoiding any air bubbles.
1. Use 40x or low-power 10x to visualize the samples.
2. Draw the cyanobacteria on a large scale in your notebook. Pay attention to fine details. Be careful not to mix up the pipettes in taking samples from culture tubes.
Questions
Answer the following questions.
- Can you see nuclei and chloroplasts in any of the cells?
- Are all cells in the filaments identical to one another?
- Look for the presence of specialized nitrogen-fixing cells, such as heterocysts, in some of the filaments.
Activity 3: Microscopy of a Gram-Stained Bacteria
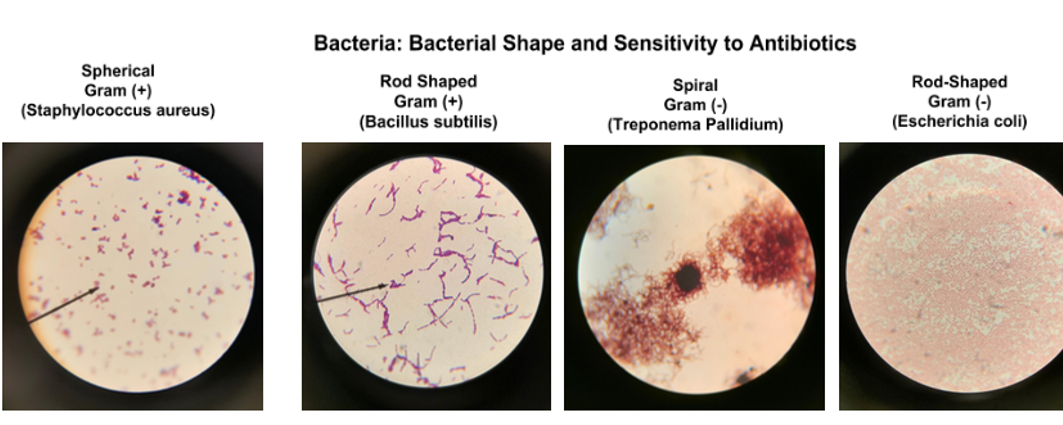
This exercise is designed to familiarize you with different types of bacteria, based on their reaction to a procedure called Gram staining (named after the scientist who developed this procedure in 1884, Hans Christian Gram).
The Gram stain technique is used to differentiate bacteria based on the biochemical composition and structure of their cell wall. After staining Gram-positive bacteria appear purple and Gram-negative bacteria appear pink. Identifying an unknown bacterial sample as Gram-negative or Gram-positive tells the investigator a good deal about the structure of the bacterial cell envelope. In clinical settings, knowing whether a patient is suffering from a Gram-negative or Gram-positive infection will influence the selection of antibiotics used to treat the infection.
Procedure
Analyze images of prepared Gram stain slides of each bacterium on the demonstration microscopes in the lab or, projected on the screen by your instructor and provided below. Examine the pictures of the bacteria provided below and note the cell morphology of each bacterial culture.
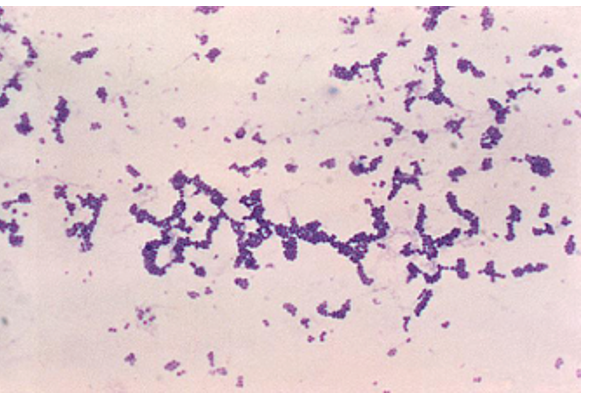
Complete a Prokaryotic survey table like the one below based on your exploratory observations of Figures 3–5, by recording the cell shape and Gram-stain.
| Bacteria | Shape | Gram-stain reaction |
| Treponema pallidium | ||
| Staphylococcus aureus | ||
| Bacillus subtilis |
Figure 6 provides examples of bacterial observed using light microscopy.
Questions
1. Please draw one bacterium from the four different types of bacteria depicted in Figure 6.
2. What type of morphology, cellular structures, or arrangement do you observe in these samples presented below? Please, draw your exploratory observations. For better viewing, please, enlarge the images on your screen.
V. Post-lab Questions
Answer the questions below to summarize the lab activity.
1. What type of cell is considered more primitive or basic?
2. State one difference between a prokaryotic and a eukaryotic cell.
3. What two domains contain prokaryotic celled organisms?
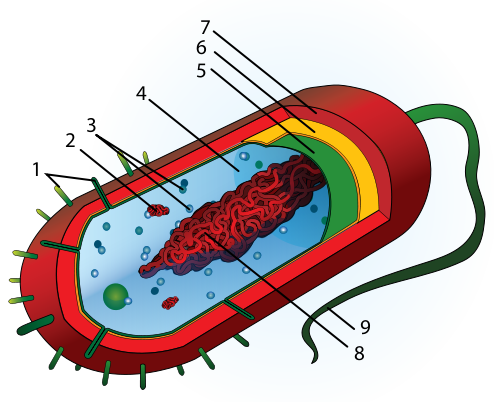
4. Identify structures 1–9 on the generalized prokaryotic cell pictured below.
5. Are the cyanobacteria autotrophic or heterotrophic?
6. Which cyanobacteria species secrete a gelatinous sheath?
