15 Film processing (Developing film)
SNAPSHOT
Film developing:
- The importance of the negative
- Loading film onto developing reels
- What you will need
- Film processing step by step
- Identifying errors in film developing
The importance of a good negative
It is critical you understand the negative is the master image. It is the intermediate between what you photographed and the print you want to make. Anything degrading the image through improper developing, carelessness in handling, or poor storage will affect the final print.
It is paramount for correct film development to follow procedures and be consistent.
Temperature, developing time, and correct inversions for agitation are the most important.
A poorly developed negative complicates the makes the printing process. Some of the problems caused by poor negatives are: prints that are either too low or too high in contrast, unwanted grain, streaks, scratches, dust, uneven tones and over dense edges of the film.
How it works

What you need
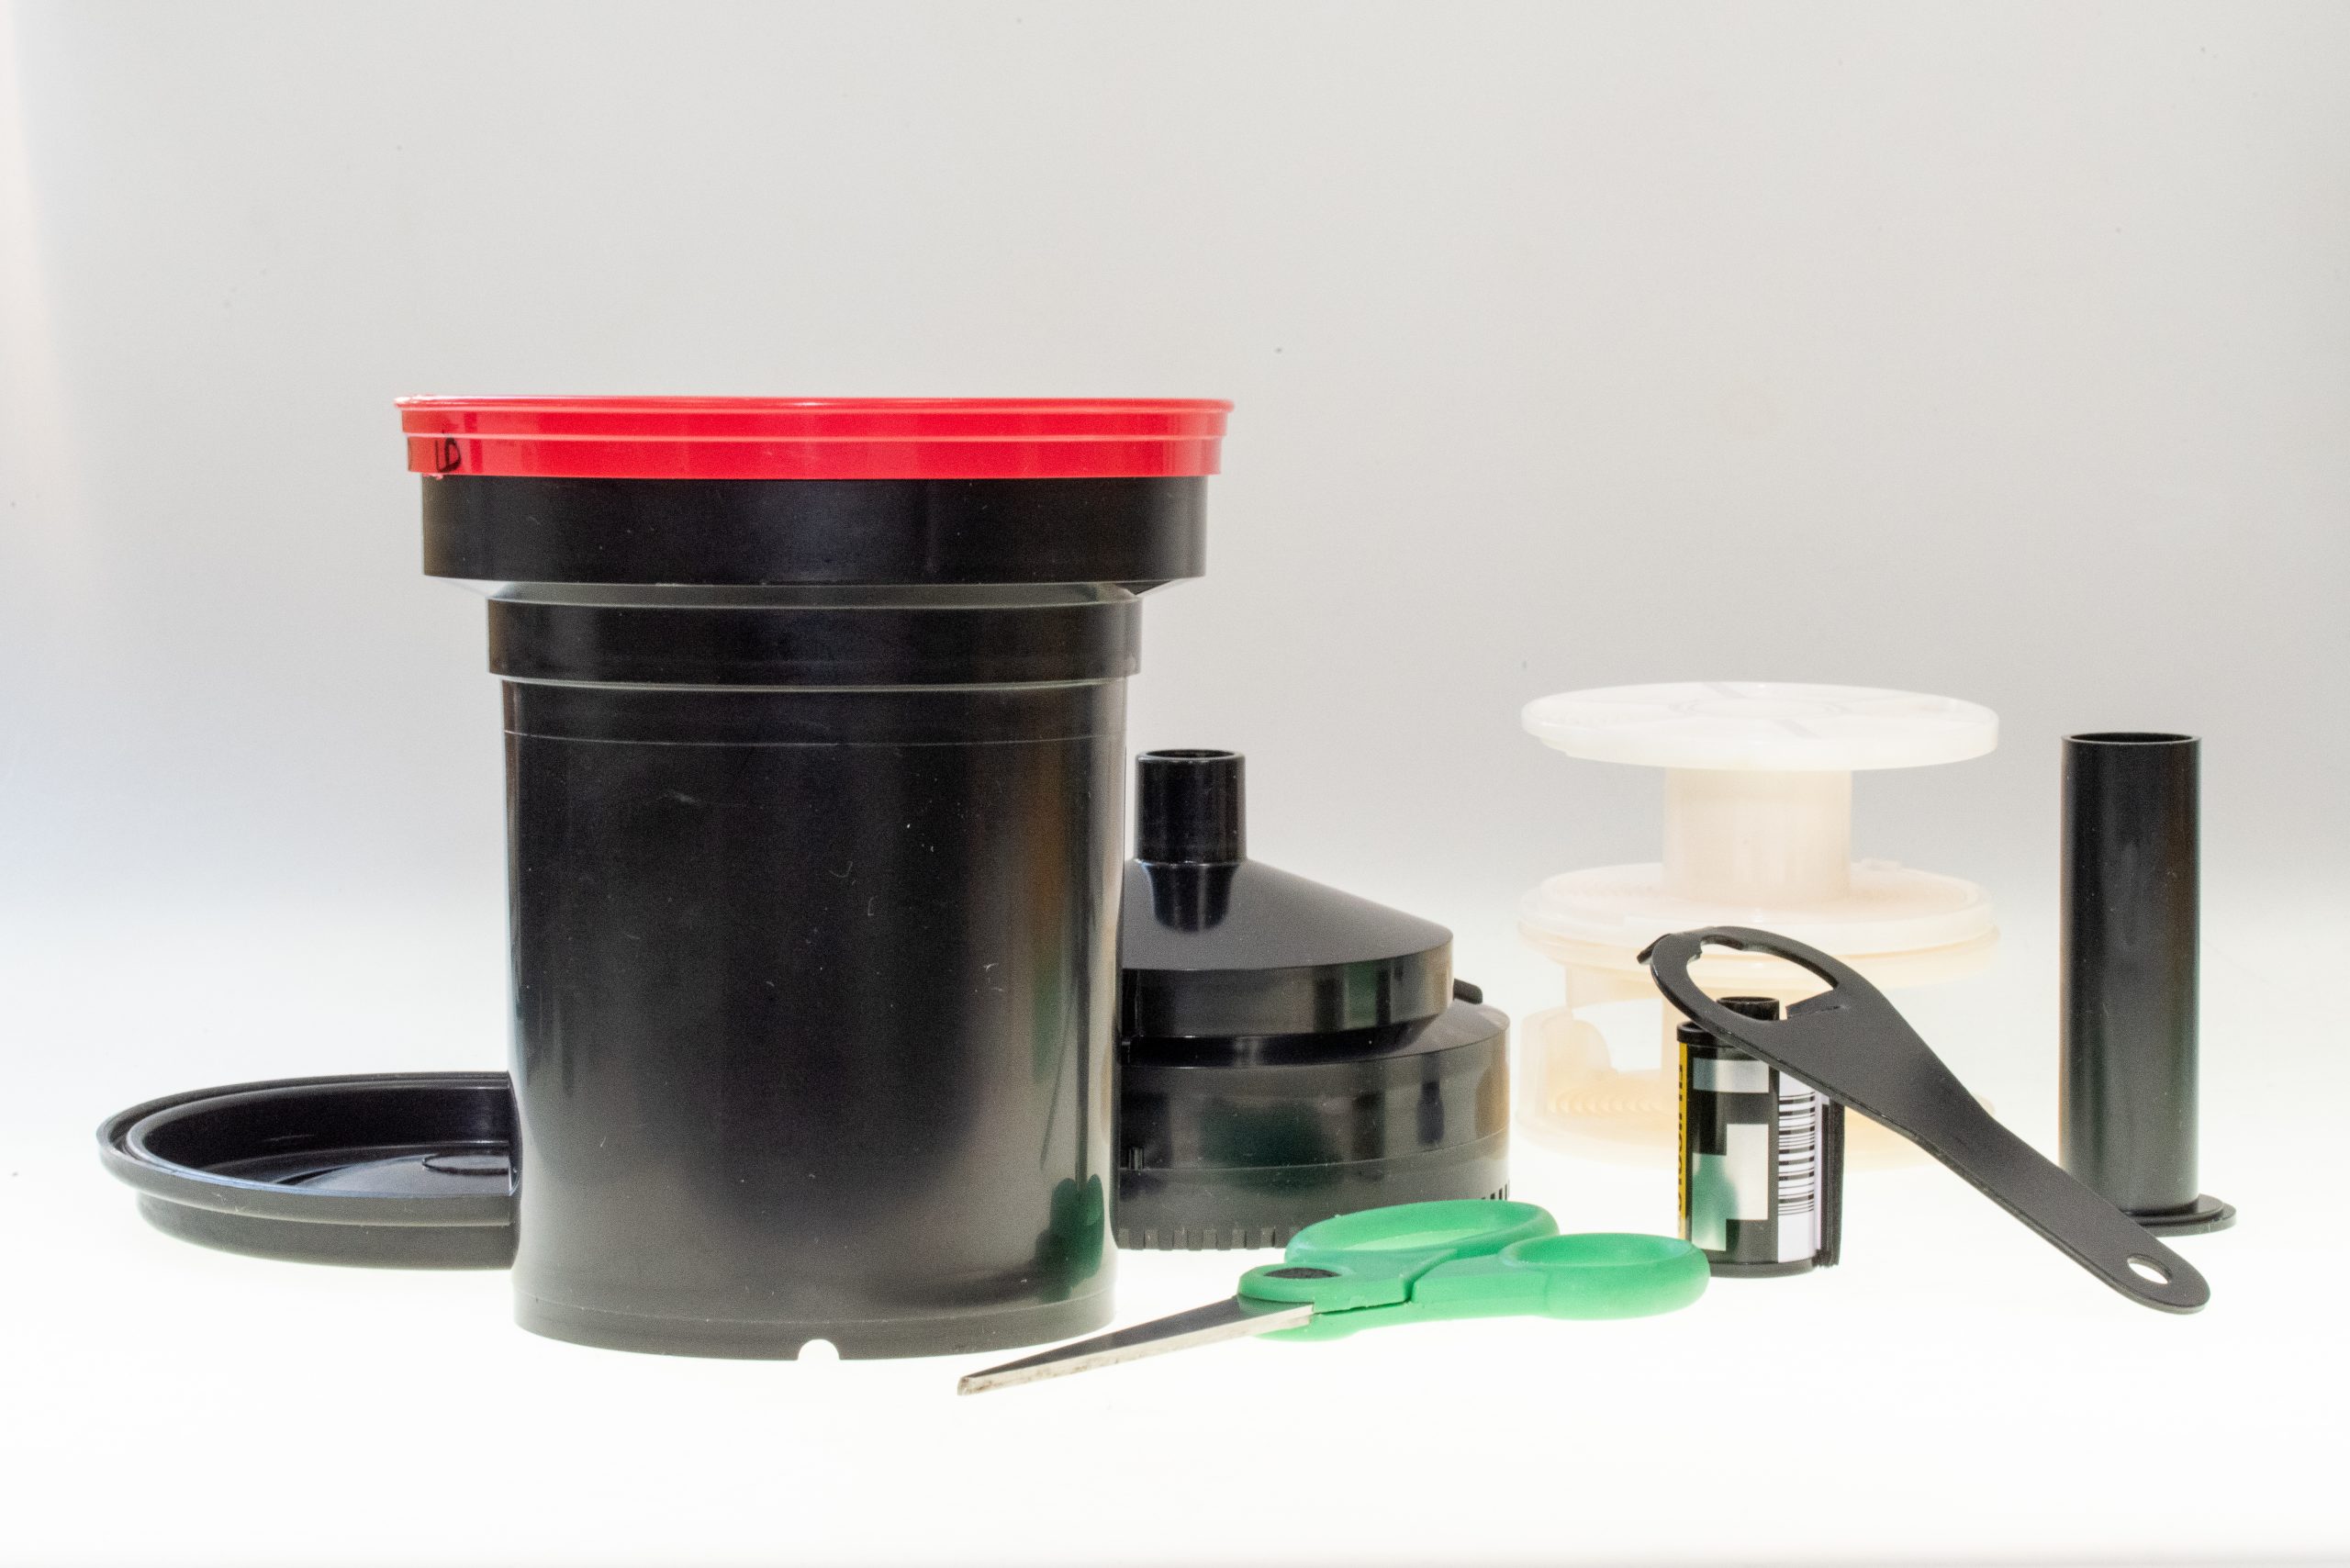
- A darkroom or a film-changing bag
- Film developing tank
- Two reels
- Can opener
- Scissors
- Thermometer
- Beakers or measuring containers
- Timer
- Chemicals
- Clear plastic envelopes to hold entire an entire roll of film
Below is a short description of some of the items on the list you may not be familiar with.
Darkroom – A darkroom is a space where no light can enter. Usually equipped with light trapping entrance or a revolving door. It is easy to transform any small room into a darkroom. You could find details online.
Film-changing bag – A film-changing bag is a bag constructed with double dark fabric preventing any light to enter it. You could buy a film-changing bag at a photography supplies store or online if you plan to develop film at home.
Film developing tank (plastic) – We know by now that the film is light-sensitive. This means you need to take the film out of the metal canister and into the developing tank in total darkness. DO NOT TURN THE LIGHTS ON until the film is loaded safely into the tank with the lid securely locked. The light-tight tank is constructed in such a way that light cannot reach the film. The critical component to keeping light out is the center tube that the reels slide on to. DON’T LEAVE IT OUT.
Film loading reels – The reels allow you to load the film in a way that none of the film touches, allowing all surfaces of the film to receive the chemicals evenly.
Loading film on the film reel
Watch and read the instruction on how to load film onto the reel until you understand the process but only practice will get you there. Practice with a dummy roll and the lights on first. Then turn the lights off and continue practicing. When confident, start with real film.
These videos explain every step that you need to do to successfully load your film.
Open the film canister inside a darkroom with the door closed and without any safe lights on
Loading film into the film reel
How to develop your film
At this point, your film is successfully loaded onto the reel and you are ready to start developing it.
Remove the developing tank cap and start following the steps below. Pay attention to the temperature of the chemicals, the recommended time for the film type you are using, and the agitation (Inversion Method). All are extremely important steps and will affect the outcome if not followed correctly.
The chemicals needed for film processing come in powder or liquid form. They are prepared for you in our darkrooms as stock solution. If you process film at home please follow the manufacturers’ instructions.
- The film developer reacts with the photo-sensitive emulsion on the film and makes the latent image visible.
- The stop-bath (we use tap water) stops the action of the developer
- The fixer removes the unexposed silver from the film only after fixing the film you may open the tank and look at your film in room light.
- Wetting agent protects your film from water marks and streaks
Below is another film developing video. All the steps are very similar to the steps we follow in our facilities.
https://youtu.be/5tQRnAmw2SU
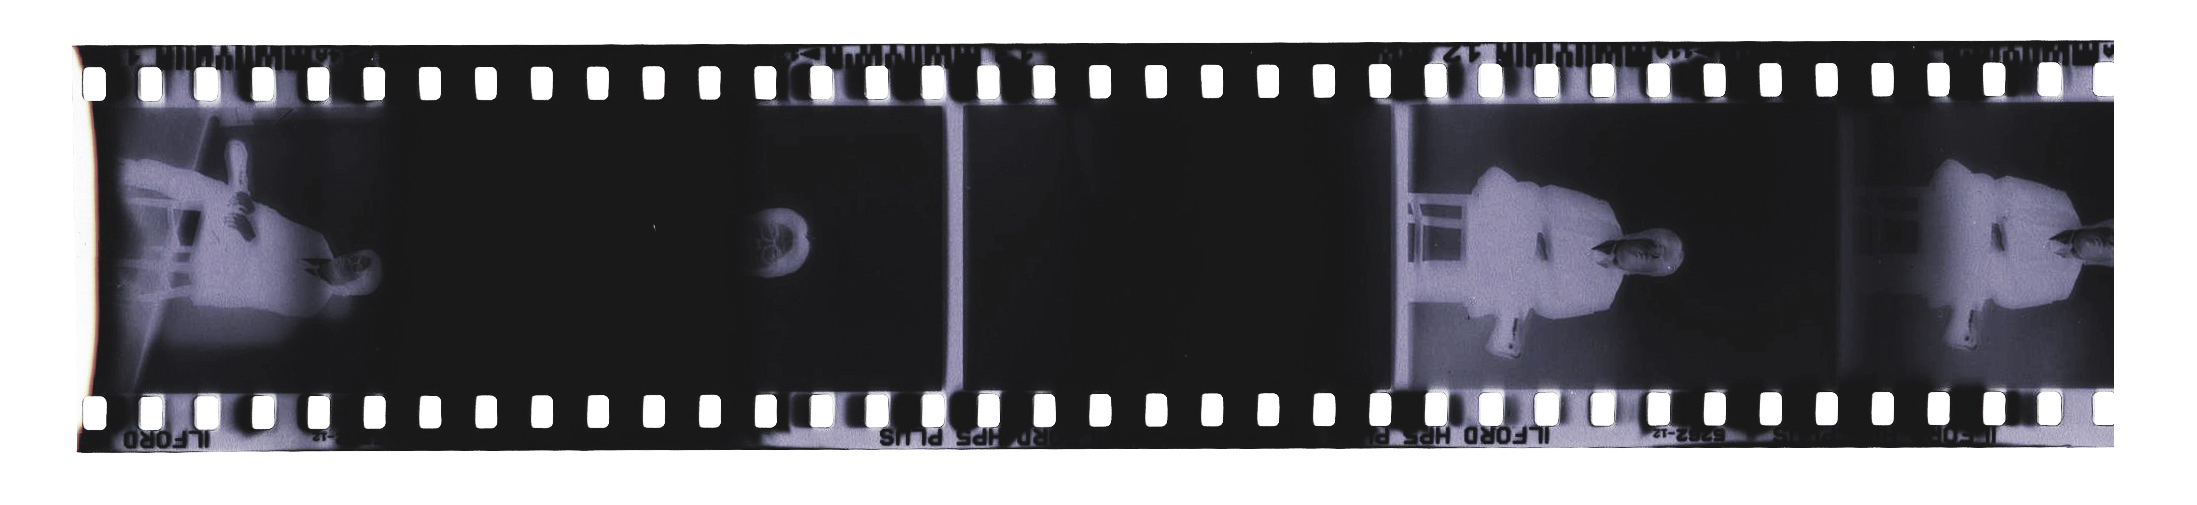
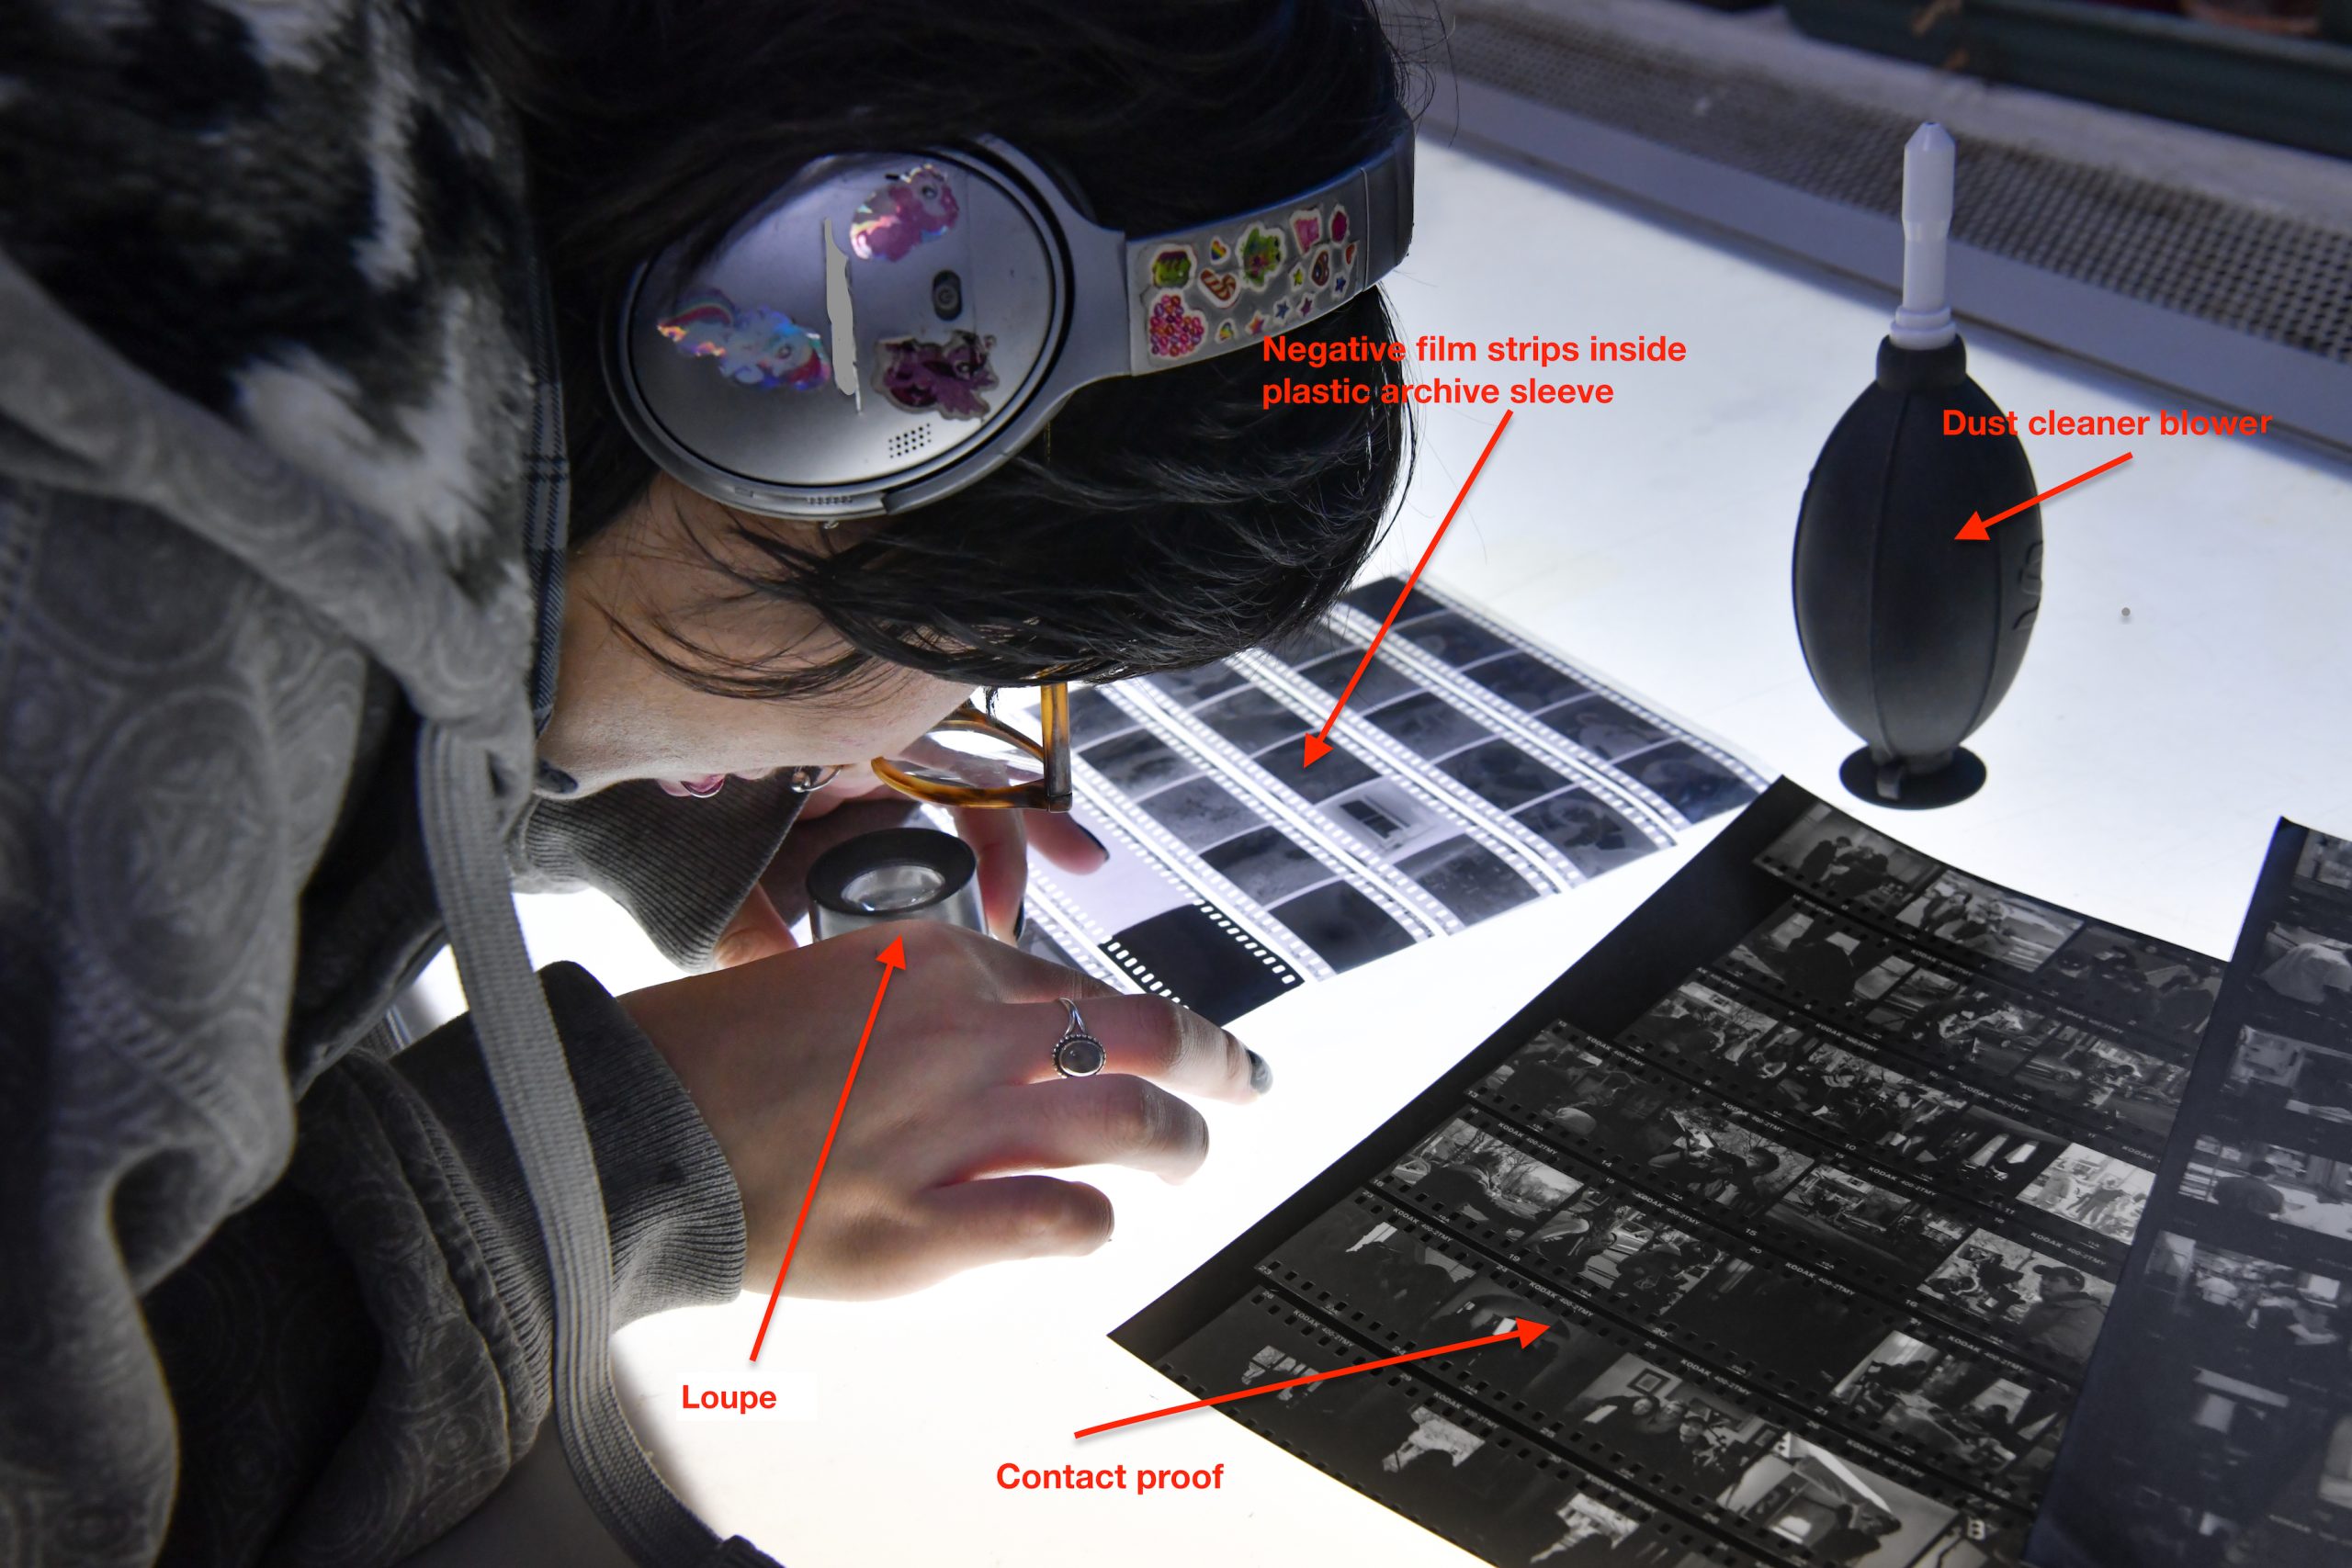
Examining you freshly developed negatives
The film developing processing chart
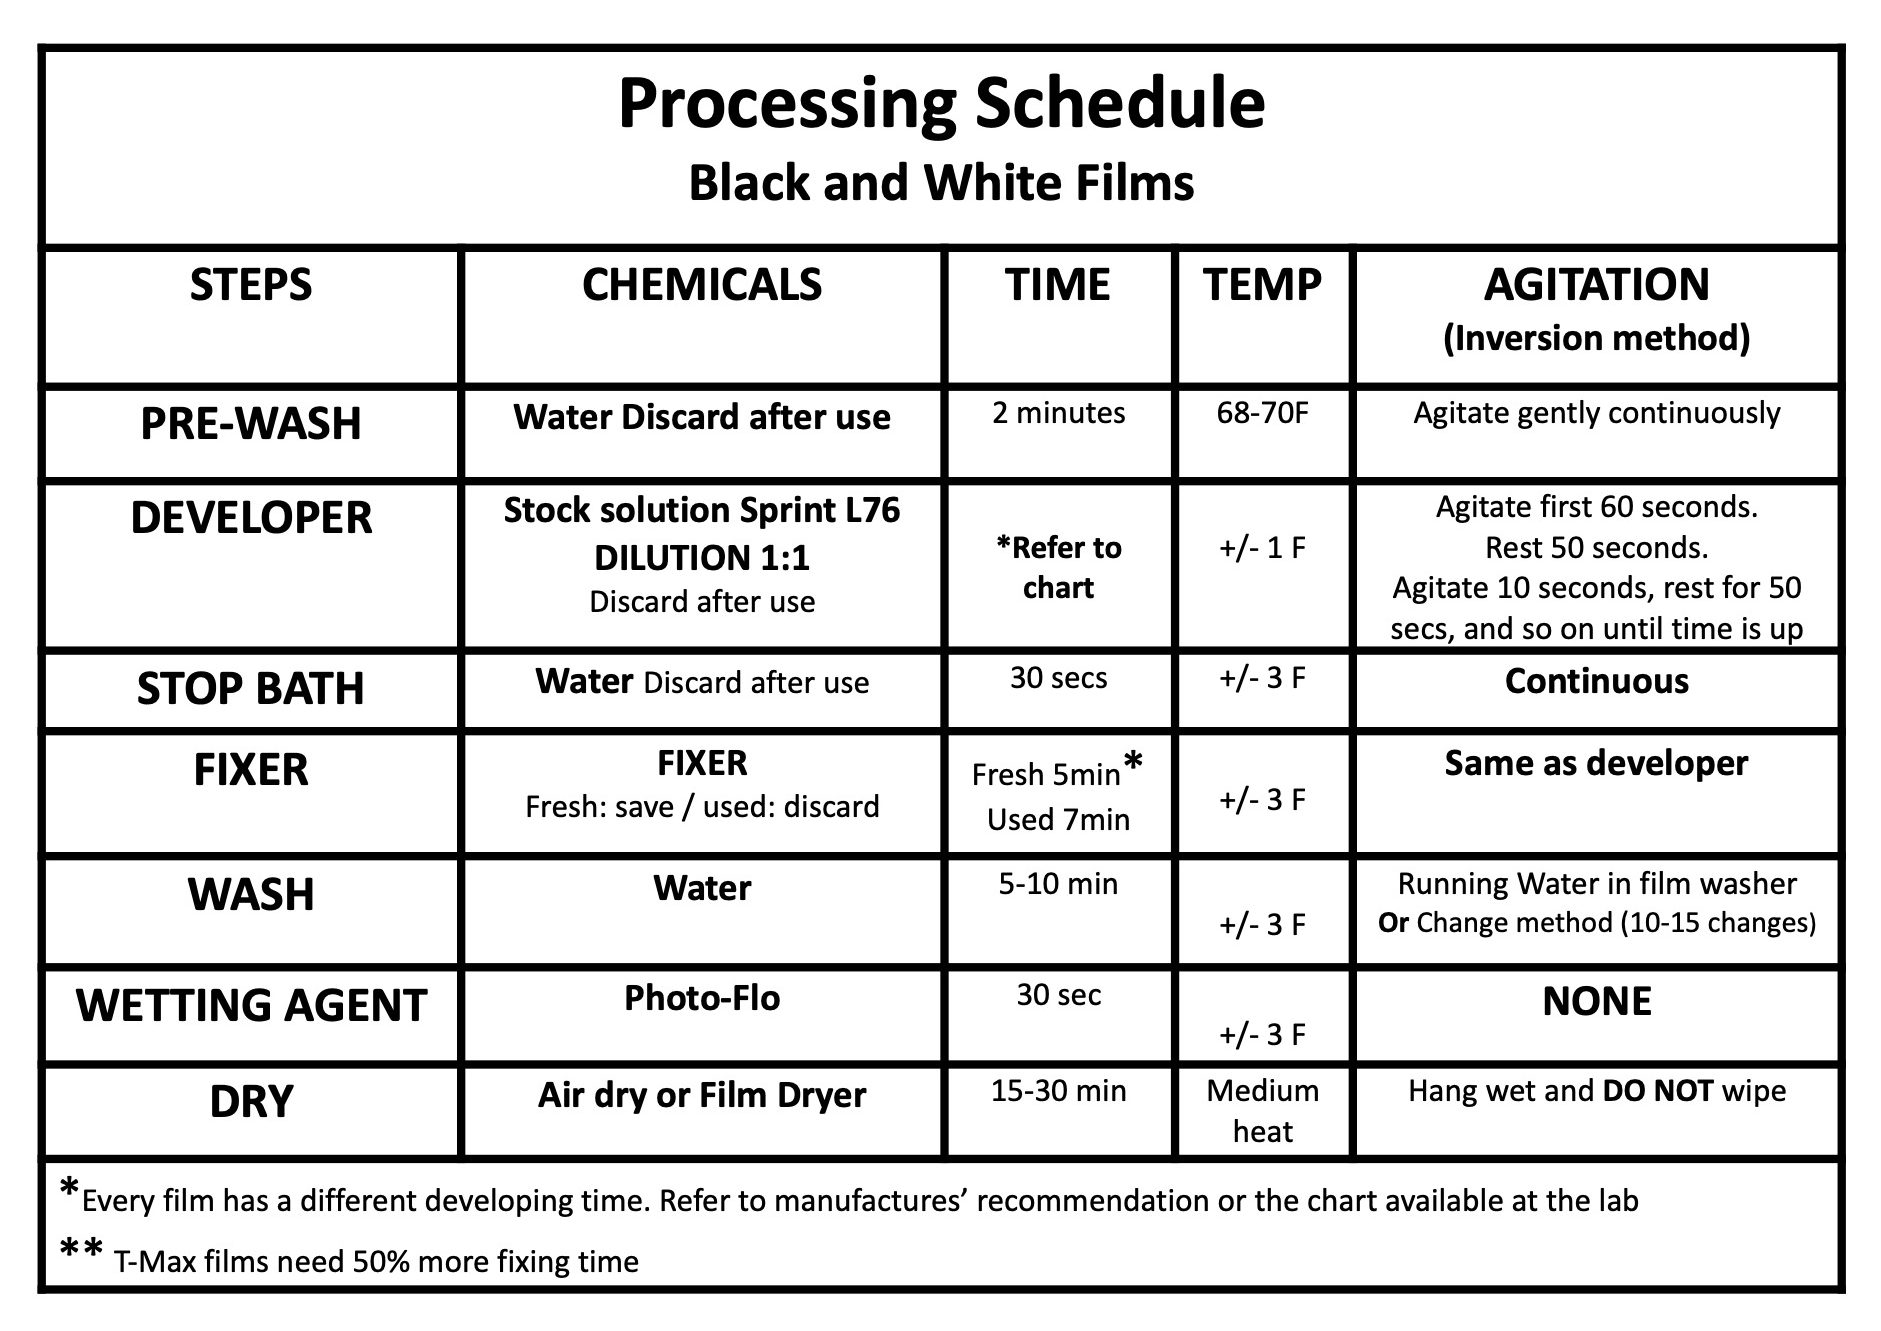
Download and print: BW-film-Processing-Schedule
Film developing Times Chart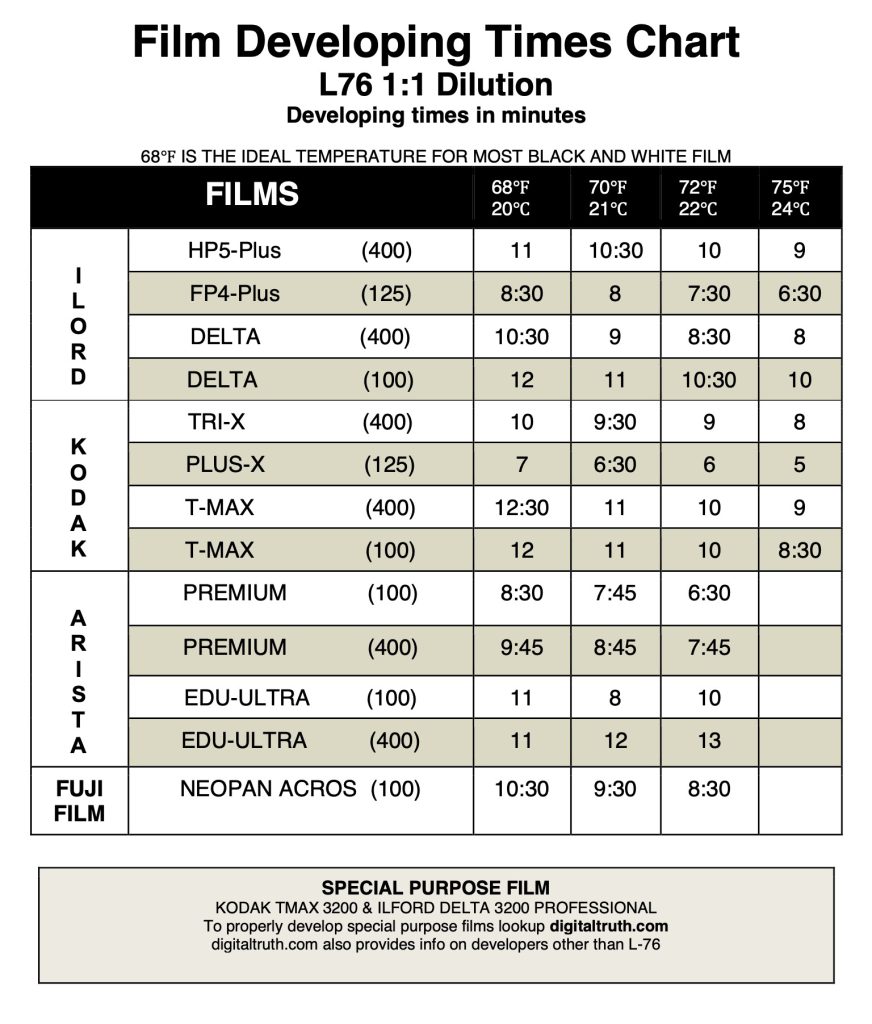
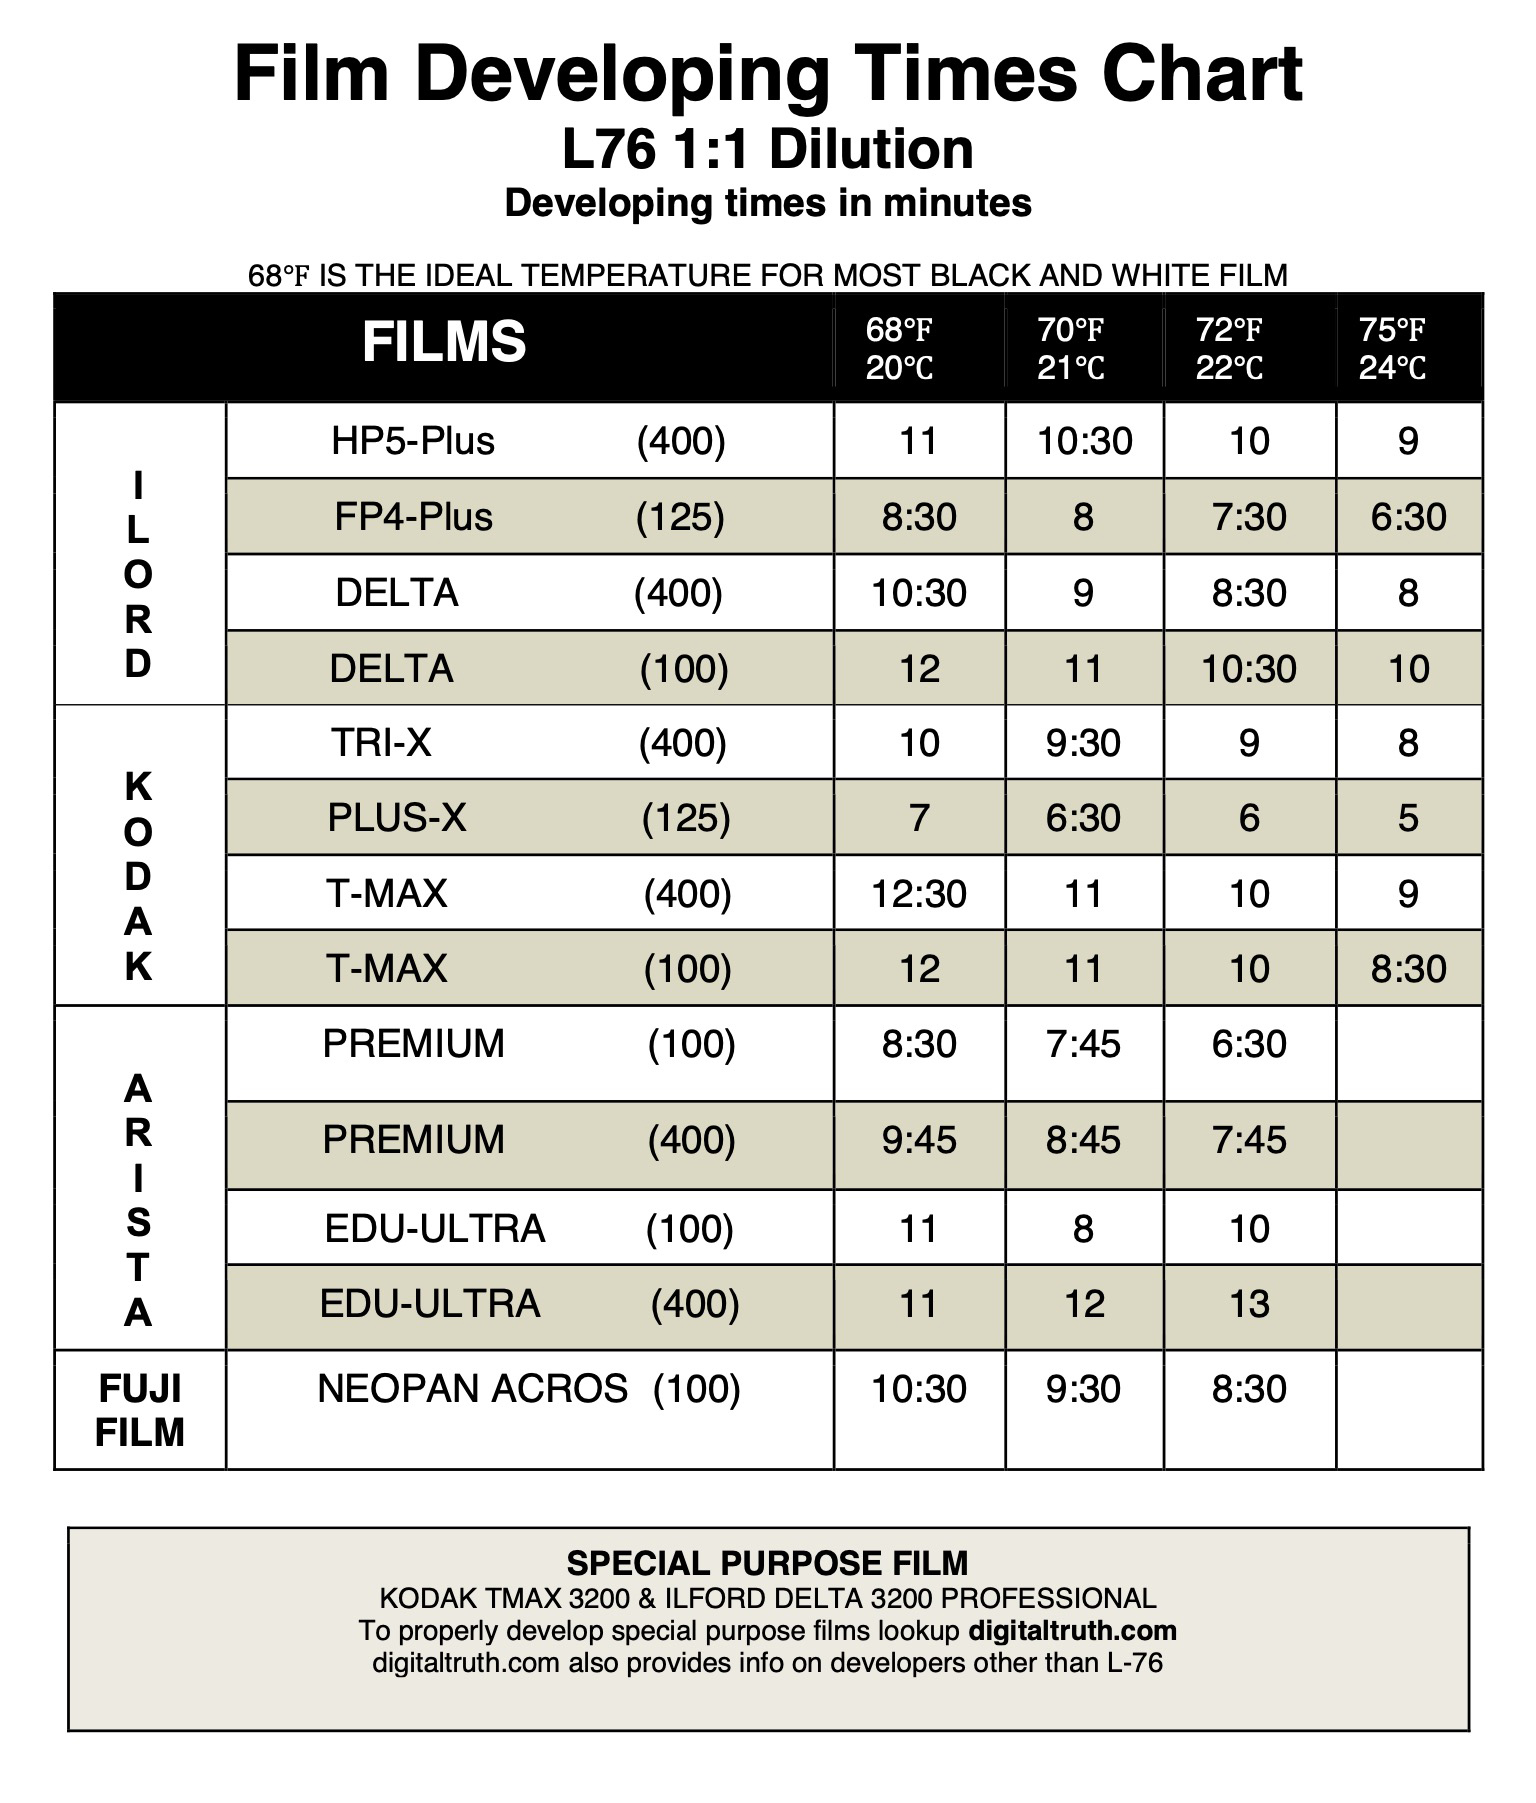
Download and print: Film_Developing_Chart
Common processing problems
You just developed a roll of film, but it doesn’t look good. Below are some of the issues we frequently see:
For other issues regarding developing processing errors please check out Ilford’s link below. Most likely you will find your answer and the remedy so it never happens again. And don’t worry too much. It happens to all beginners. your masterpieces were not in this roll of film.
Taking care of your negatives
- Protect your freshly developed negatives from getting scratched and accumulating dust. It is recommended to wear cotton lint-free gloves while handling negatives. If that is not possible make sure your hands are dry, the surface you work with negatives is clean and dust-free and you have the plastic film print file archive sleeves next to you to store your negatives.
- Make sure your film is completely dry when you start cutting it into strips. If the film is ‘bowing’ it is not dry yet.
- Avoid touching your film, especially the emulsion side. Handle it from its edges. Fingerprints, dust, and lint will show up when you make the print.
- Never store your negatives in your notebook or your backpack if they are not already inside the plastic film print file archive sleeves.
DID YOU KNOW
The oldest surviving negative dates back to 1835
FAQ
What is the best film to use as a beginner?
We suggest any brand of 35mm 36 exposure B&W film 400 ASA because it will work well on a cloudy overcast day, late in the afternoon, in a well-lit interior space, as well as on a sunny day.
What are common mistakes I should be aware off?
- Make sure you load the film correctly in your camera.
- Make sure you are developing the film in temperatures the manufacturer recommends.
- Make sure the film you buy is a real B&W film. Some color films are marked as B&W but they are actually color films and you get good results only if you develop them in a professional lab as color films. Avoid film marked as C-41 process. Consult your instructor for more info.
How do I choose the correct B&W film for my project?
- Read the label. Make sure the ISO is what you need. Make sure it is not labeled C-41 process. It also depends on where you plan to take photographs. Outdoors on a sunny day? Using flash? Choose low ISO slow film ISO 100 or 125 to benefit from less grain.
- Cloudy day? Indoors? Choose a higher ISO, faster film ISO 400, or 800 or 1600. Cons: grainier photos. Pros: more shutter speeds and aperture combination options.
How do I store film?
- At room temperature, low humidity space, away from direct sunlight.
- If you buy many rolls to use for several months or years, you may store your film in the fridge or the freezer in a zip-lock bag.
Why are there different types of B&W films?
- To accommodate different shooting situations, locations, ideas, etc.
- To resolve high or low light issues, and increase or decrease the grain structure for aesthetic reasons.
A room without lights where we process photographic materials.
A room with a light-trapping revolving door or equipped with a heavy curtain to trap light. It is also equipped with safe yellow or red lights to use while printing.
Safelights are used to illuminate darkrooms only when making prints. Never when processing film. (There are exceptions for special types of films like Lith film)
A light-tight (plastic) tank is constructed in such a way that light cannot reach the film. Trapping the light is enabled by a hollow post or tube and the special construction of its cover.
Plastic or metal reels allow you to load the film in a way that all surface of the film receives chemistry evenly.
A concentrated solution (as of developer or fixer) that usually is diluted with water before use in photography.
An image on an exposed film or print that has not yet been made visible. Only after development in chemicals, it becomes visible
