11 Film exposure
SNAPSHOT
Beginners guide to understanding the three factors that affect exposure which are:
- Aperture
- Shutter
- Film speed (ISO)
What is exposure
Exposure is the amount of light that passes through the camera lens and reaches your film over a period of time (Light x time).
Exposure determines how light or dark your image is.
You control exposure by adjusting the amount of light you let into the camera. With too much light your picture will be too bright or overexposed, not enough light, your picture will be too dark, or underexposed.
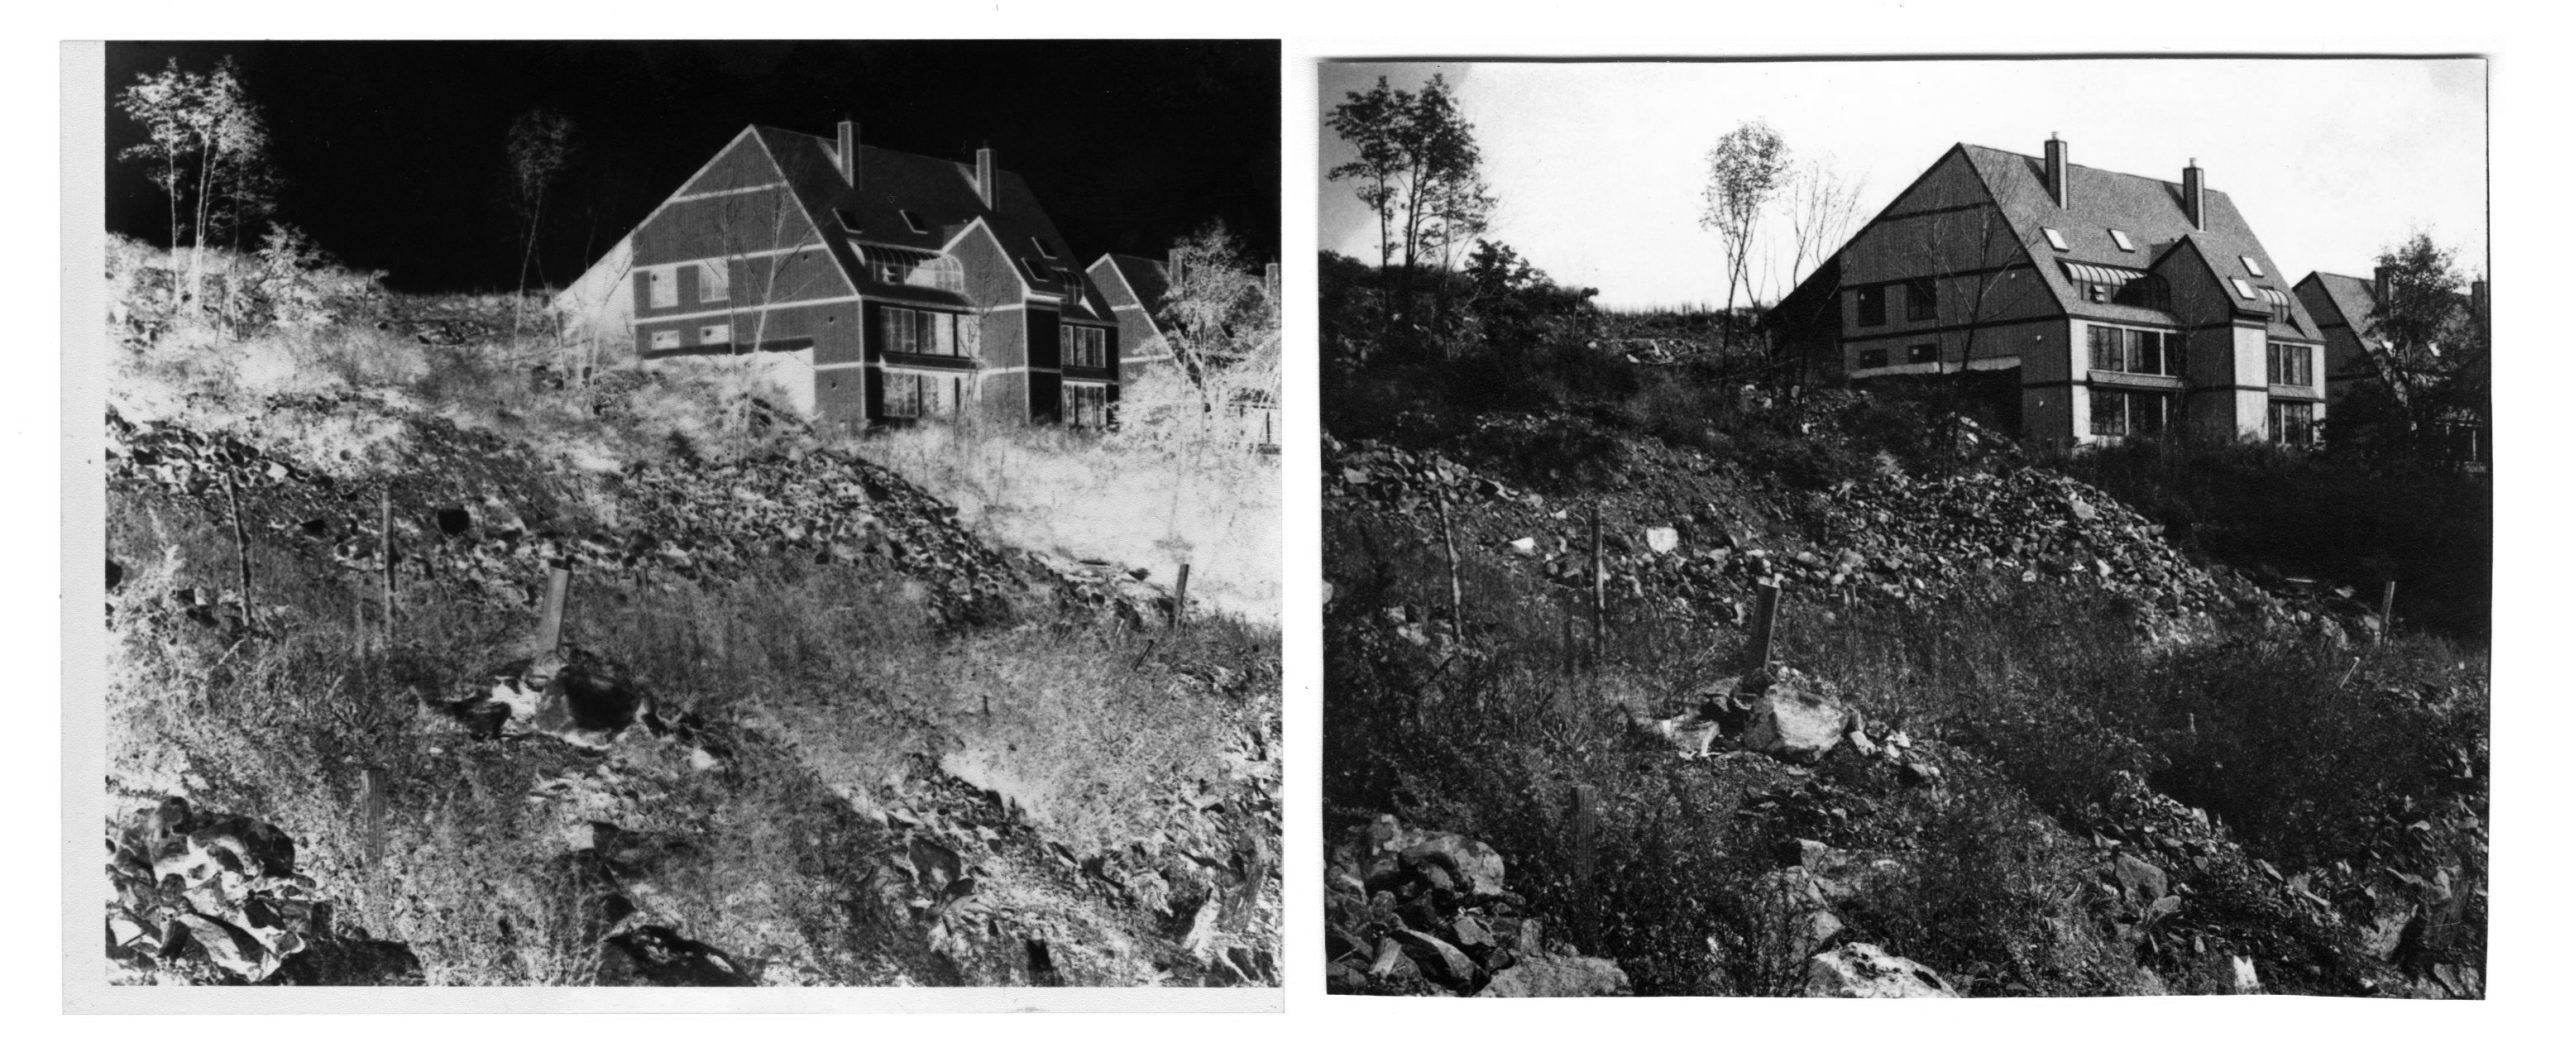
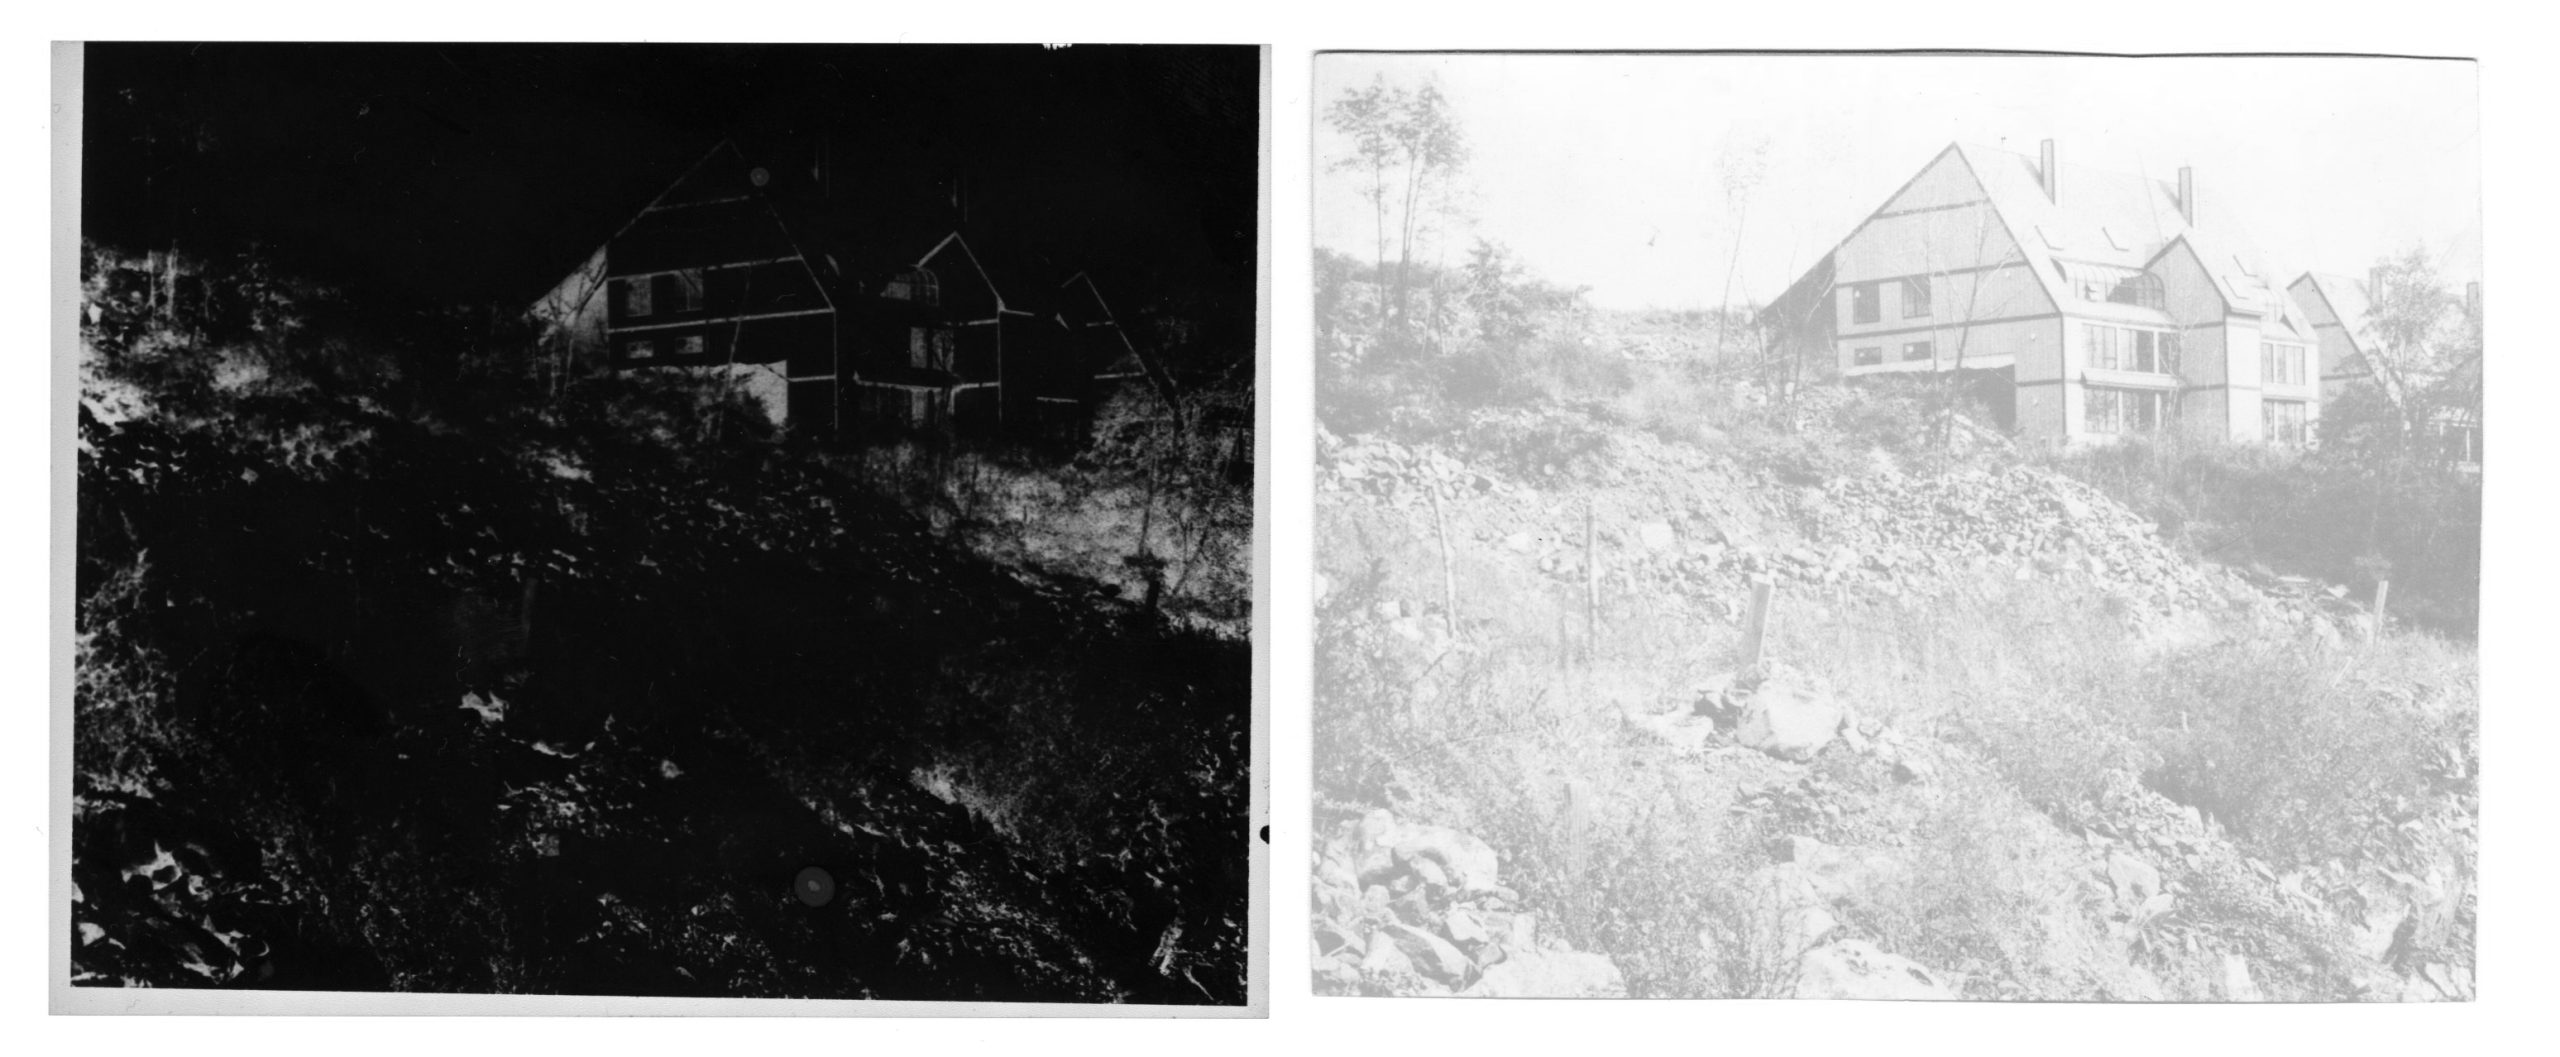
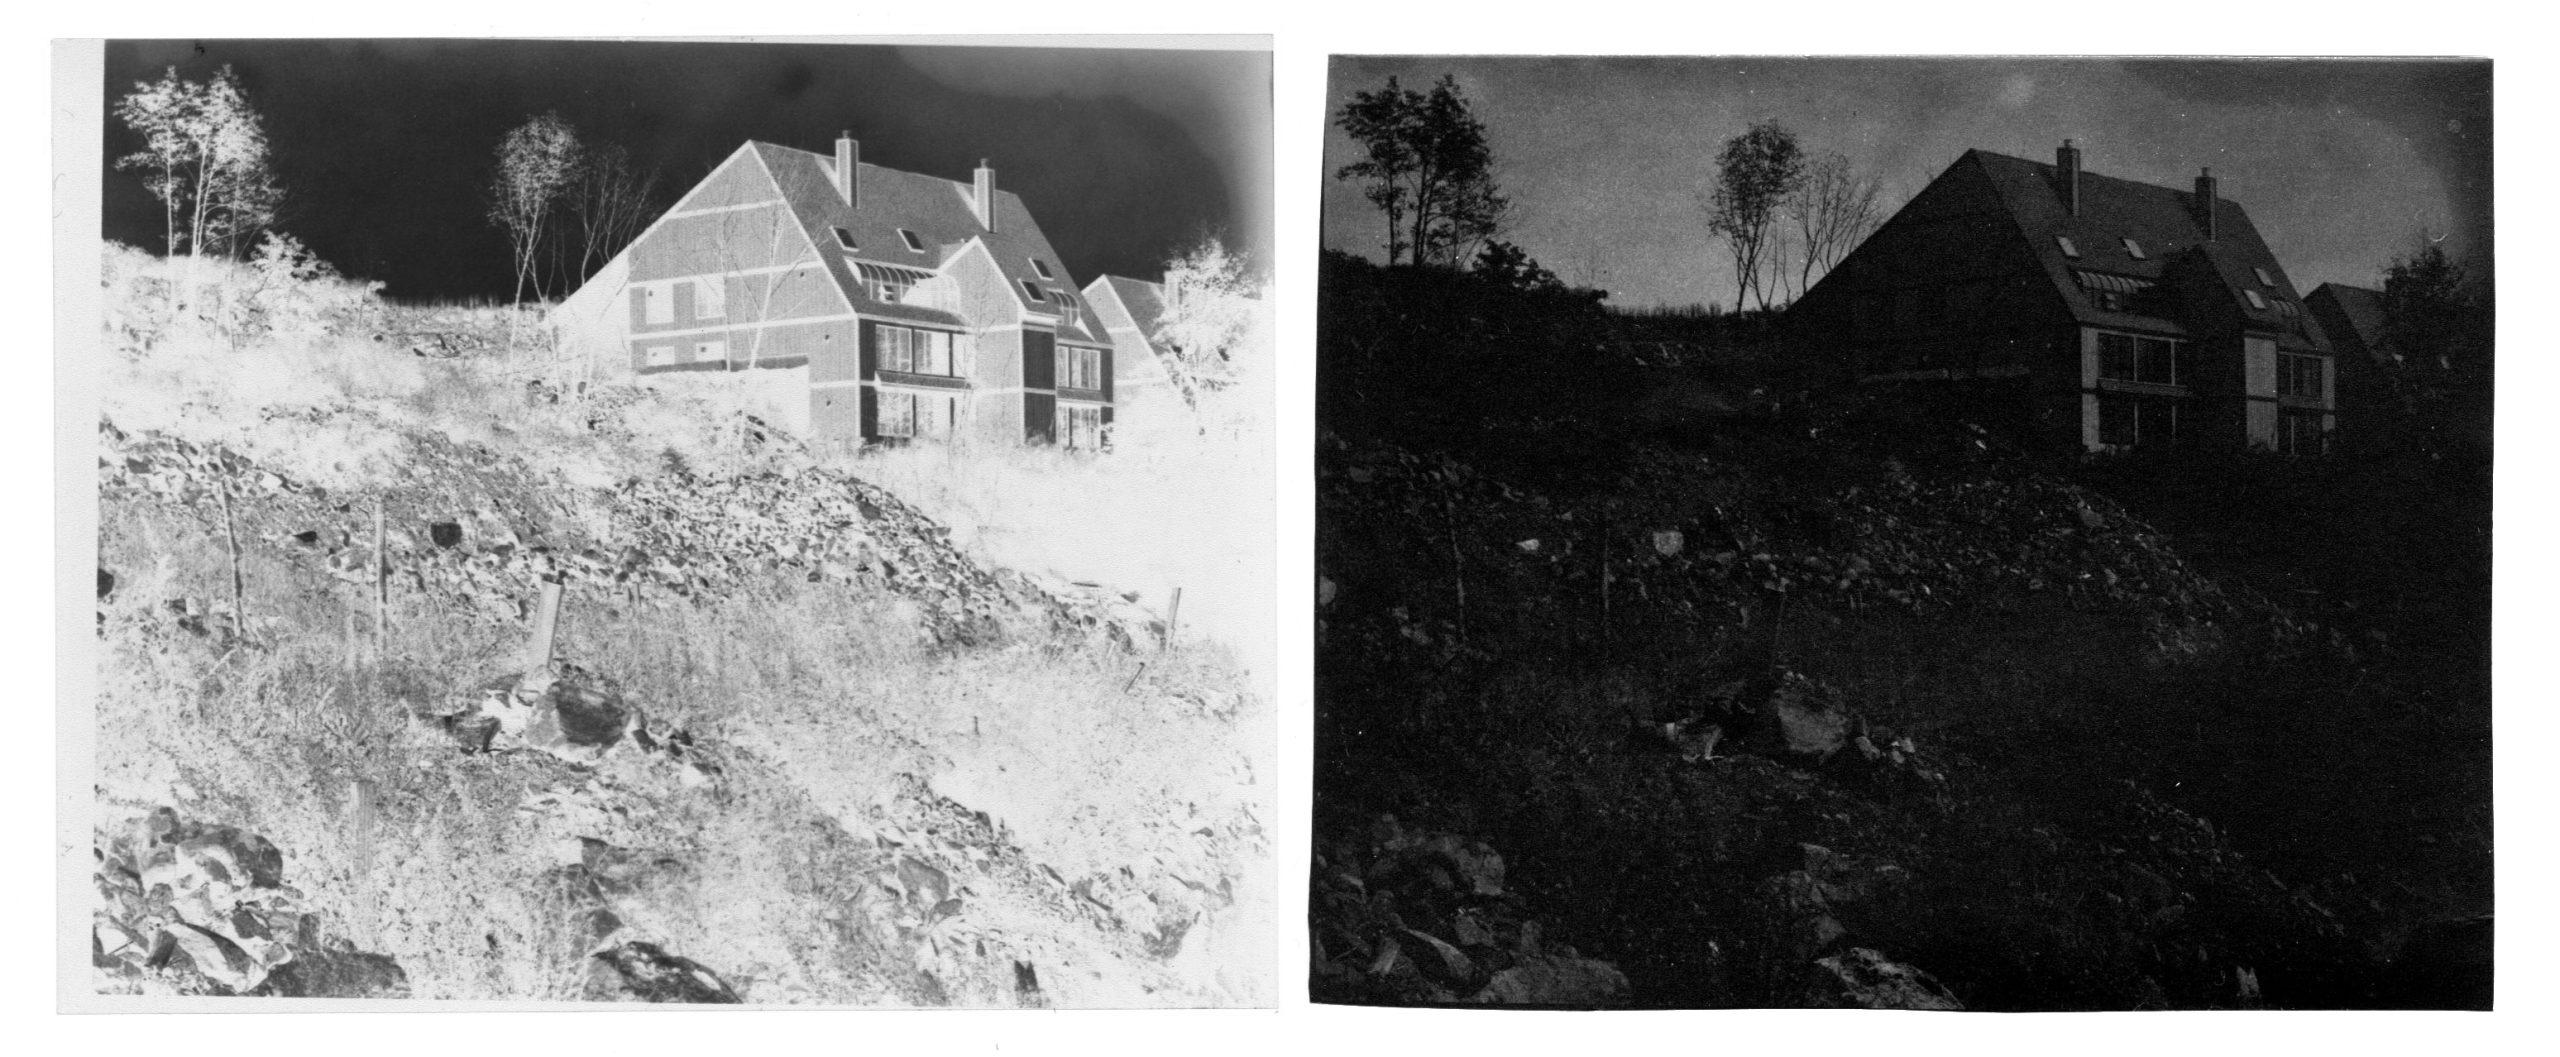
Correct, over, and under-exposed negatives and prints
A correctly exposed negative will be easy to print resulting in an image with a long grayscale tonal range.
- Correct exposure results in a print and a negative that have details in the shadows and highlights of the image.
- Underexposure results in a print that is too dark and a negative that is too light.
- Overexposure results in a print that is too light and a negative that is too dark.
Below is an example showing the negatives and prints made from underexposed, overexposed, and correctly exposed negatives.
Obviously, the trick is to let just the right amount of light into your camera in order to get the correct exposure. The following three settings affect exposure. They are Aperture, Shutter, Speed, and ISO. Each one of these settings has a different effect on the overall image, however, their relationship to each other is critical to getting the correct exposure. Finding the right balance is all about understanding what each one does, how it affects the others, and how you can use it to be a creative photographer.
Some cameras offer a few easy options to get the correct exposure.
Manual Mode is camera mode that allows the most creativity.
Program or Auto Mode makes all the decisions for you.
Aperture or Shutter priority Modes are helpful settings but only after you understand how they each affect the image, and when to use them.
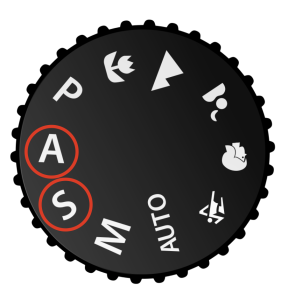
Different shooting modes
- Manual Mode The photographer chooses the aperture and the shutter speed to achieve the correct exposure (M).
- Aperture Priority Mode The photographer chooses the aperture and the camera chooses the shutter speed to achieve correct exposure (A or AV).
- Shutter speed Priority Mode The photographer chooses the shutter speed and the camera chooses the aperture to achieve the correct exposure (S or TV).
- Program Mode The camera makes the choices for the photographer automatically (P).
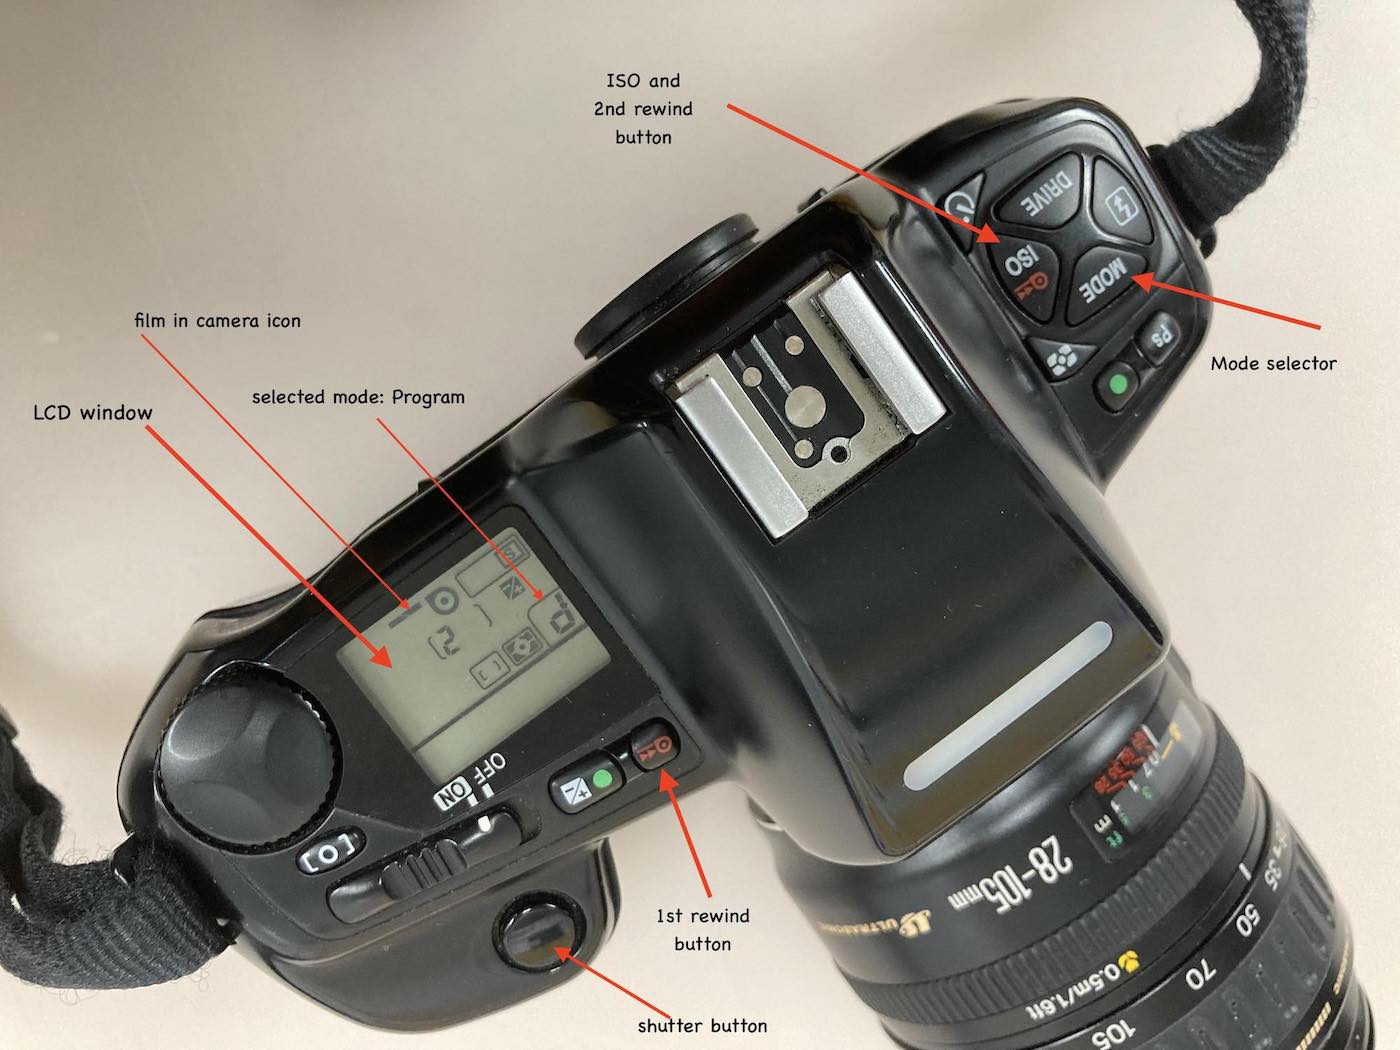
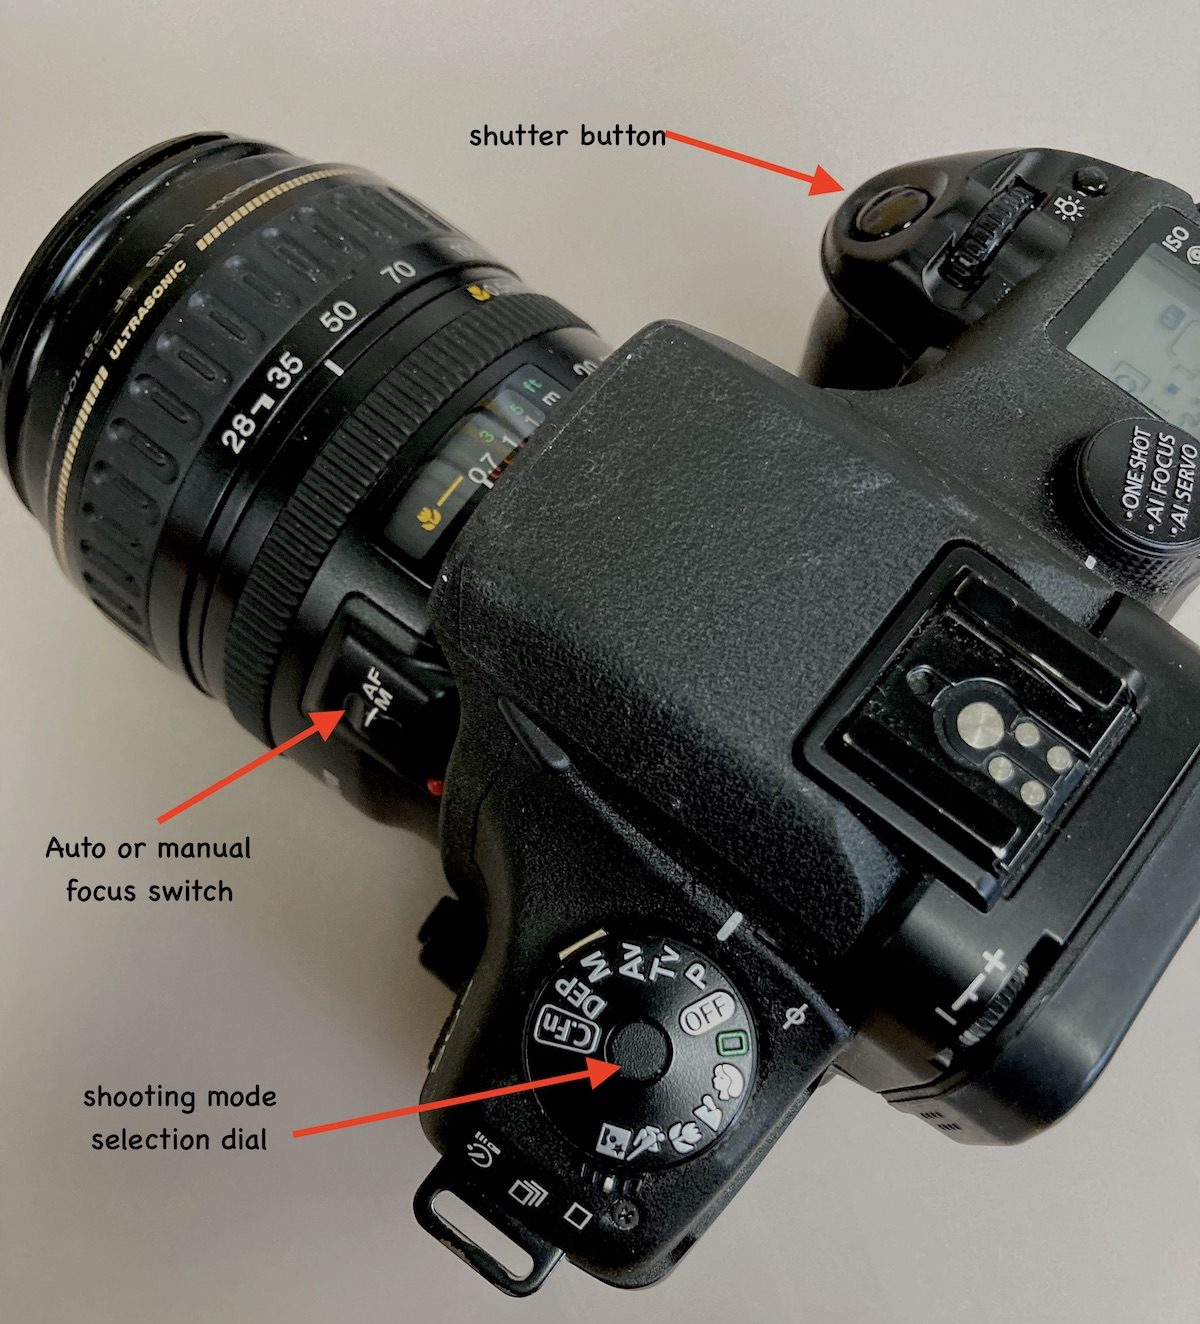 Manual Exposure is set by turning the shooting mode dial to M, while Manual Focus is set by setting the switch on the lens to M.
Let’s unpack this
Aperture controls how much light strikes the film (quantity).
Shutter Speed controls how long the light stays on the film (time).
Film speed ISO or (ASA on older cameras) refers to the film’s sensitivity to light.
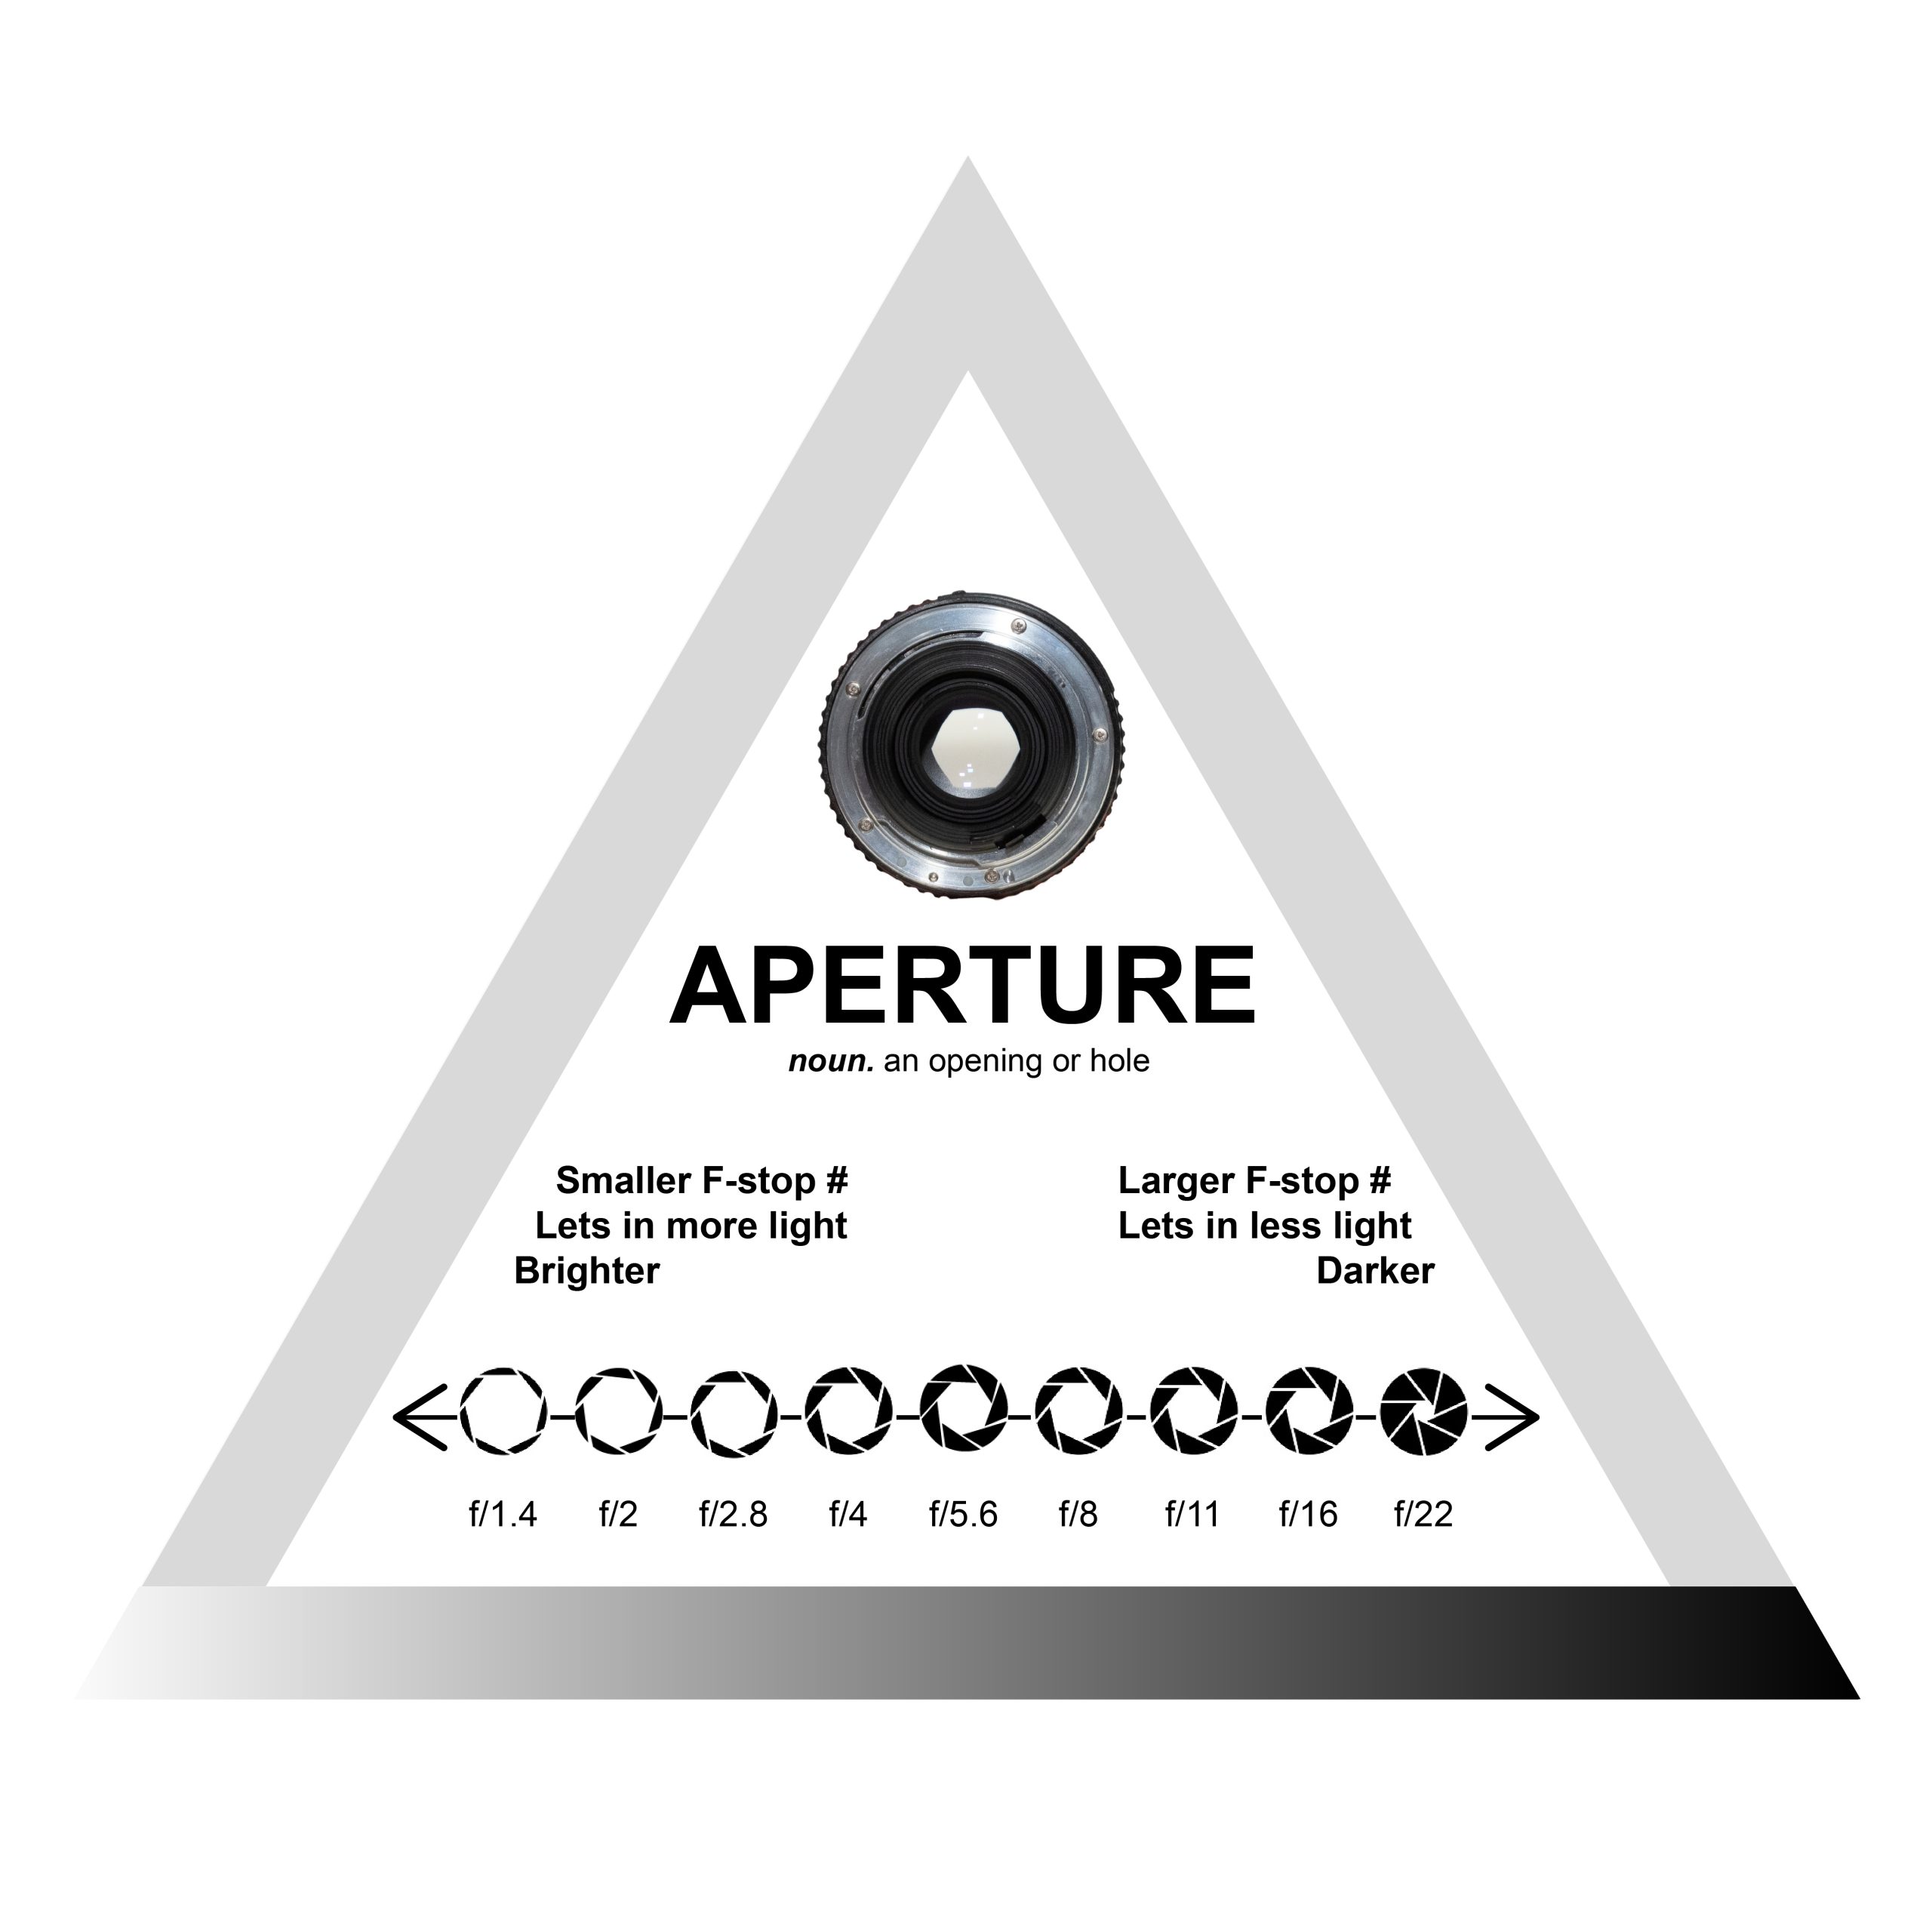
Aperture
The aperture is an opening in the lens, not in the camera body itself. It functions a lot like the pupils in your eyes. When it’s dark, it opens wider to let in more light, and when it’s bright, it gets smaller to let in less light. Have you ever walked indoors after being outside in bright light and everything is a little too dark for a few seconds? That’s because your pupils are still small, they automatically adjust to the darker interior light by widening, so you can see clearly in the dim light.
Unlike your eyes, the camera lens needs you to make the adjustment manually by changing the aperture setting. The size of the opening is a specific measurement, called an F stop.
 Darker situations may require a bigger lens opening and brighter situations may need smaller lens openings.
Each F stop will let in twice as much light as the smaller opening before it. In other words, F 4 lets in exactly twice as much light as F 5.6. This is an important fact to understand because it is how you will learn to balance the amount of light entering the camera with the length of time the shutter stays open.

Different lenses have varying F stop ranges, so you may not have all the same F stops as illustrated above.
Don’t be fooled by F stop numbers, the bigger the F stop number, the smaller the opening is.
If you have an electronic camera, you may have other F stop numbers in between the ones shown here. These are half-stops. Don’t be fooled by them. For now, it is best to ignore them. Memorize these numbers and skip over the half stops. Most cameras will allow you to change the setting to show only full stops. Your user manual will instruct you how to do that.
Aperture affects Depth of Field
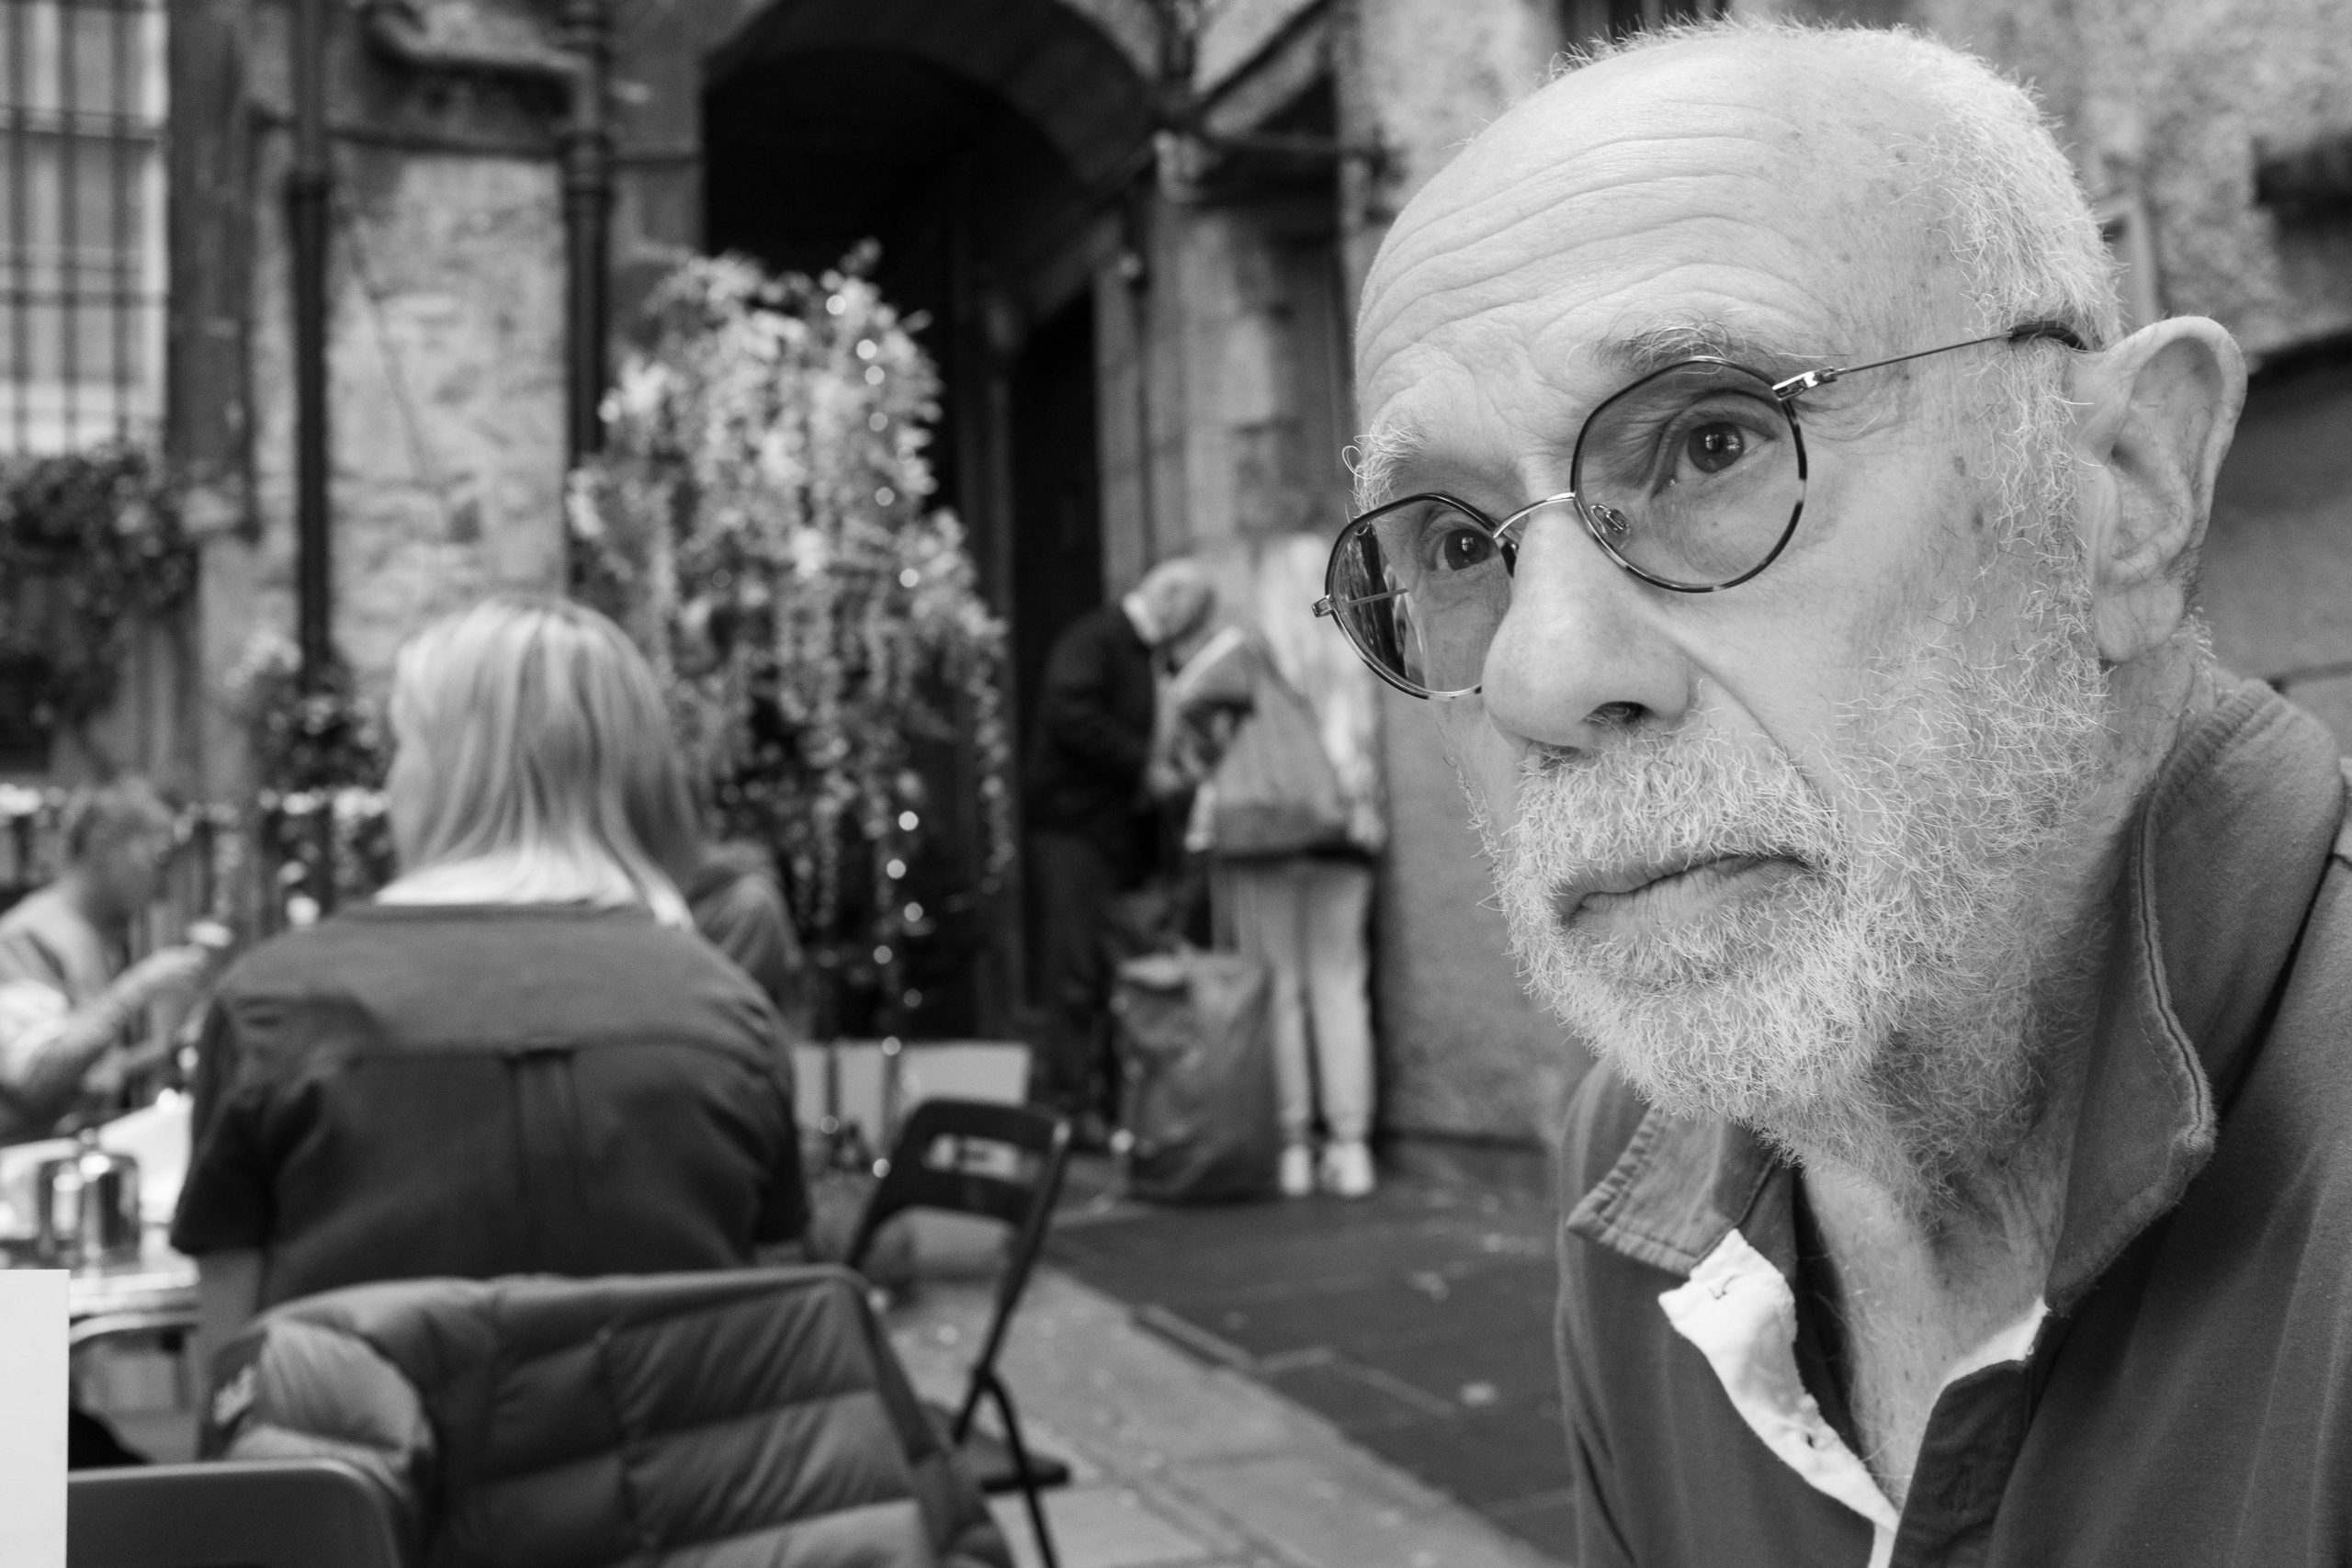
Along with controlling how much light enters your camera, the aperture also determines the Depth of Field in your image. Depth of field, simply put, is how much of your image is in focus. A small opening like F 16 will give a deep depth of field, useful when you want everything to be sharp in your picture. A large opening, like F 2.8 will produce a shallow depth of field useful for creating mood and atmosphere. See the chapter on Lenses for more DoF explanation.


This might help you remember the rule about Depth of Field:
BIG F-number = Big Depth of Field. (deep, large and big are interchangeable terms)
small F-number = small Depth of Field (small, shallow and narrow are interchangeable terms)
Working in Aperture priority mode allows you to choose the aperture and the camera will select the shutter speed to give you the correct exposure. As you change the aperture setting, the camera will automatically change the shutter setting. By choosing a wide opening, such as F 4, your camera will select a faster shutter speed to compensate for how much light is entering the lens. Choosing a small opening, such as F 22, your camera will select a slower shutter speed.
Shutter Speed
Shutter speed determines how long light is allowed to pass through the lens and strikes the film. When you click the shutter release button to take a photo, your camera’s shutter opens to let the light in and then closes to block the light. The length of time the shutter stays open is controlled by your shutter speed.
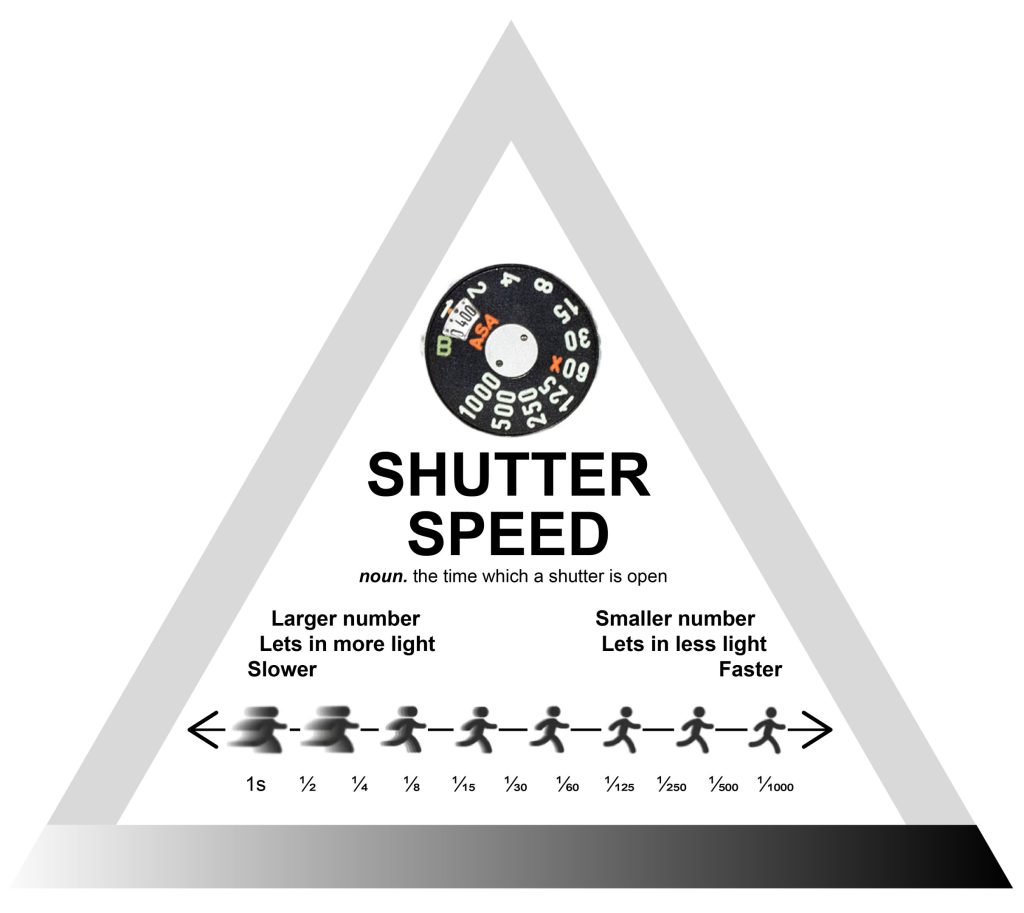
Shutter speed is measured as a fraction of a second. It is either written as a fraction such as 1/60 or a whole number, like this, 60, but either way, it refers to a fraction of a second. The exception is when you see a whole number followed by quotation marks, like this 60” that means your shutter will be open for 60 seconds. It is unlikely you will use 60 seconds but you may see 1”, 2”, or 3” which means 1, 2, or 3 seconds.
Darker shooting conditions will require you to use a slower shutter speed, such as 1/60, to let in enough light to fill the scene. In brighter conditions, you need less light, so you should use a faster shutter speed, such as 1/500.
A slow shutter speed lets in twice as much light as the faster speed before it. For example, a 125th of a second (1/125) is twice as long as a 500th (1/500) of a second.
When shooting in Shutter Priority mode, you choose the shutter speed and the camera automatically selects the aperture setting to make the correct exposure. By using a slow shutter speed, such as 1/60, your camera will select a smaller aperture to adjust for how long the light is entering the lens. By choosing a fast shutter speed, such as 1/500, your camera will select a wider aperture.
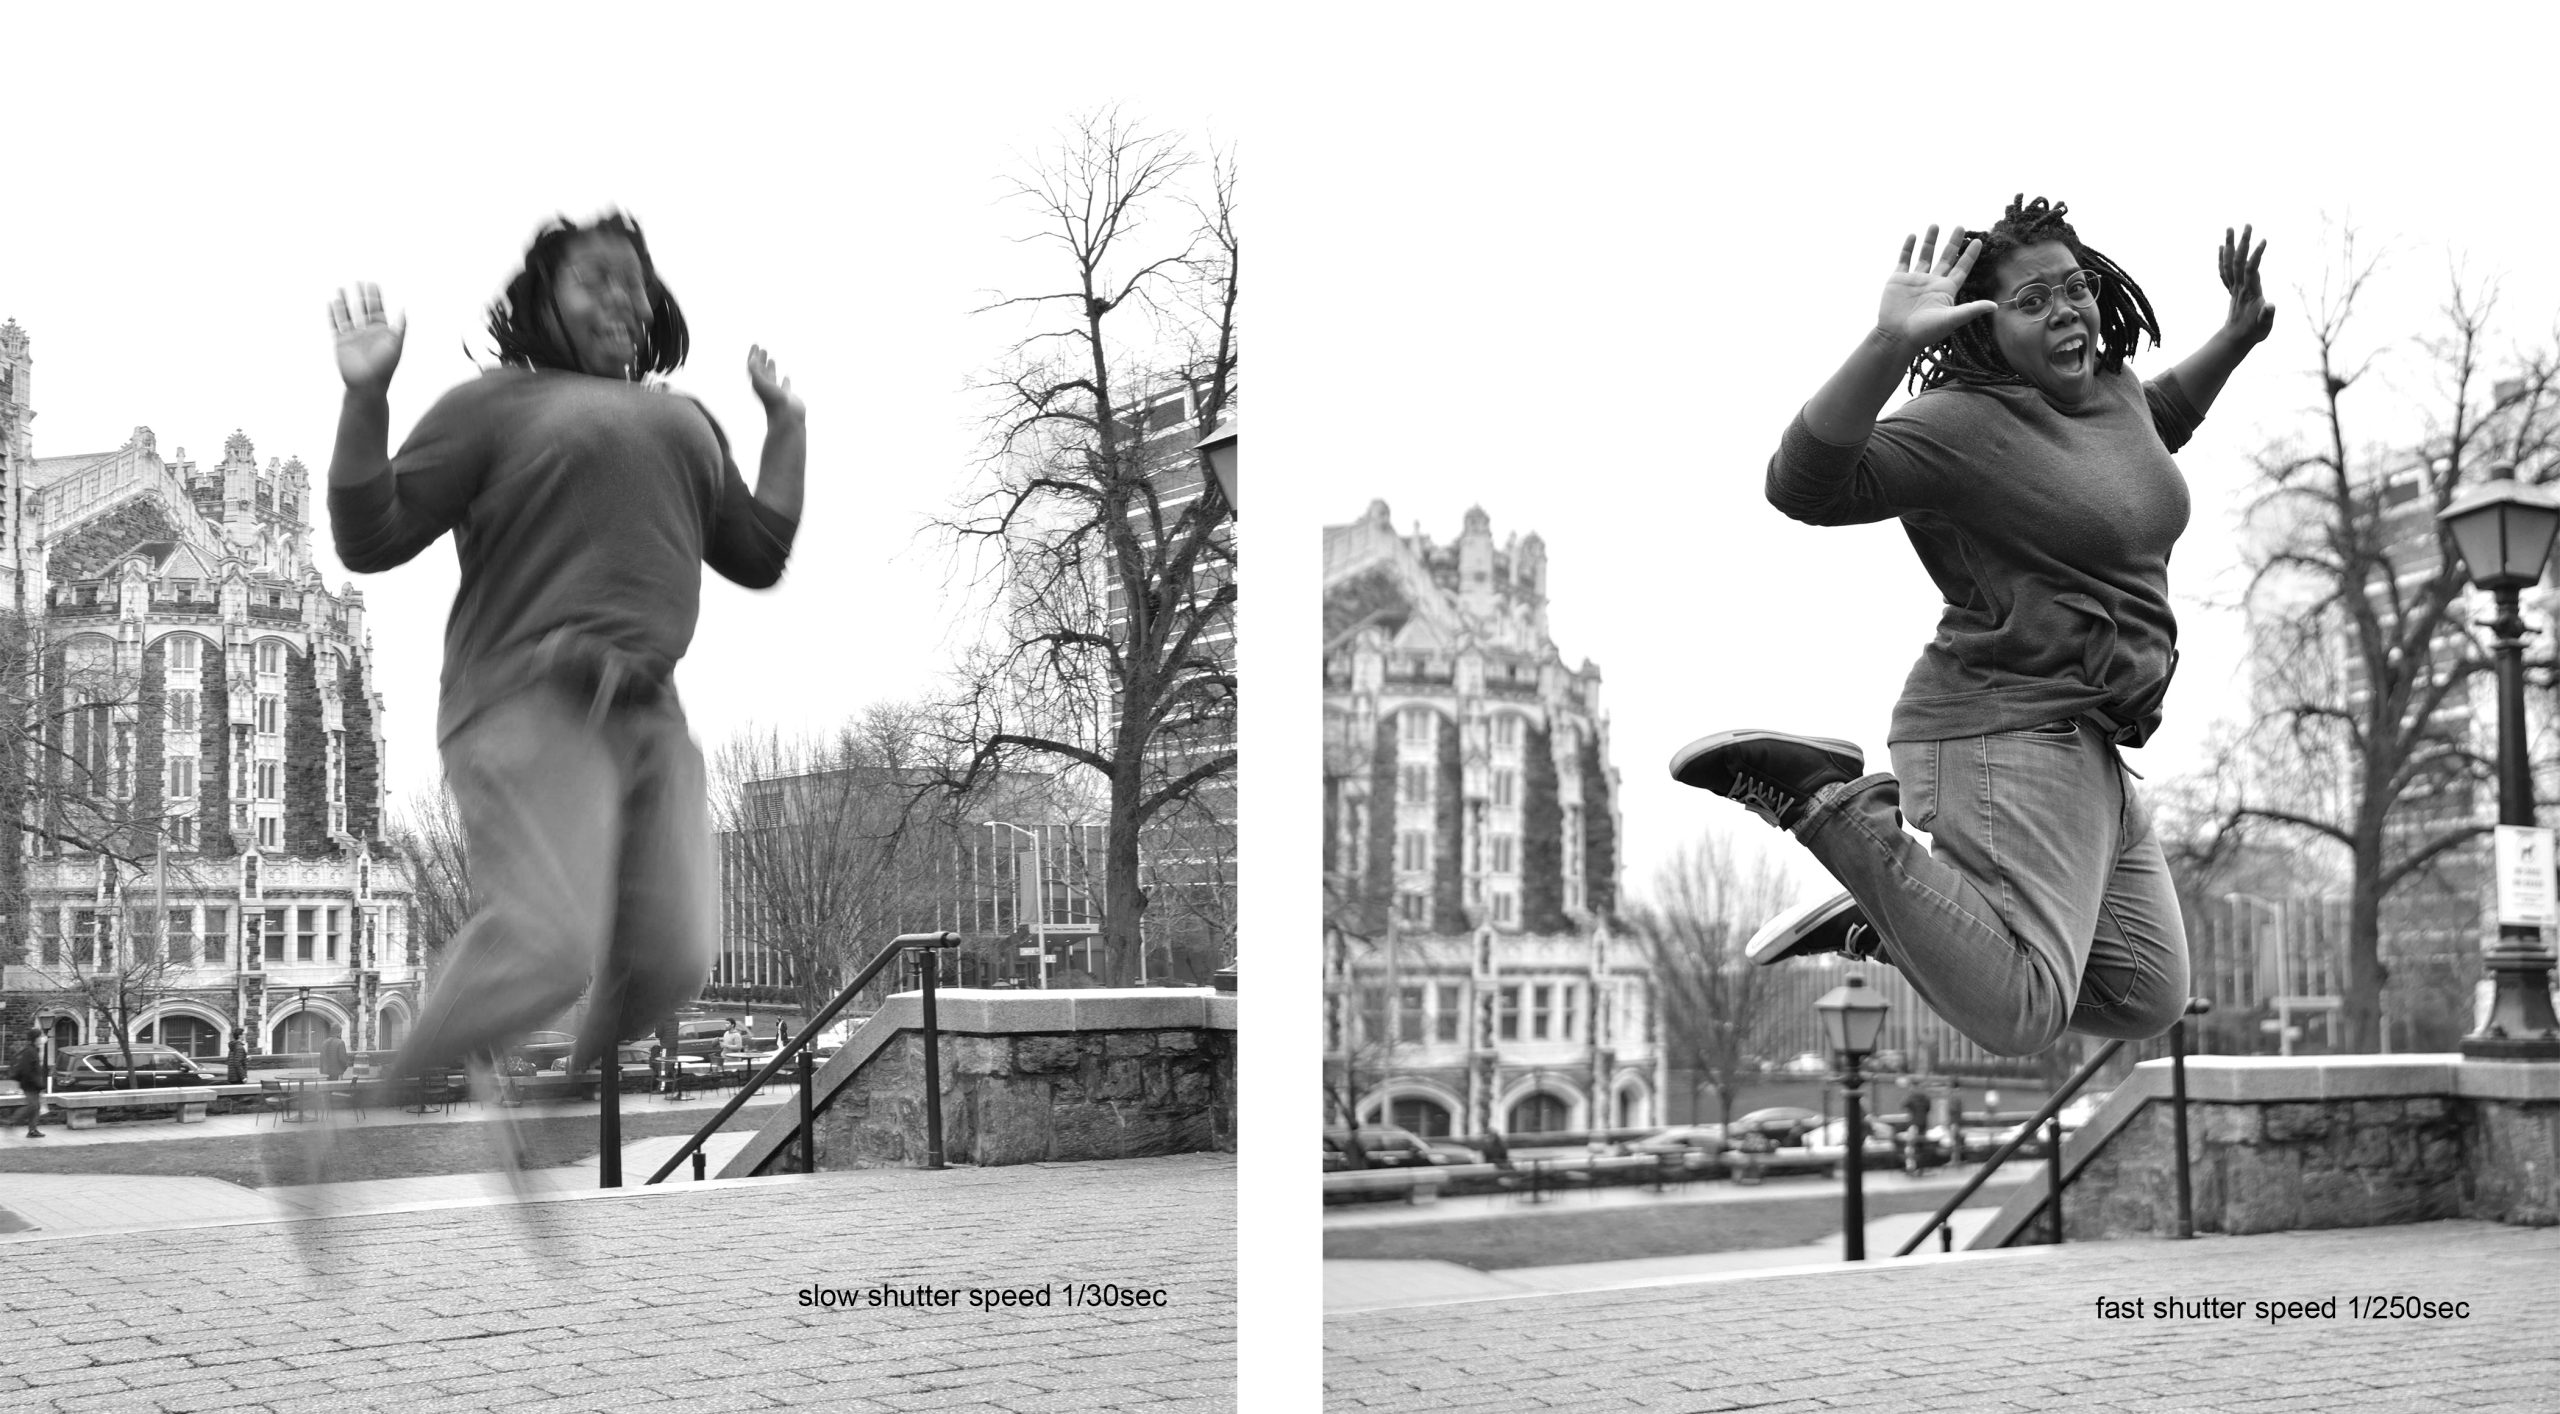
More than controlling how long light is allowed to enter your camera, the shutter speed can capture movement in two different ways.
A slow shutter speed like 1/30 may cause a moving object to appear as a blur in your picture, whereas a fast shutter speed like 1/250 can freeze the action.
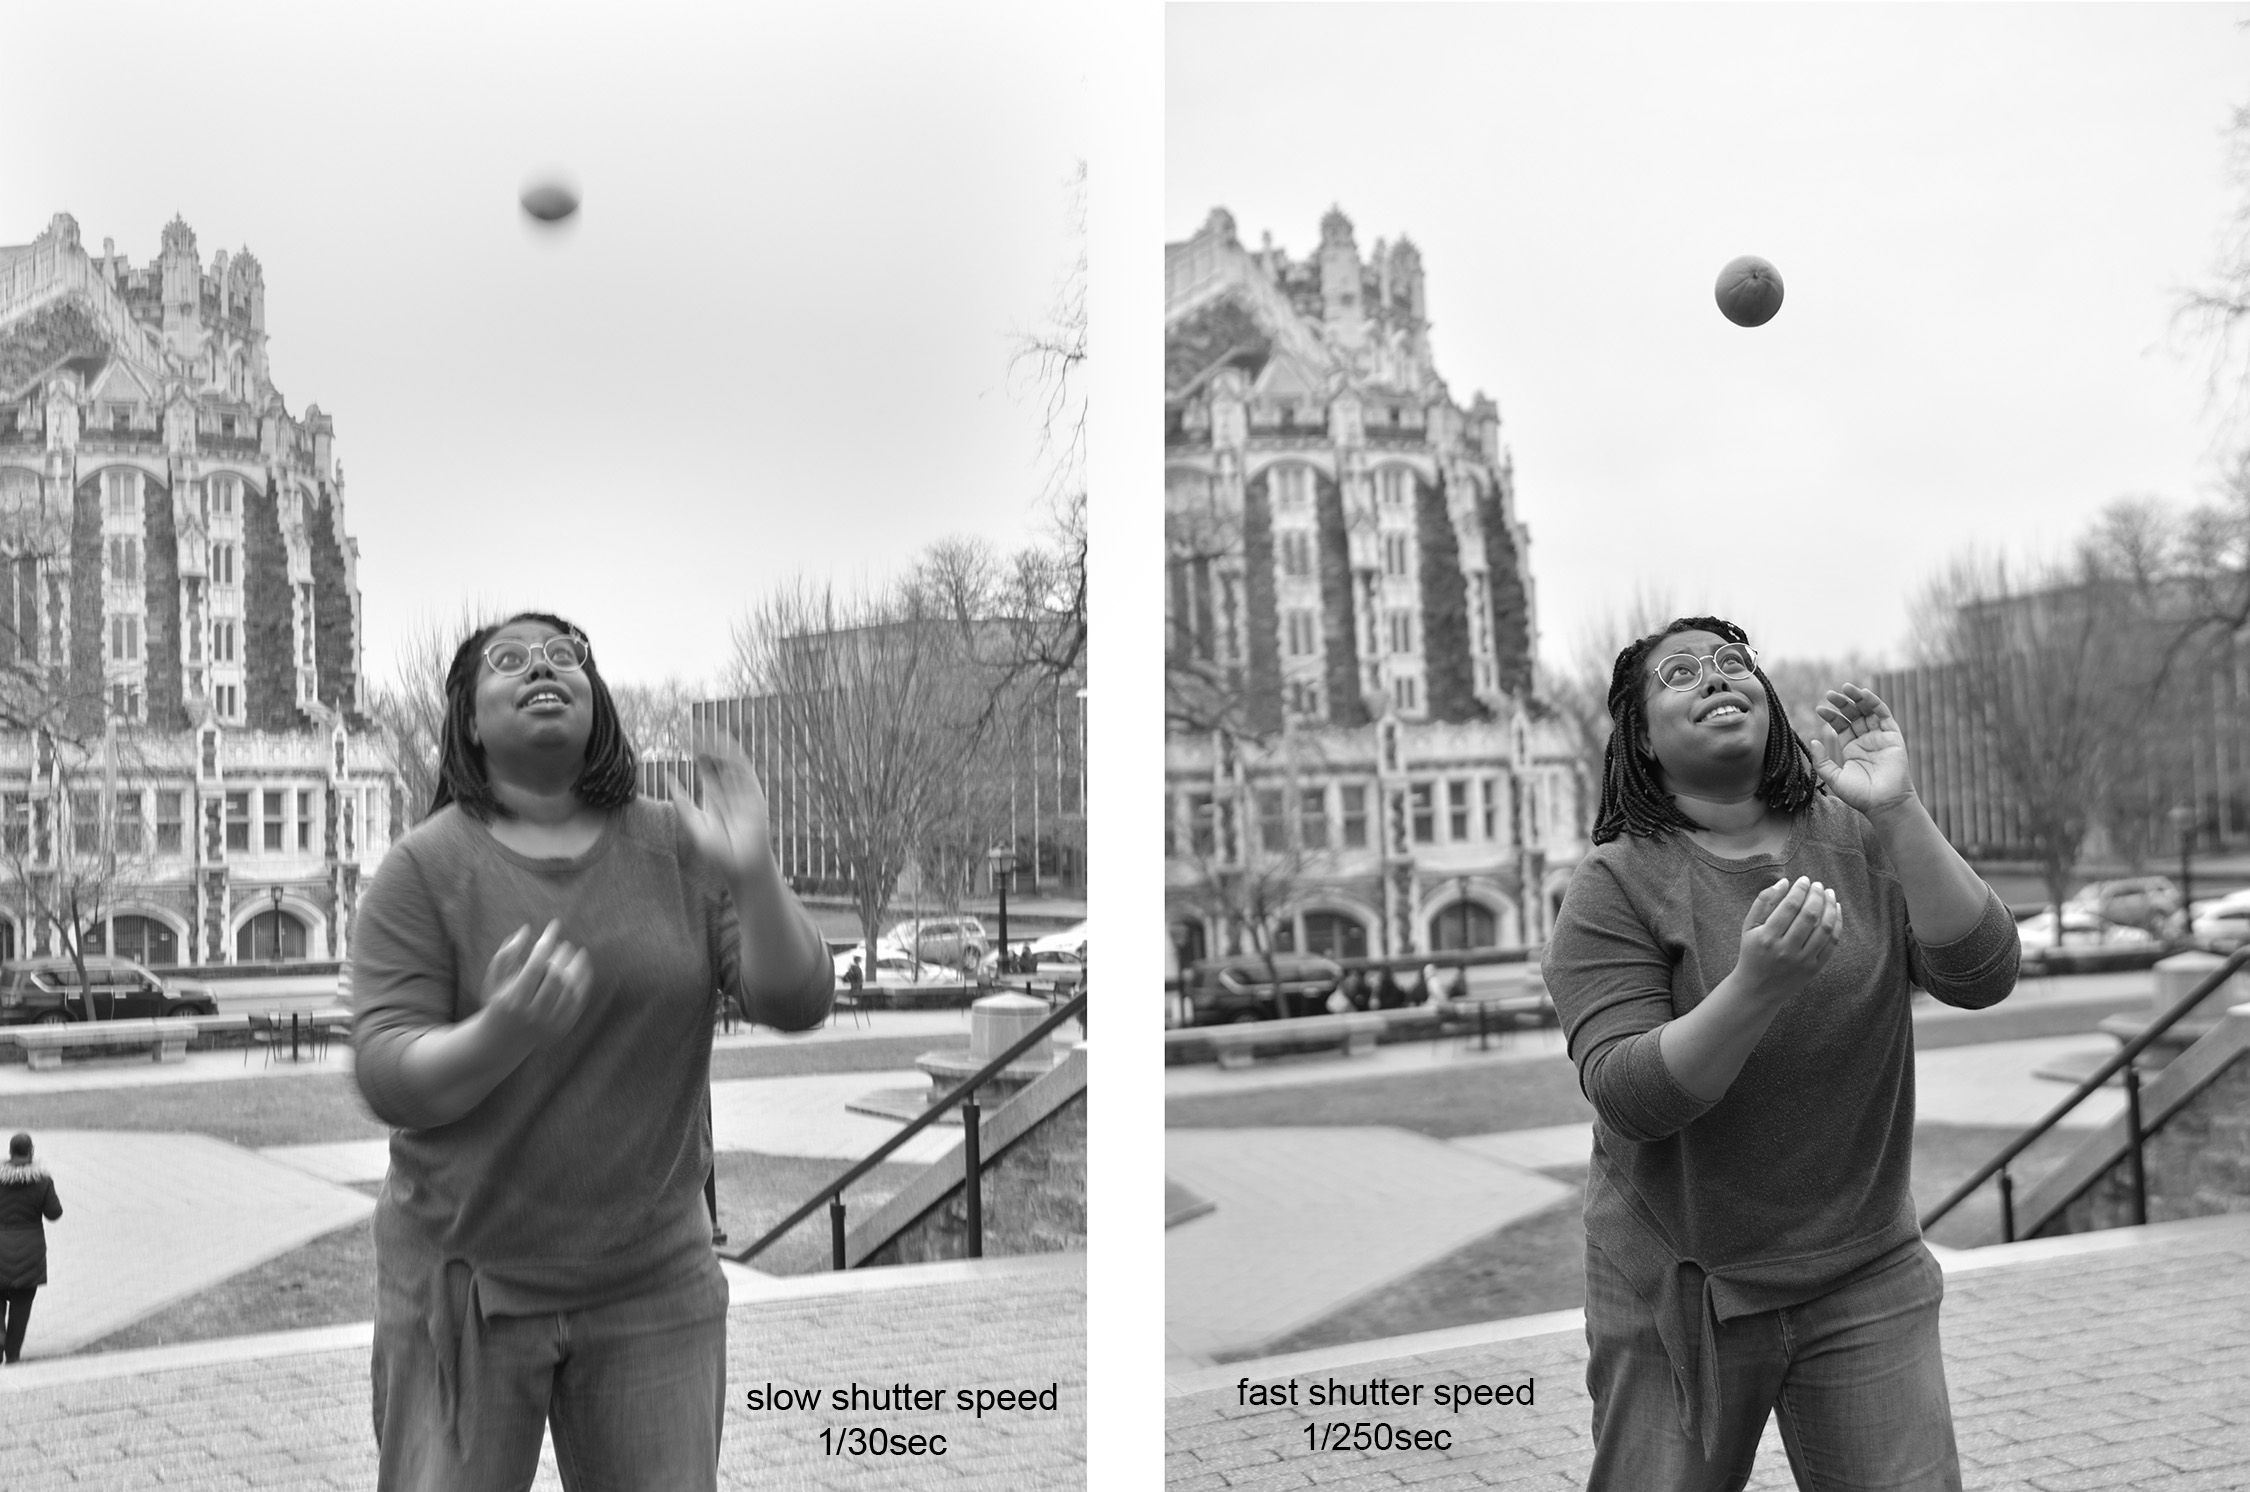
CAUTION: if you are shooting on a slow shutter speed, even 1/30 your camera may shake, which will cause the entire picture to be slightly blurry. Most people can not hand-hold a camera steady at speeds slower than 1/60. Slow shutter speeds require a tripod or placing the camera on a table or something that does not breathe.
We will put this all together for you when we discuss the Exposure Triangle.

Do you see a pattern between F stops and shutter speeds?
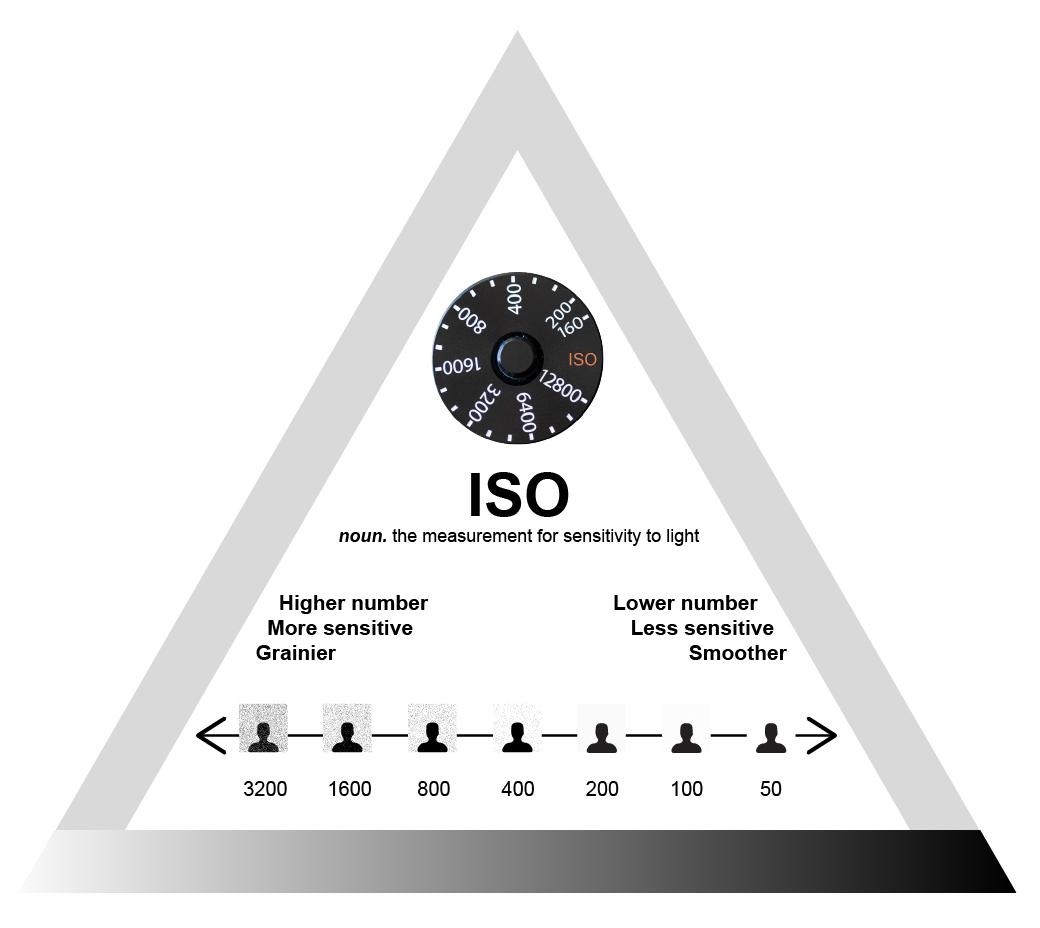
Film speed ISO
ISO measures the film’s sensitivity to light. All film has a designated ISO or ASA number that tells you how sensitive it is to light. The higher the number, the more sensitive to light and the less light it needs to record an image.
For example, in bright conditions like sunny days on the beach, sensitivity is less important, you could use ISO 100.
In average light situations, like on cloudy or overcast days, you can use a film with a medium ISO number, like 400.
A good choice of film, for normal lighting situations, is ISO 400. This is the best film to start with.
When you need to make the most of the available light, like in low light or indoors, you may prefer to use a film with a high ISO number like 1600.
Like apertures and shutter speeds, ISO numbers double or halve the amount of light needed to make a correct exposure.
The bigger the number the less light the film needs. This illustration will help.
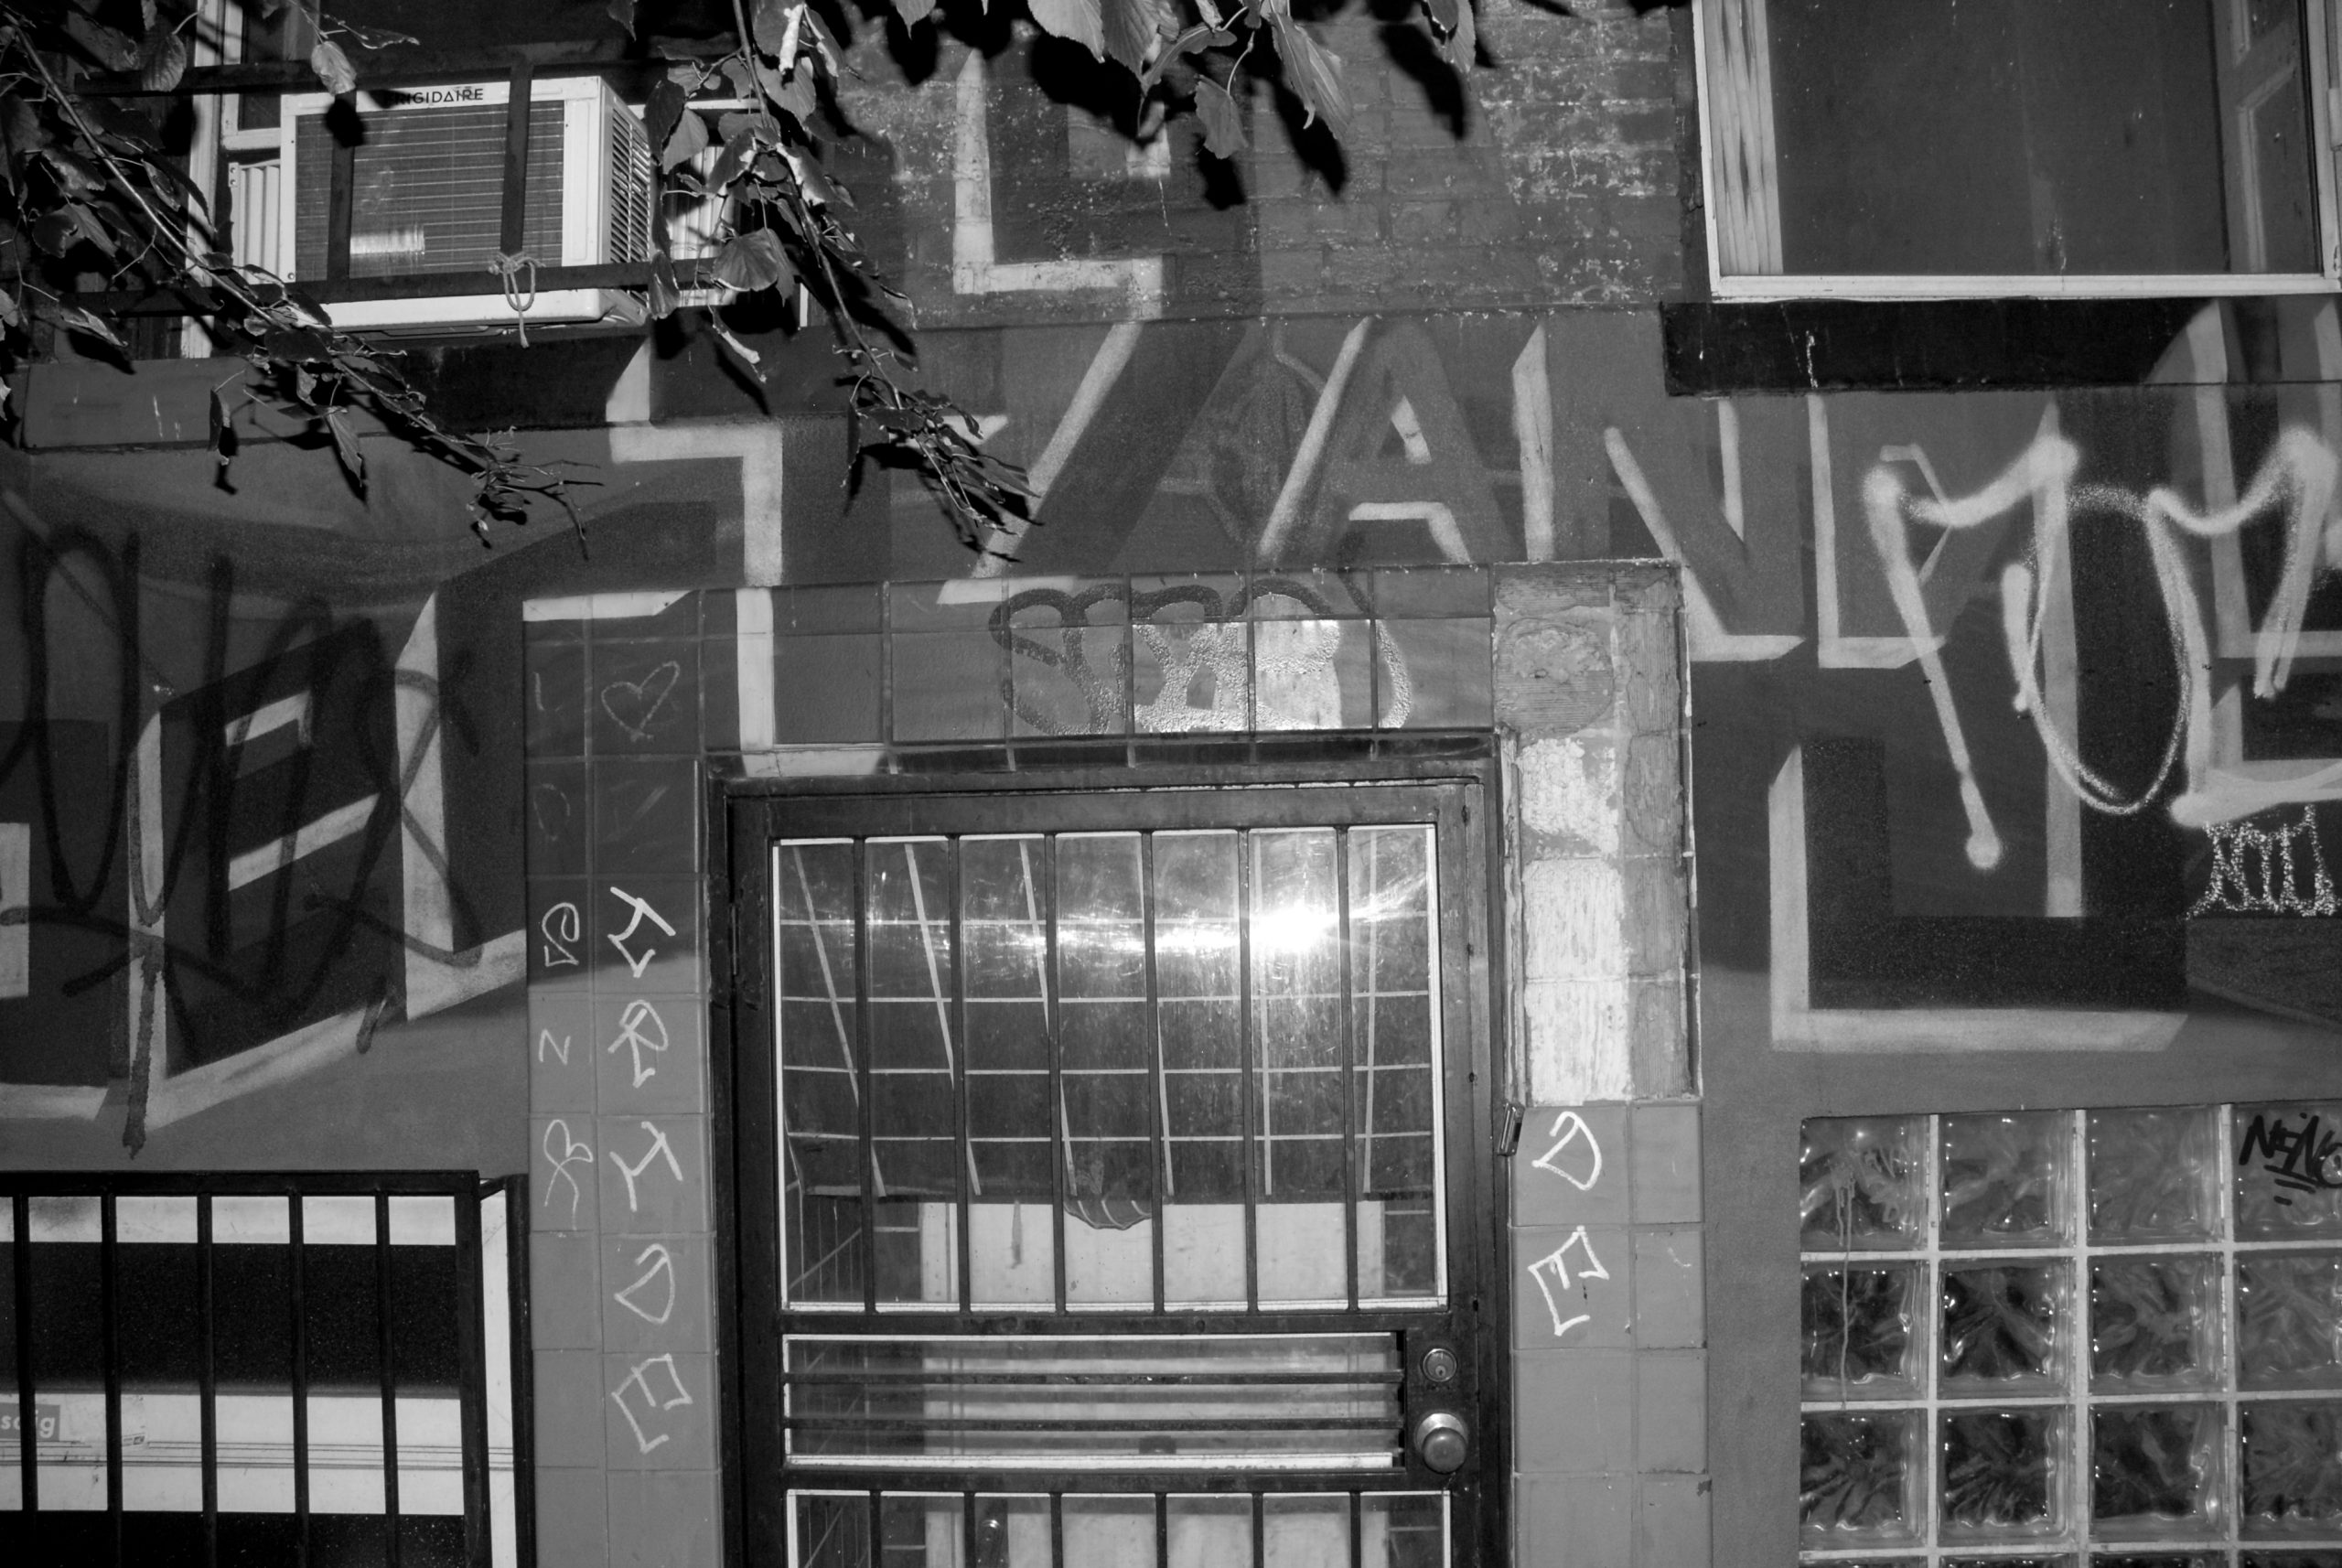
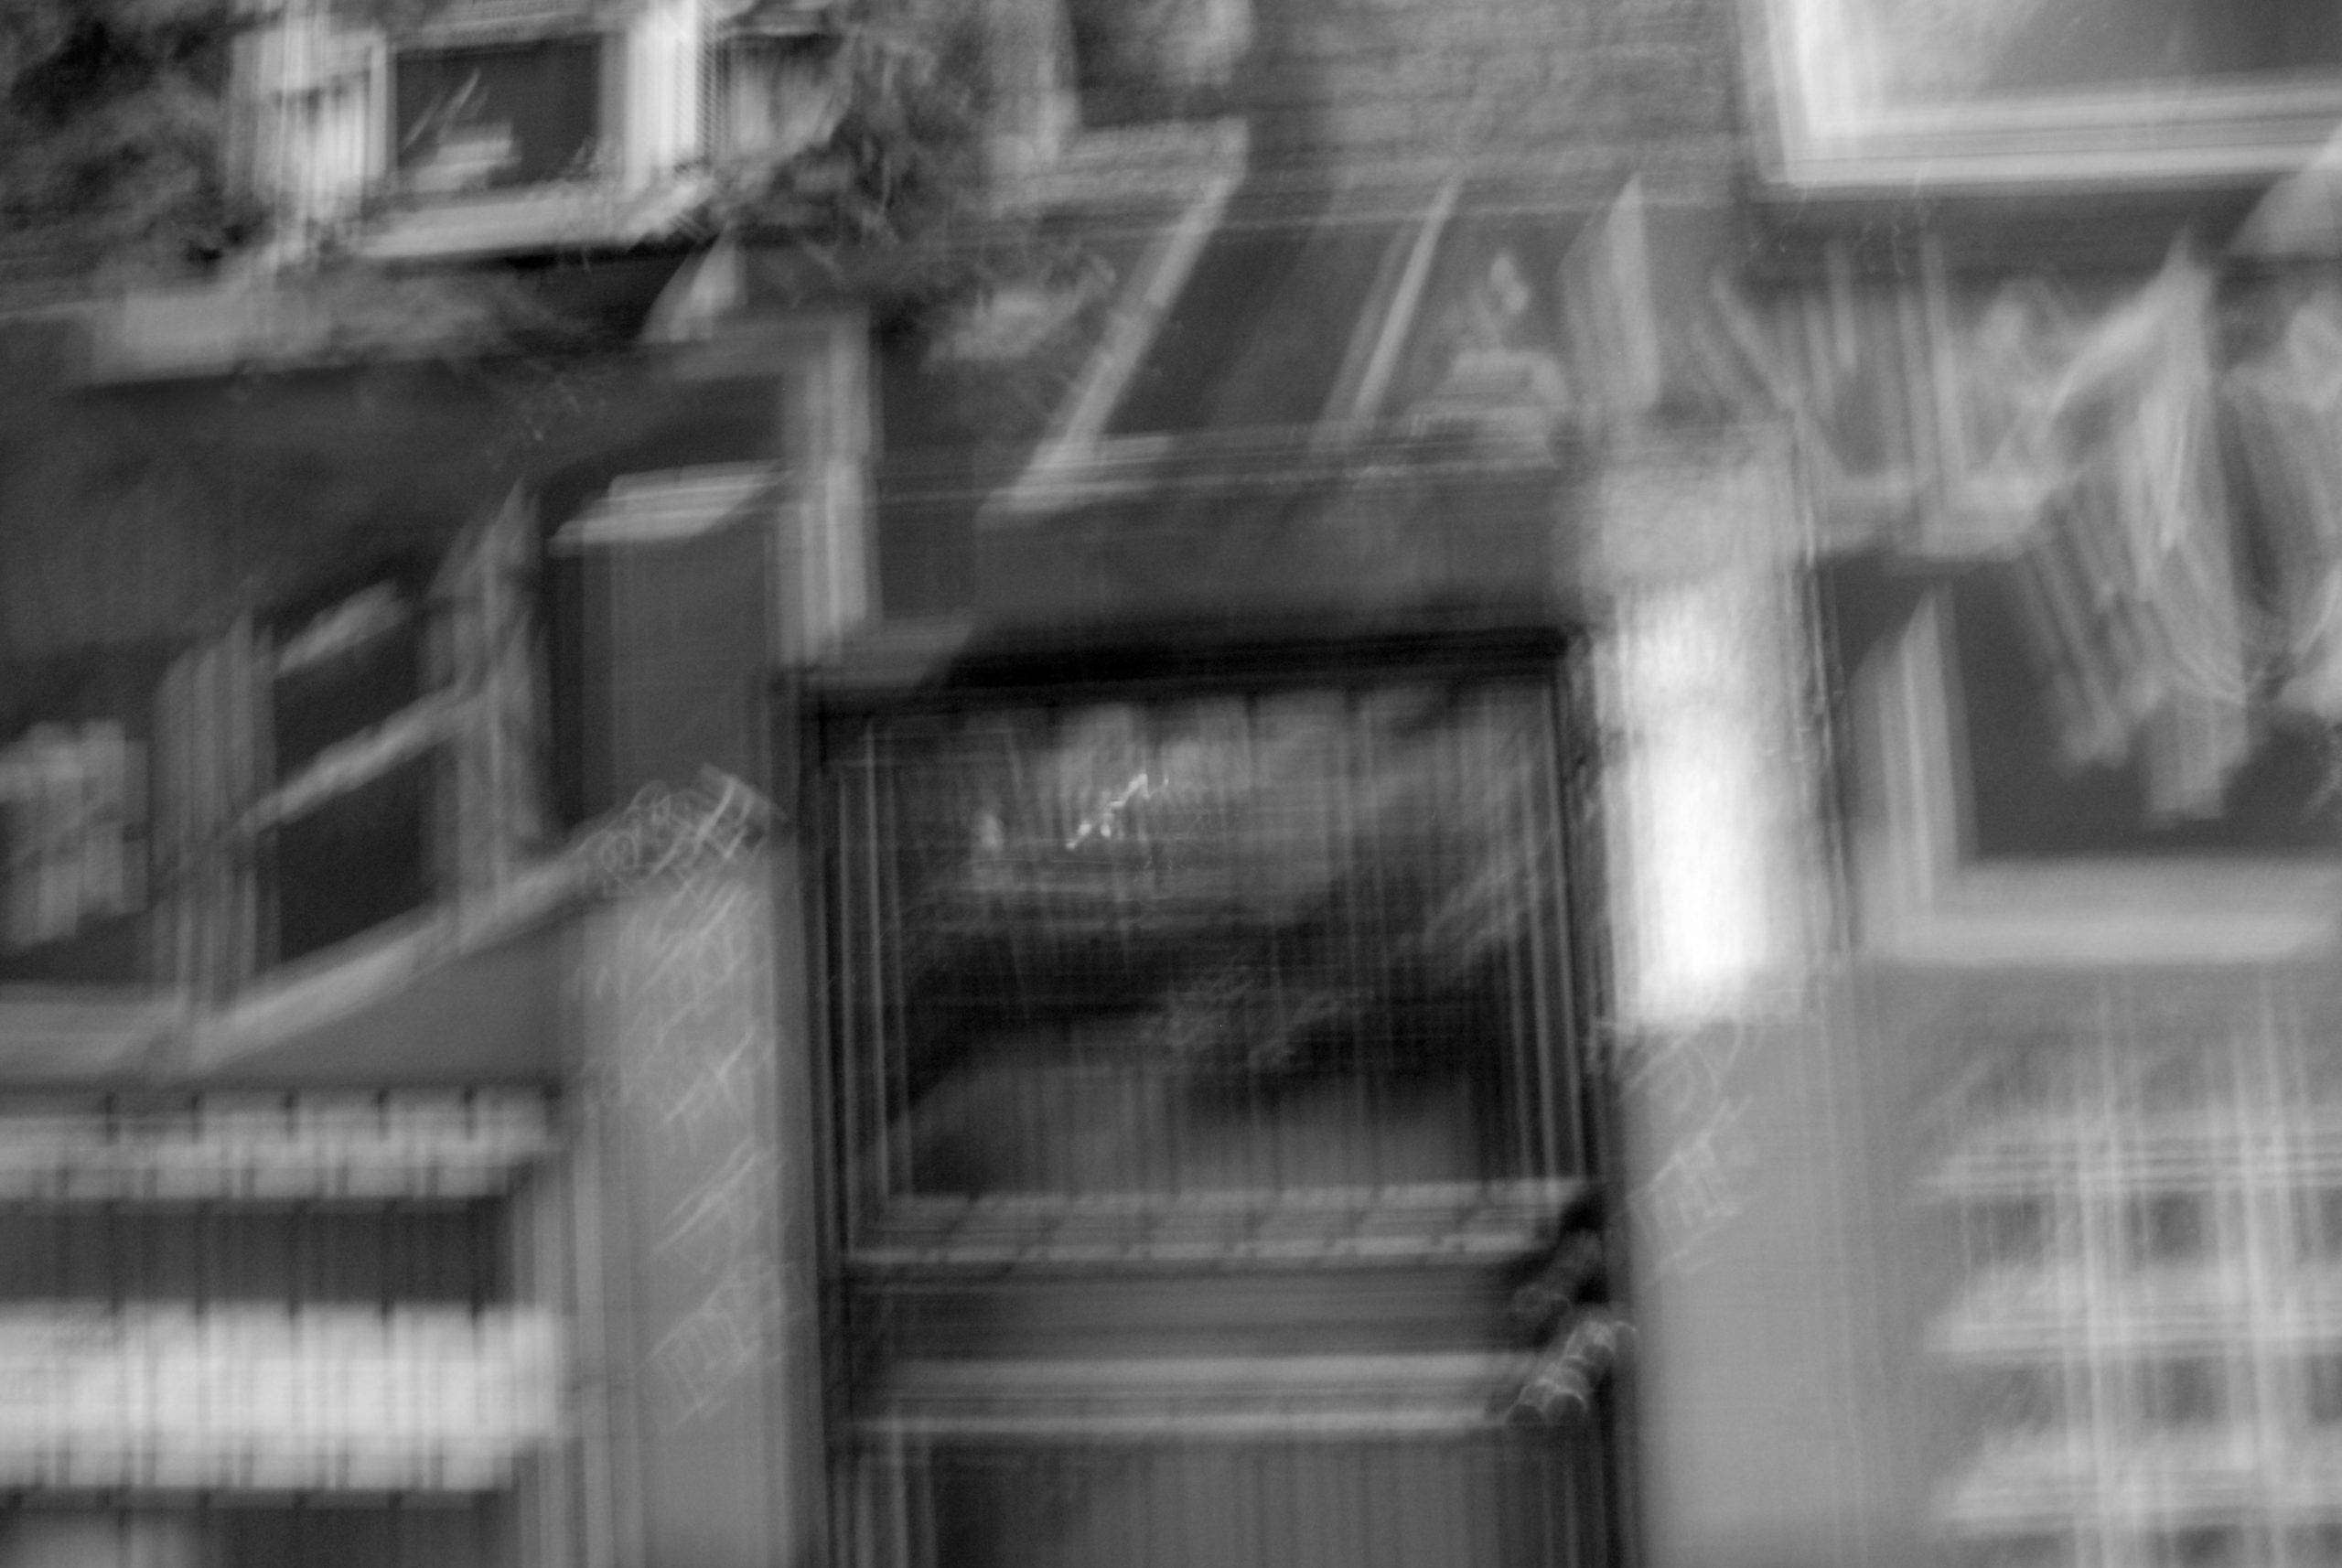
ISO affects Grain
The higher the ISO the more grain the image will have.

DID YOU KNOW
Currently, more photos are taken in a day than in the entire first hundred years of photography.
Putting it all together
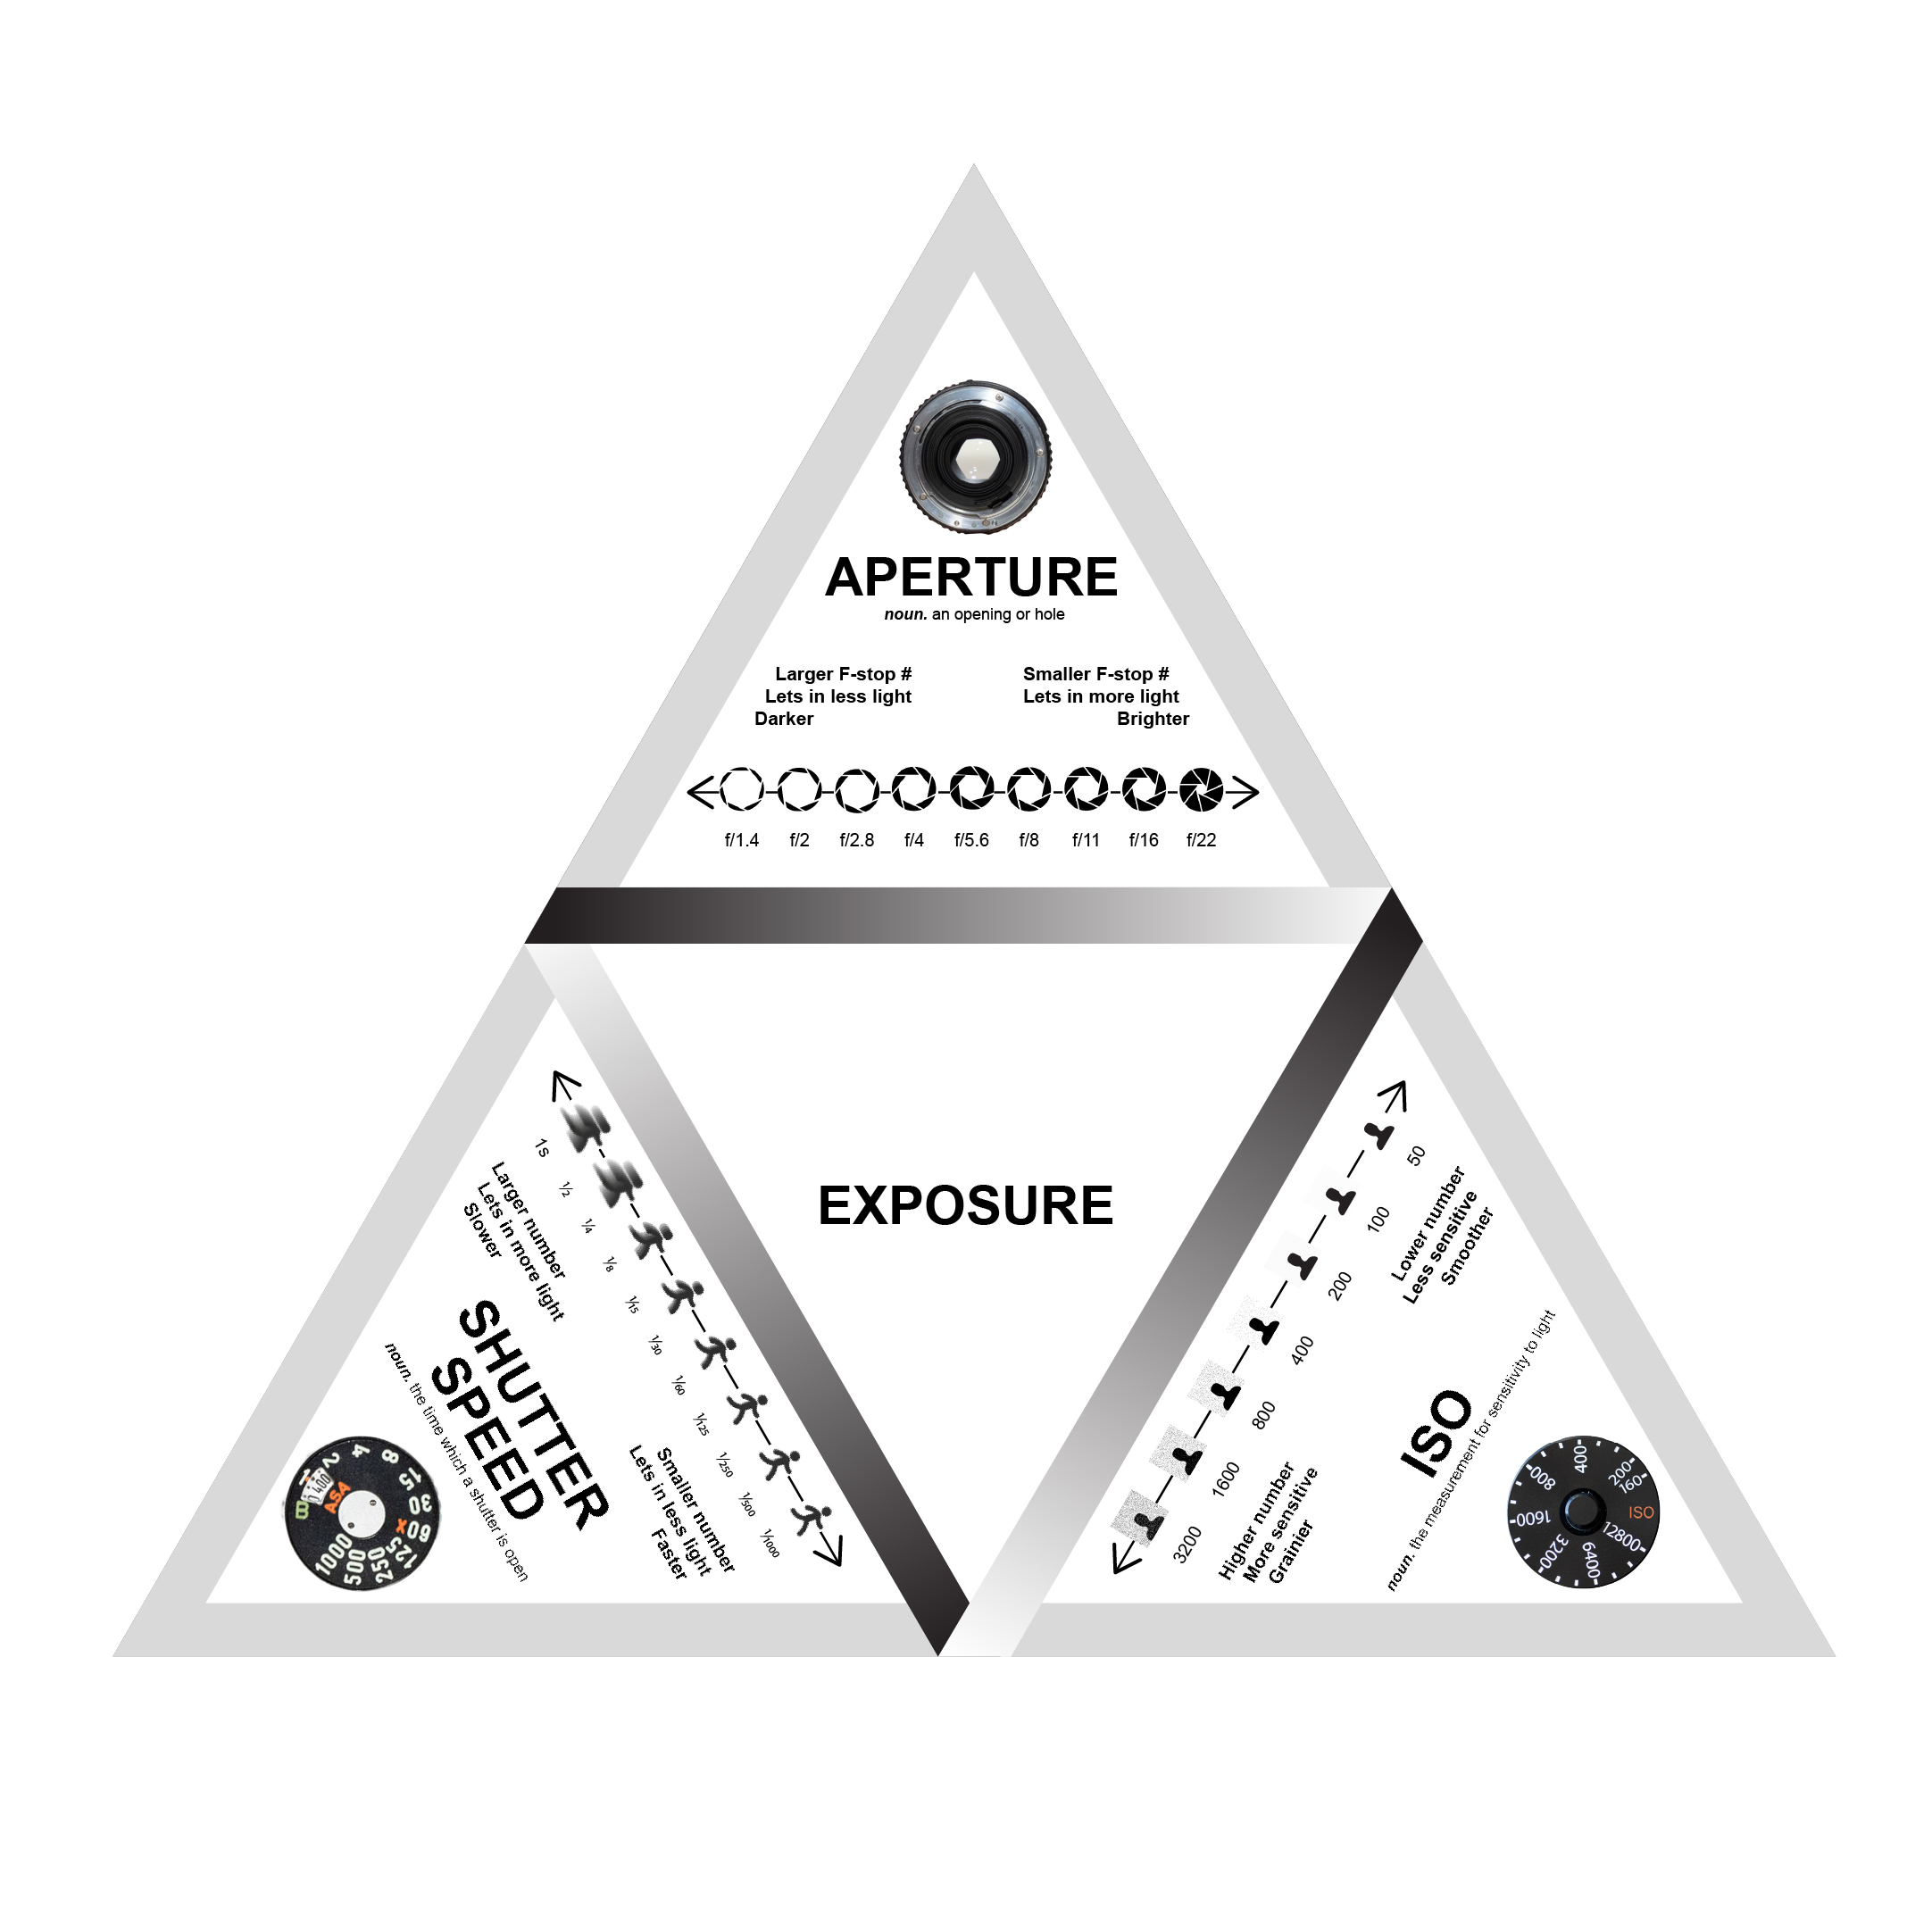
Exposure triangle
The Exposure Triangle is a convenient way to learn and remember how aperture and shutter speeds affect the image.
Here’s what you have to know:
- A Stop in photography is a unit of light.
- Aperture settings, Shutter speeds, and ISO all measure light by stops.
- Light is measured by an instrument called a light meter. See the chapter on light meters.
- A light meter will give you the correct combination of F stop and shutter speed to get a good exposure, but it may not be the combination you want for the visual effect you are after.
- For example, suppose you want to stop the action of a person jumping in mid-air, your light meter suggests F16 at 1/60. However, if you shoot it that way, the exposure will be correct but the person will be blurred. You need a faster shutter speed, like 1/500.
CAUTION: By making the shutter speed faster, you are subtracting stops of light. You have to add those stops back by opening up the aperture with the same amount of stops that you subtracted from the shutter speed.
The Exposure Triangle will help you figure this out. Here’s an example that will help you understand.
- Take a look at the shutter speed Triangle, how many stops are between 1/60 and 1/500?
- Answer: Three (3)
- Were you adding or subtracting three stops of light?
- Answer: subtracting
- Look at the aperture triangle, you need to add that light back. Choose a setting that allows three more stops of light into the camera. What f stop will you use?
- Answer: F 5.6
A different example would be if you are photographing one person and you want to include the environment without distracting the attention from the person. In this situation, you can choose a small F stop number, such as F 2.8, and focus on the person creating a shallow depth of field. However, if you want the subject and the environment in sharp focus you can choose a large F stop number like F 16, for a greater depth of field.
Now that you understand the light meter is only making a suggestion, you can choose to change the F stop to 2.8. Don’t forget you have to adjust the shutter speed to compensate for this choice.
- Take a look at the aperture triangle, how many stops are between F 11 and F 2.8.
- Answer: four (4)
- Were you adding light or subtracting light?
- Answer: adding
- Look at the shutter speed triangle. Subtract four stops from 1/60. what is that shutter speed?
- Answer: 1/1000
It’s not as complicated as it sounds, because the light meter will do all the math for you.
If shutter speed is your priority, then set the shutter speed to what you want it to be and the light meter will figure out the correct aperture setting.
If aperture is your priority, then set the aperture to what you want it to be and the light meter will figure out the correct shutter speed setting.
But what if you don’t have a light meter? Don’t worry, We have a chapter that will guide you through working without a light meter. Check it out, it’s called The light meter doesn’t work. Now what?
Print this cheat sheet out. We think you will find it a helpful tool to have in your camera bag.
Aperture Shutter Speed Cheat Sheet
ACTIVITY

Activity
Dense, dark negative. An overexposed negative has low contrast, overall high density, is too dark in the shadows, and too dense in the highlights
A photograph or print appearing darker than the actual scene. Lacks shadow details and highlights are grey
Grayscale is a range of shades of gray. The darkest possible shade is black, and the lightest is white.
Correct exposure is the correct combination of settings between aperture, shutter speed, and ISO that produced a perfectly exposed image. An image that does not have blown-out highlights or lost shadow details.
Correct exposure results in a print and a negative that have details in the shadows and highlights of the image
Camera modes are settings that allow a photographer to control the parameters of an exposure, specifically, Shutter Speed, Aperture, and ISO
Depth of Field (DoF) refers to the distance between the closest and farthest objects that appears acceptably sharp in a photograph
The button you press to take a picture. When you press it the shutter stays open for the time the shutter speed is set.
The length of time the shutter(curtain) stays open during exposure. The photographer sets the desired time using the shutter speed dial
