16 Print processing (Printing the negative)
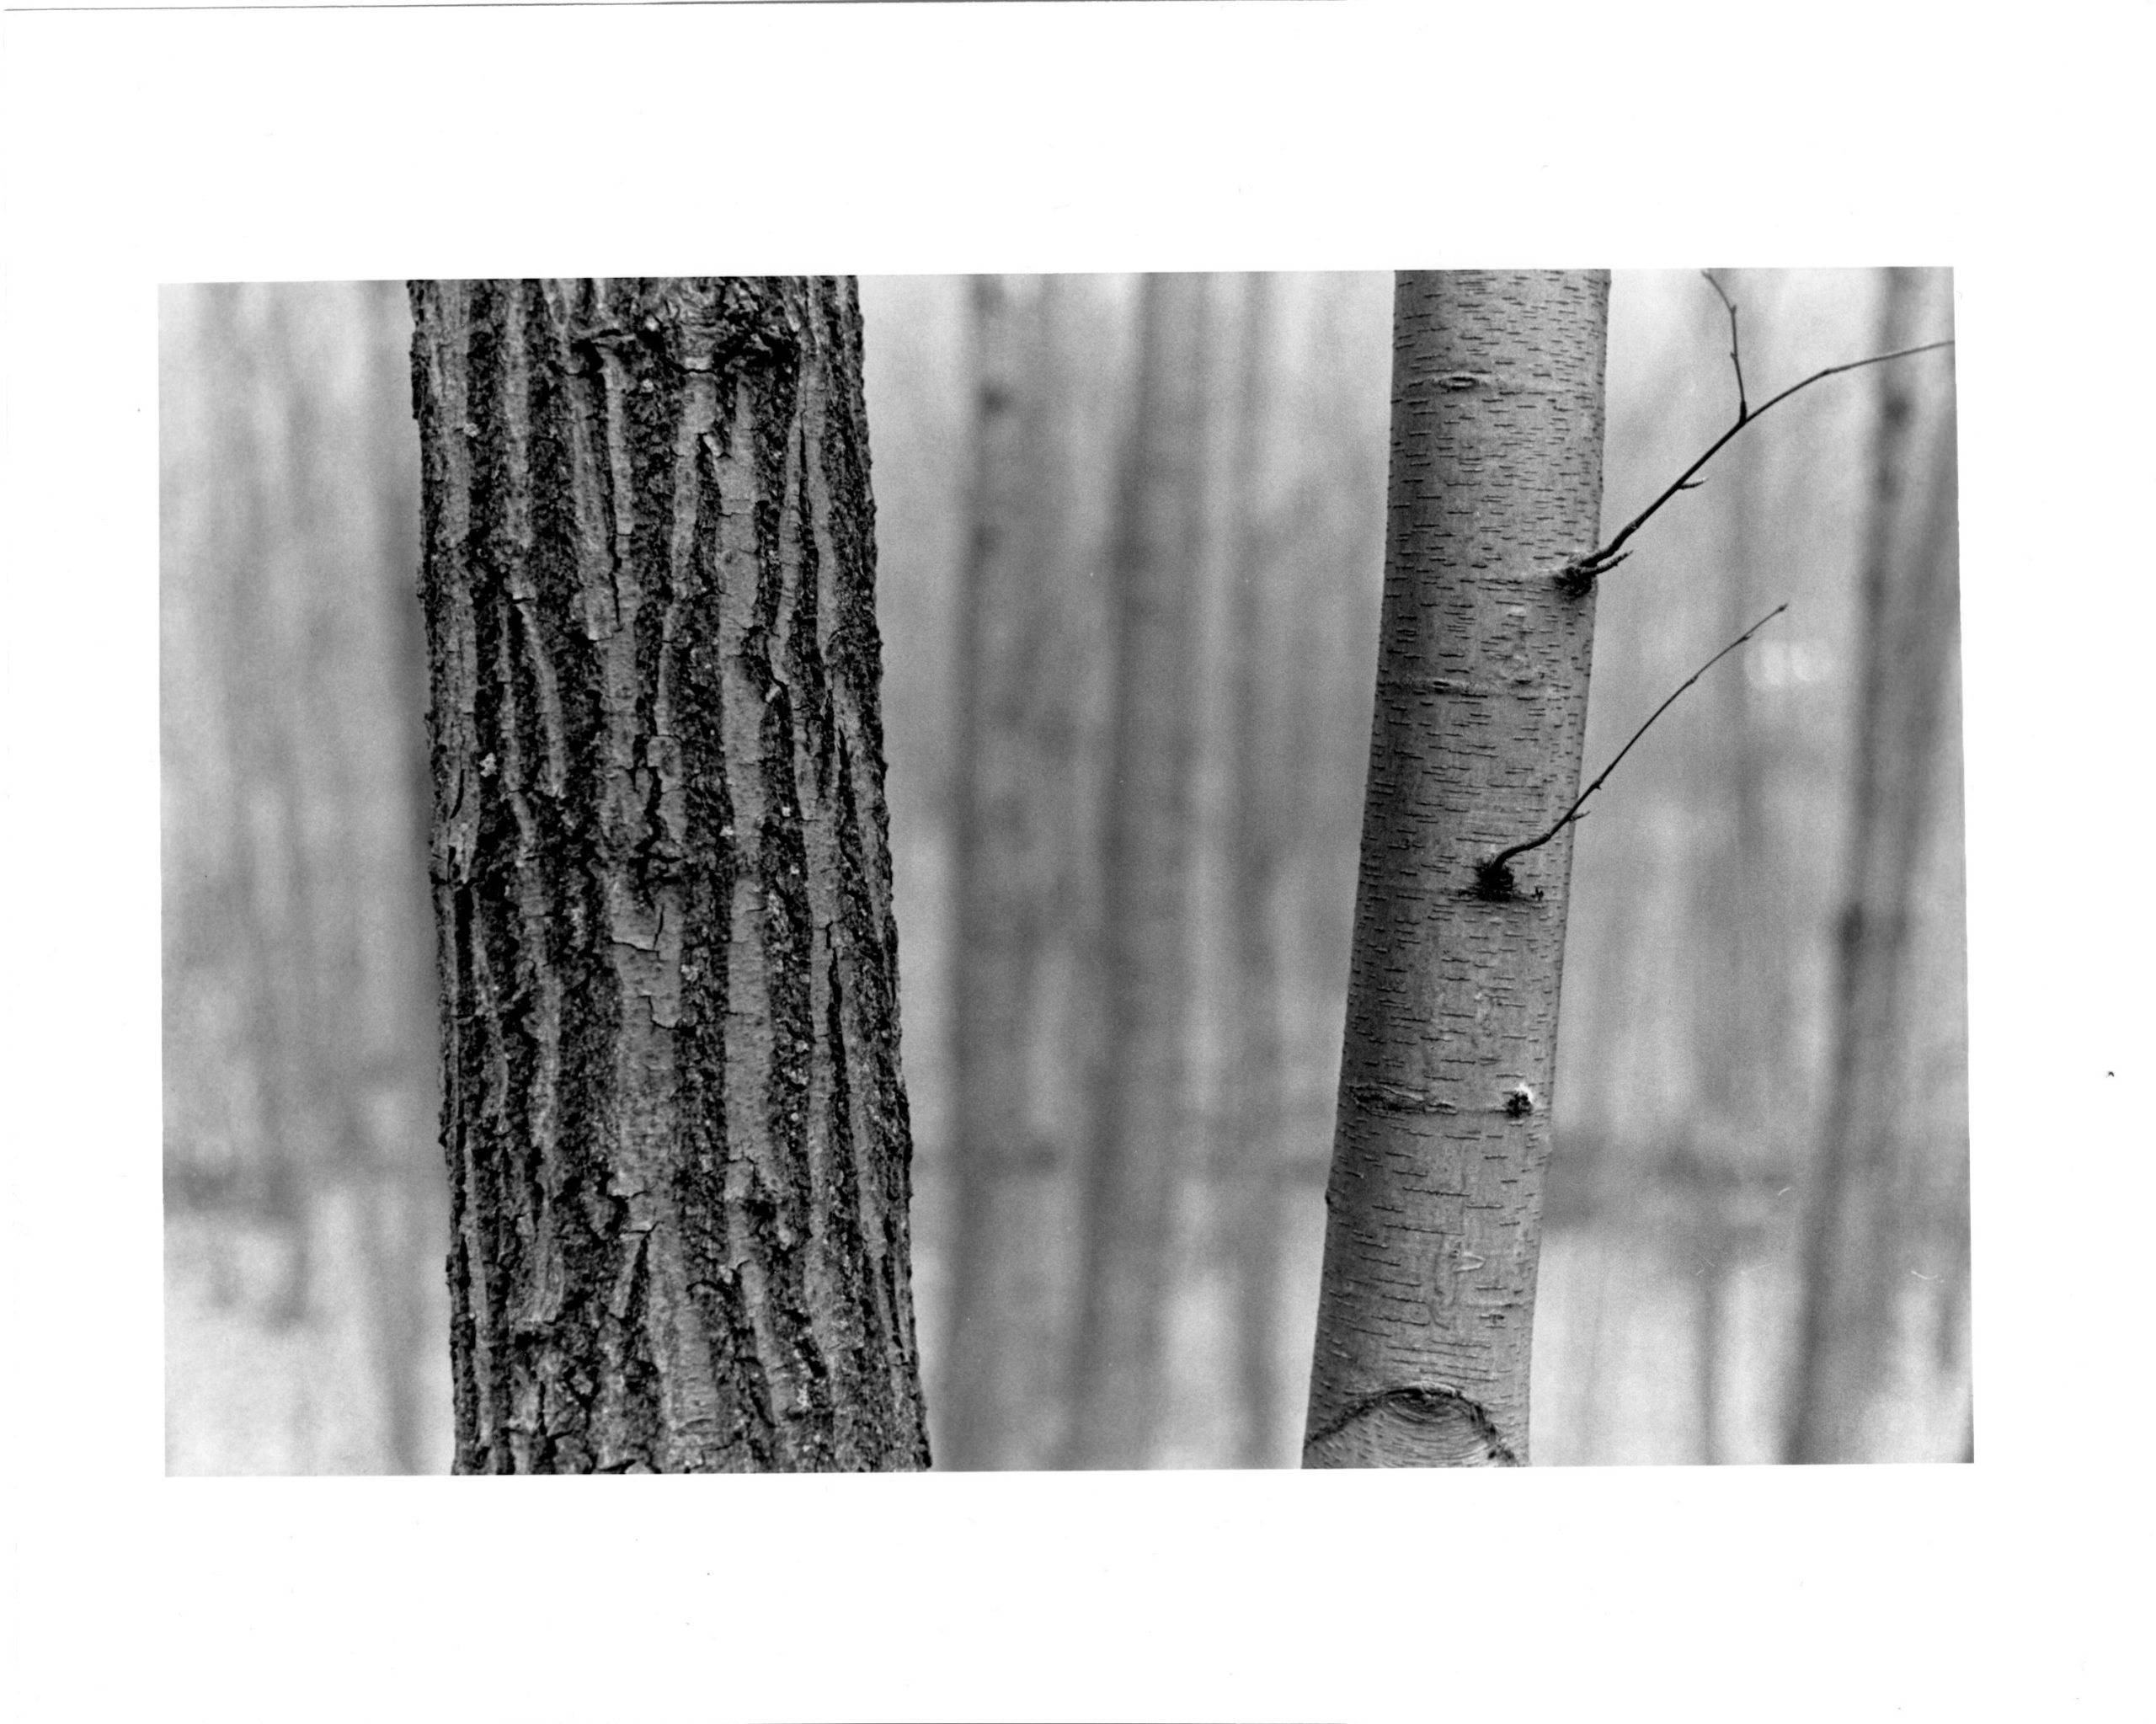
SNAPSHOT
Beginners guide to making a B&W RC print:
- The darkroom
- The enlarger
- The chemicals
- Setting the chemicals for proofing testing and printing
- Making a contact sheet or contact proof
- Making a test print
- Contrast control filters
- Making the final print
- What will you need
Darkroom – A room with a light-trapping door or equipped with a heavy curtain to trap light. It is also equipped with yellow or red safe lights which can be on during the printing session.
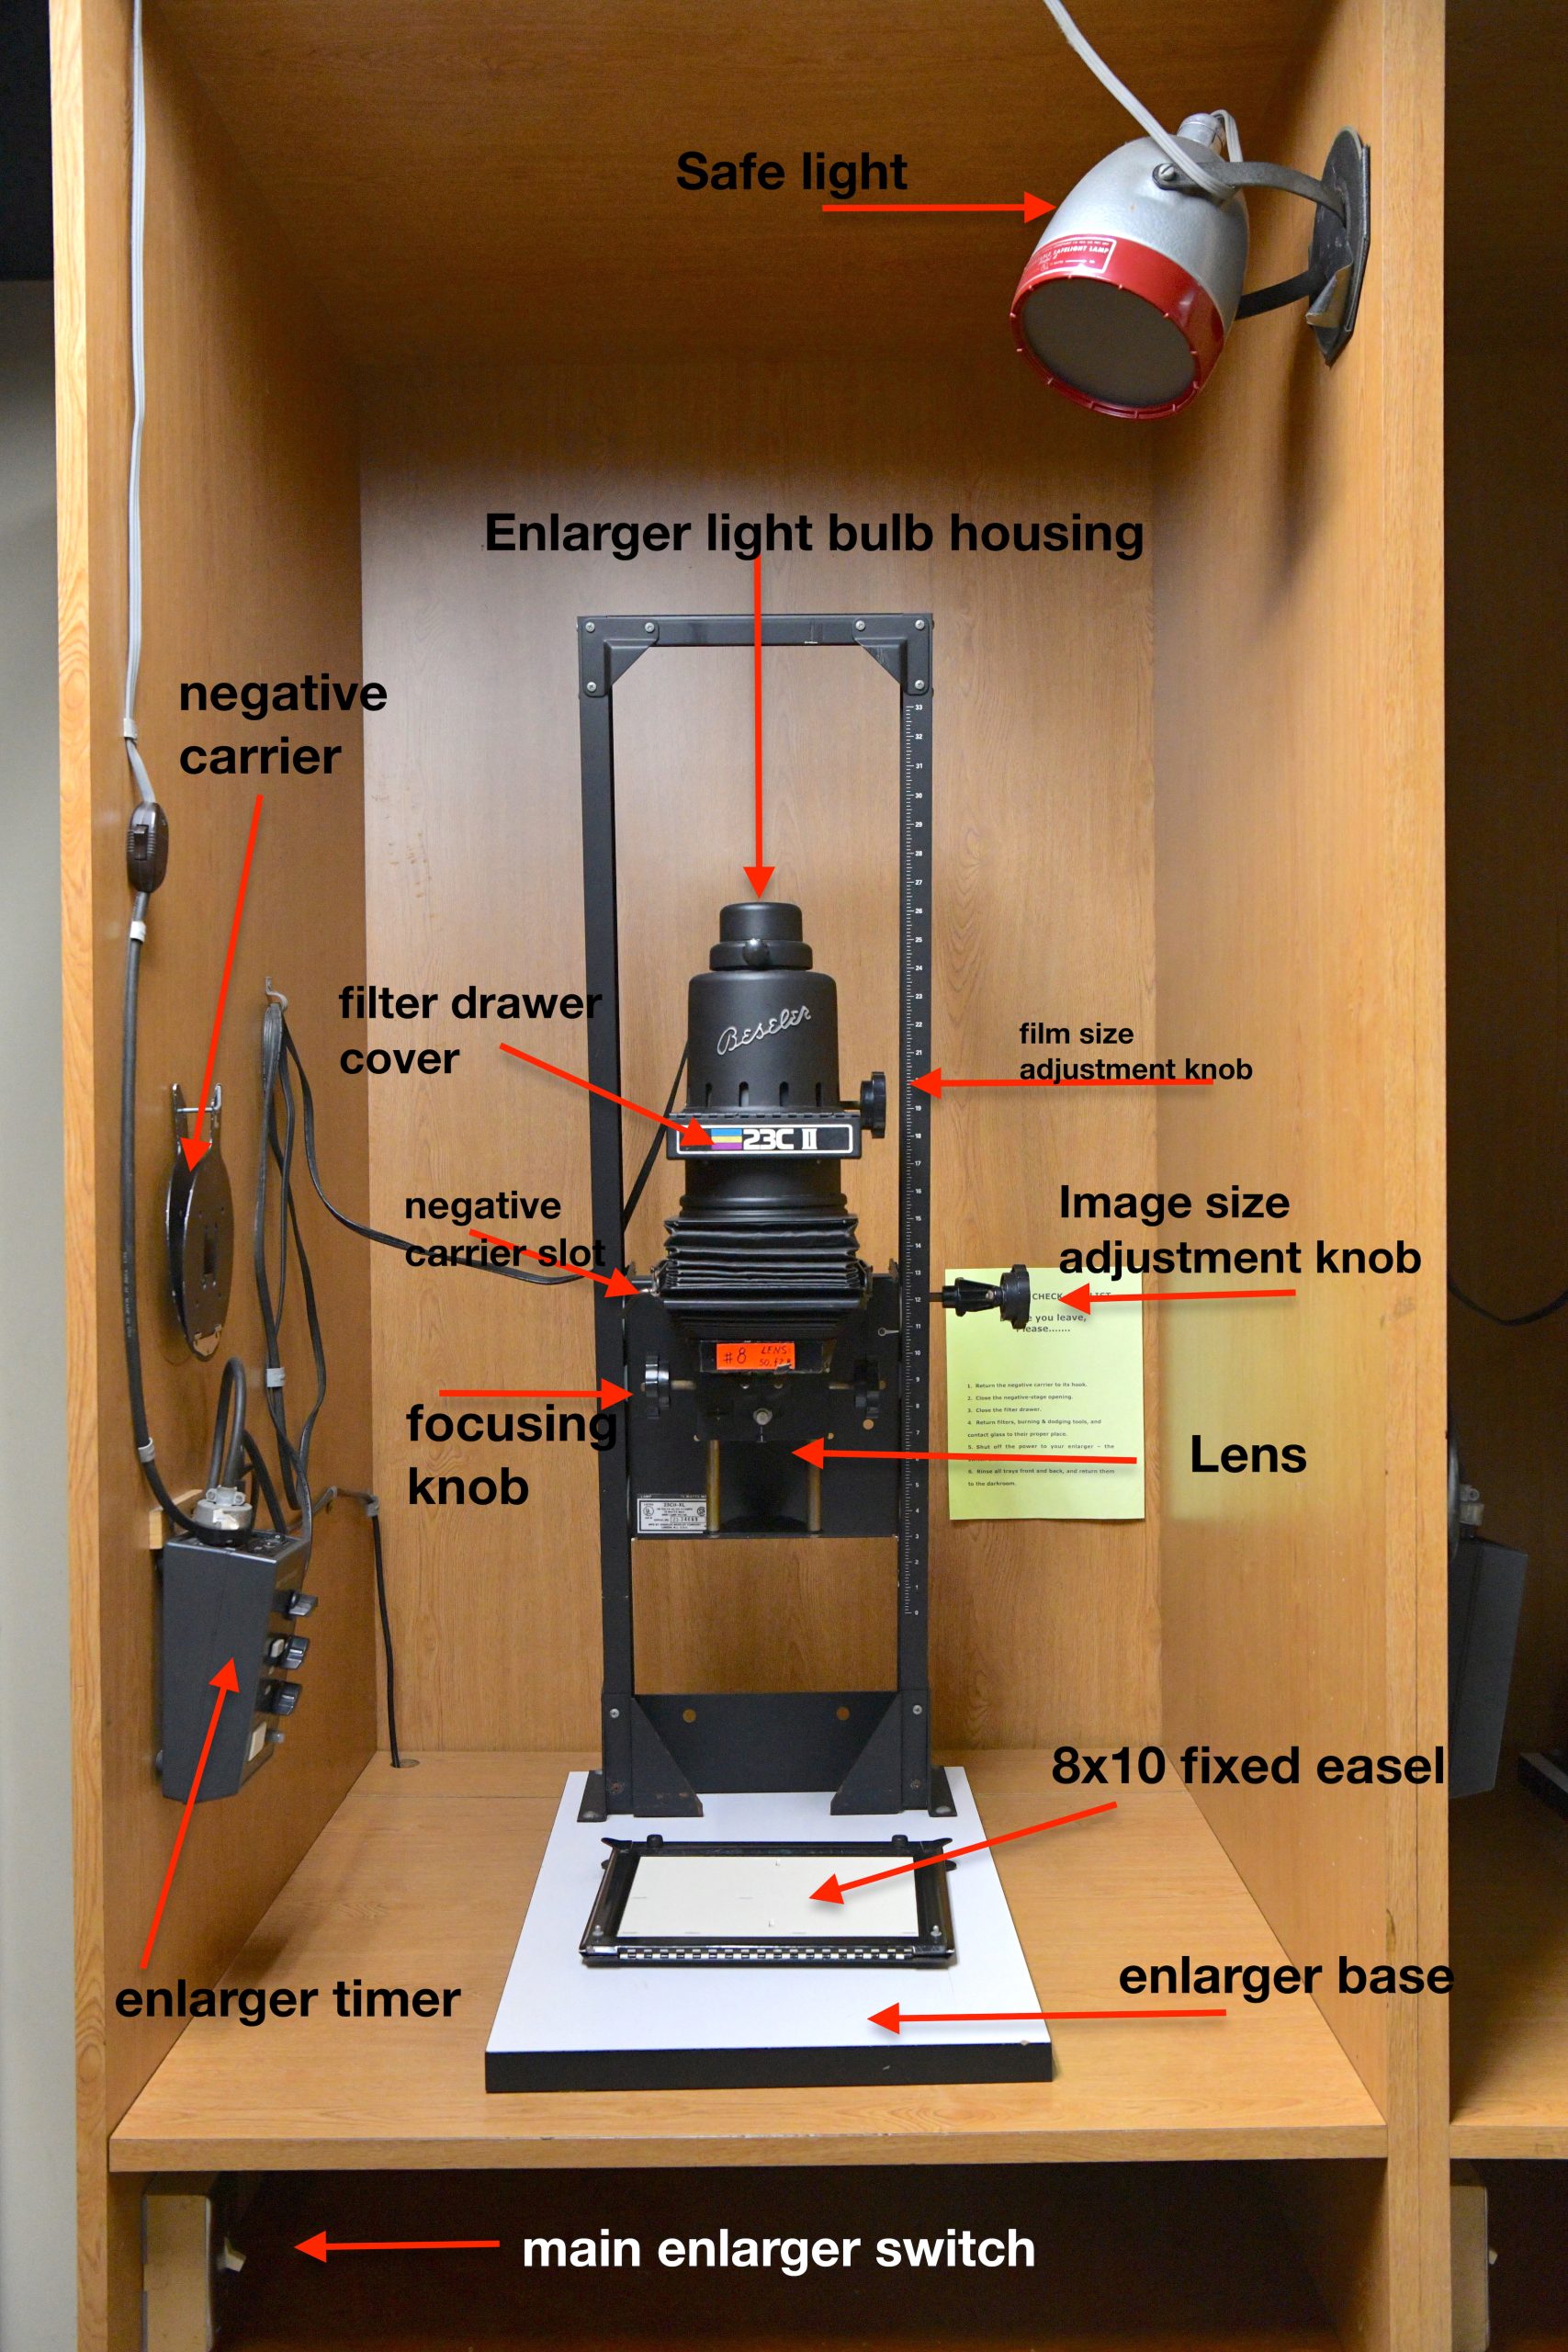
Enlarger – A machine which enables you to project the image onto a flat surface. It has a light source, two or more glass prisms, a bellows, a lens, a filter holder or drawer, and a negative carrier. The enlarger enlarges the image to the desired printing size and focuses it on the printing paper. The enlarger lens allows you to select the correct amount of light needed for proper printing exposure.
Timer – Will assist in setting the correct exposure time for the print
Easel – Will hold the printing paper in place and control the margins or the print
Safe light – Filtered light bulb to illuminate the darkroom without affecting the photo-sensitive paper
Grain focuser – A device assisting to ensure image sharpness (optional)
Contact proofer – A piece of glass or plexiglass to keep the negatives flat on the enlarger base and assist with making the contact proof or contact sheet
Sink and running water – The place to hold the trays
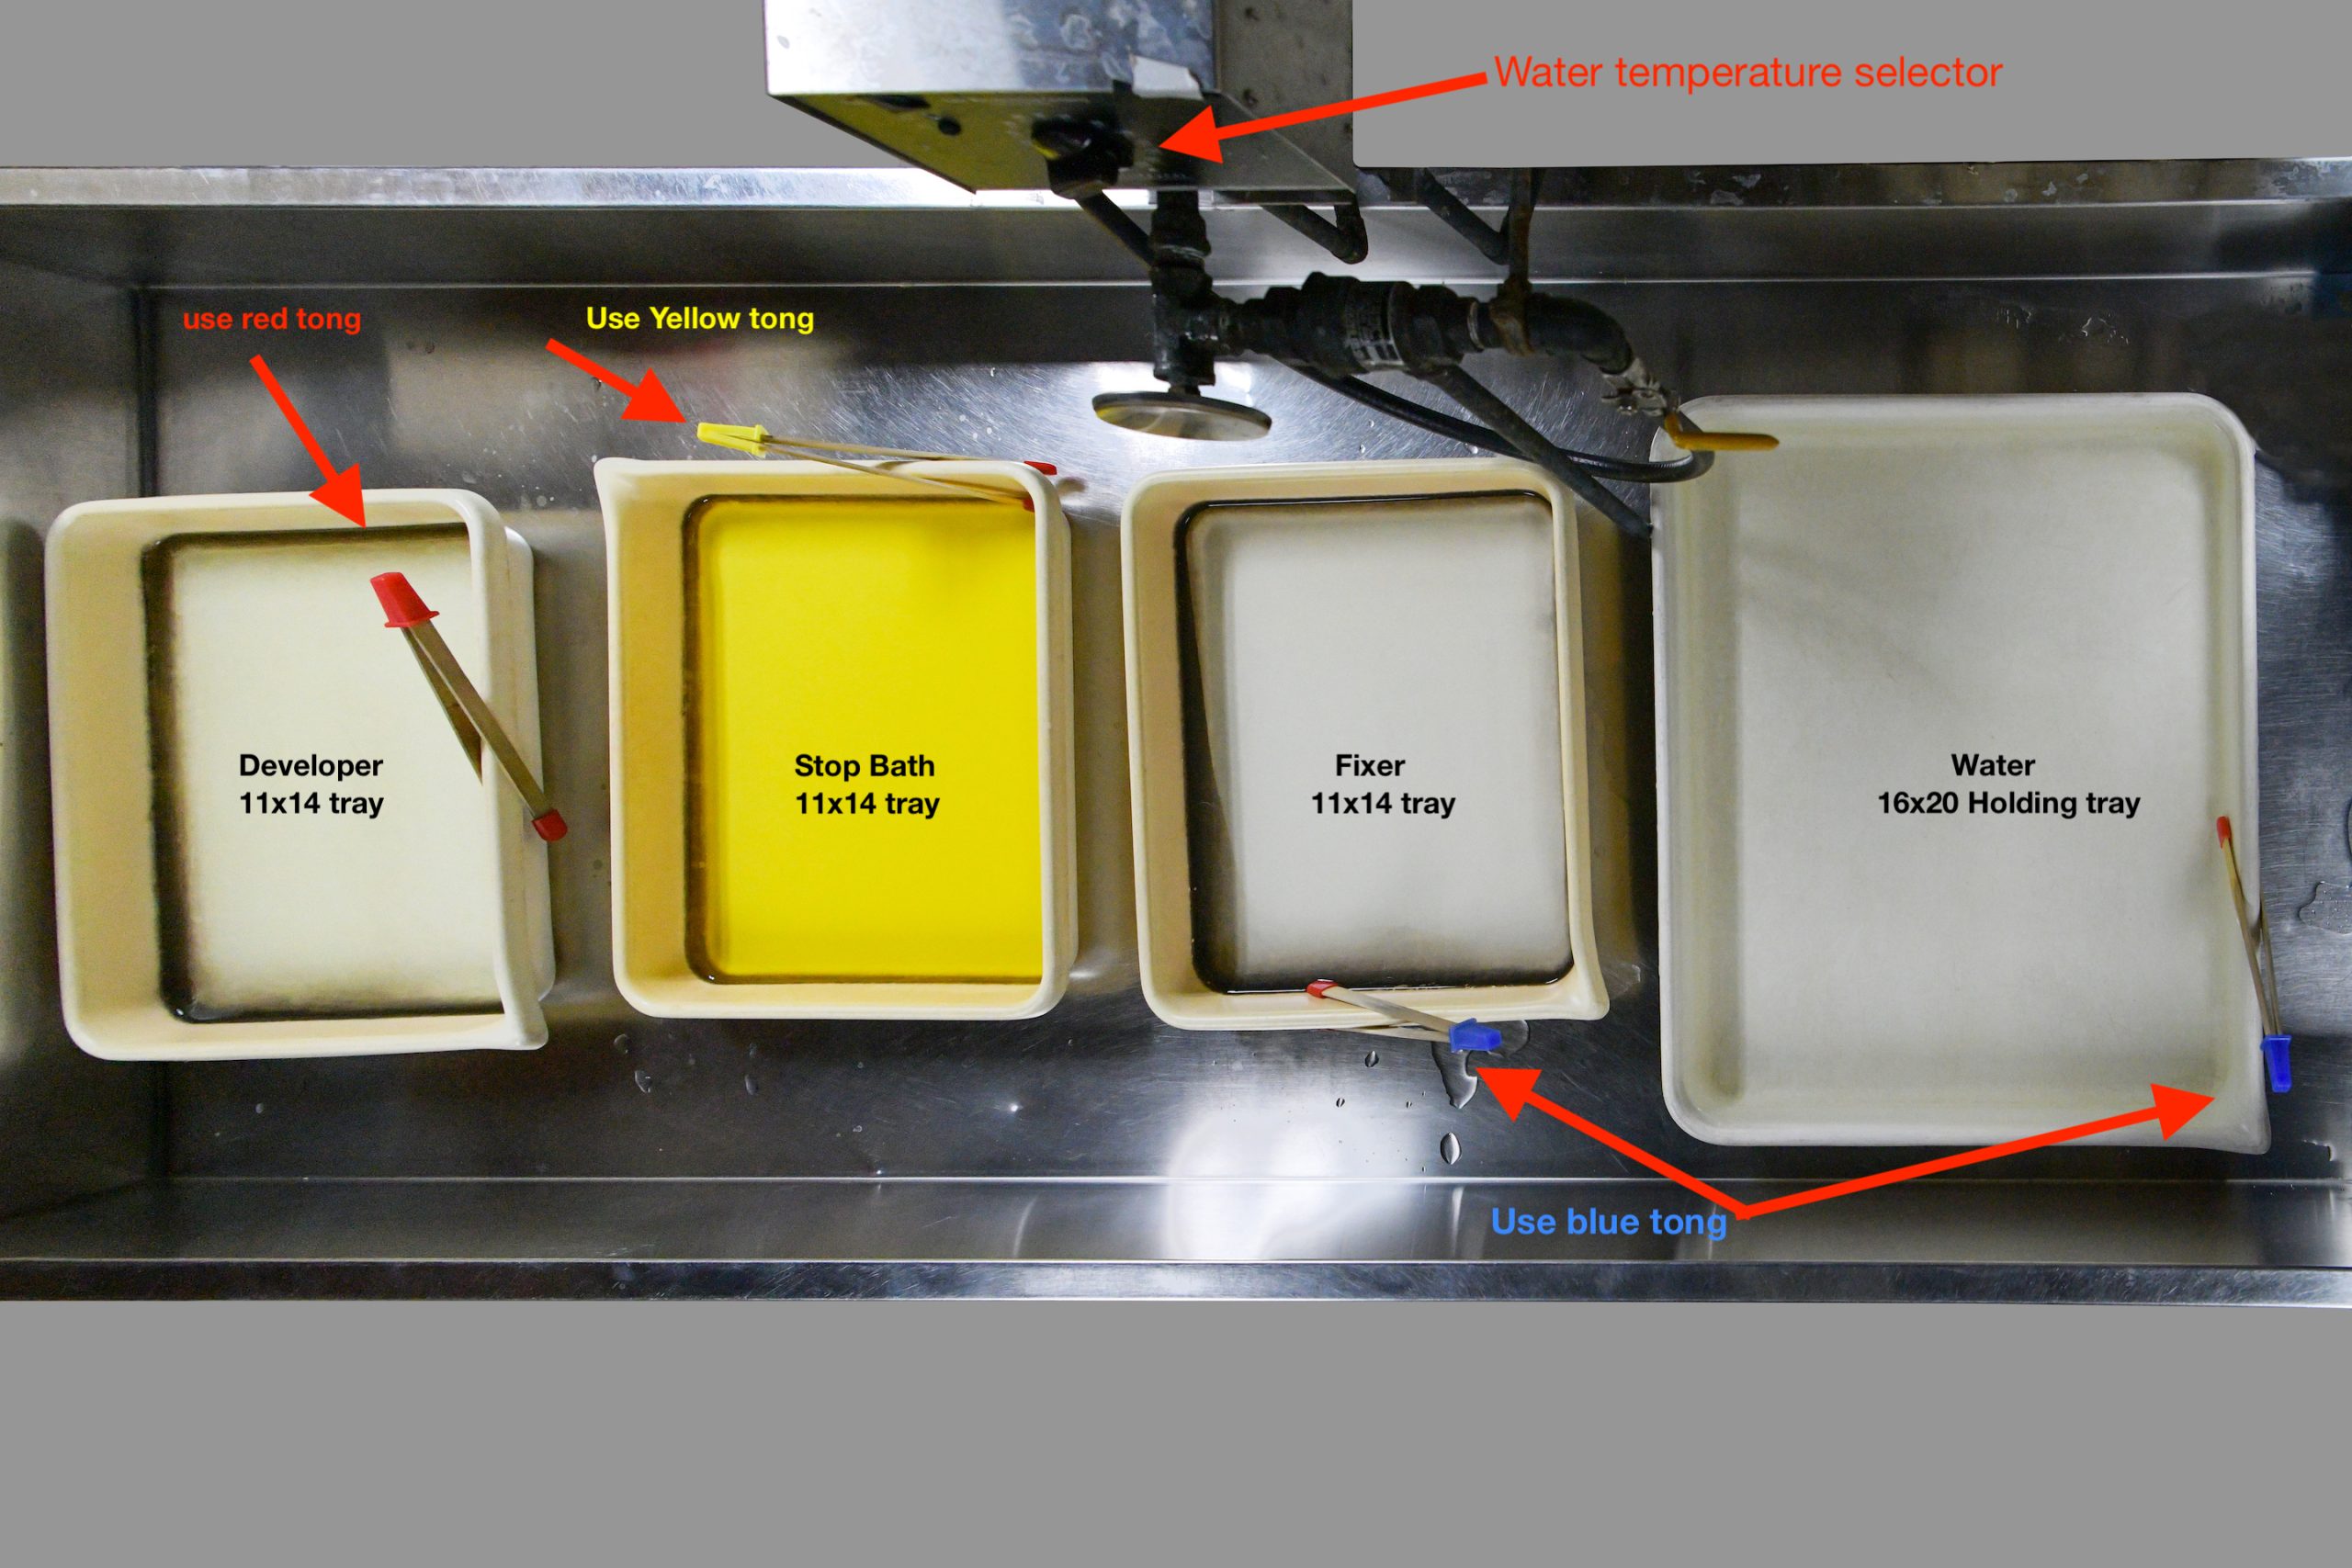
Trays – Filled with the chemistry needed to develop, fix and wash your prints
Print tong – Assist moving the prints from tray to tray
Chemicals – Developer, stop bath, fixer, running water, and optional perma-wash
Graduates – Funnels, and storage containers to measure and mix chemicals
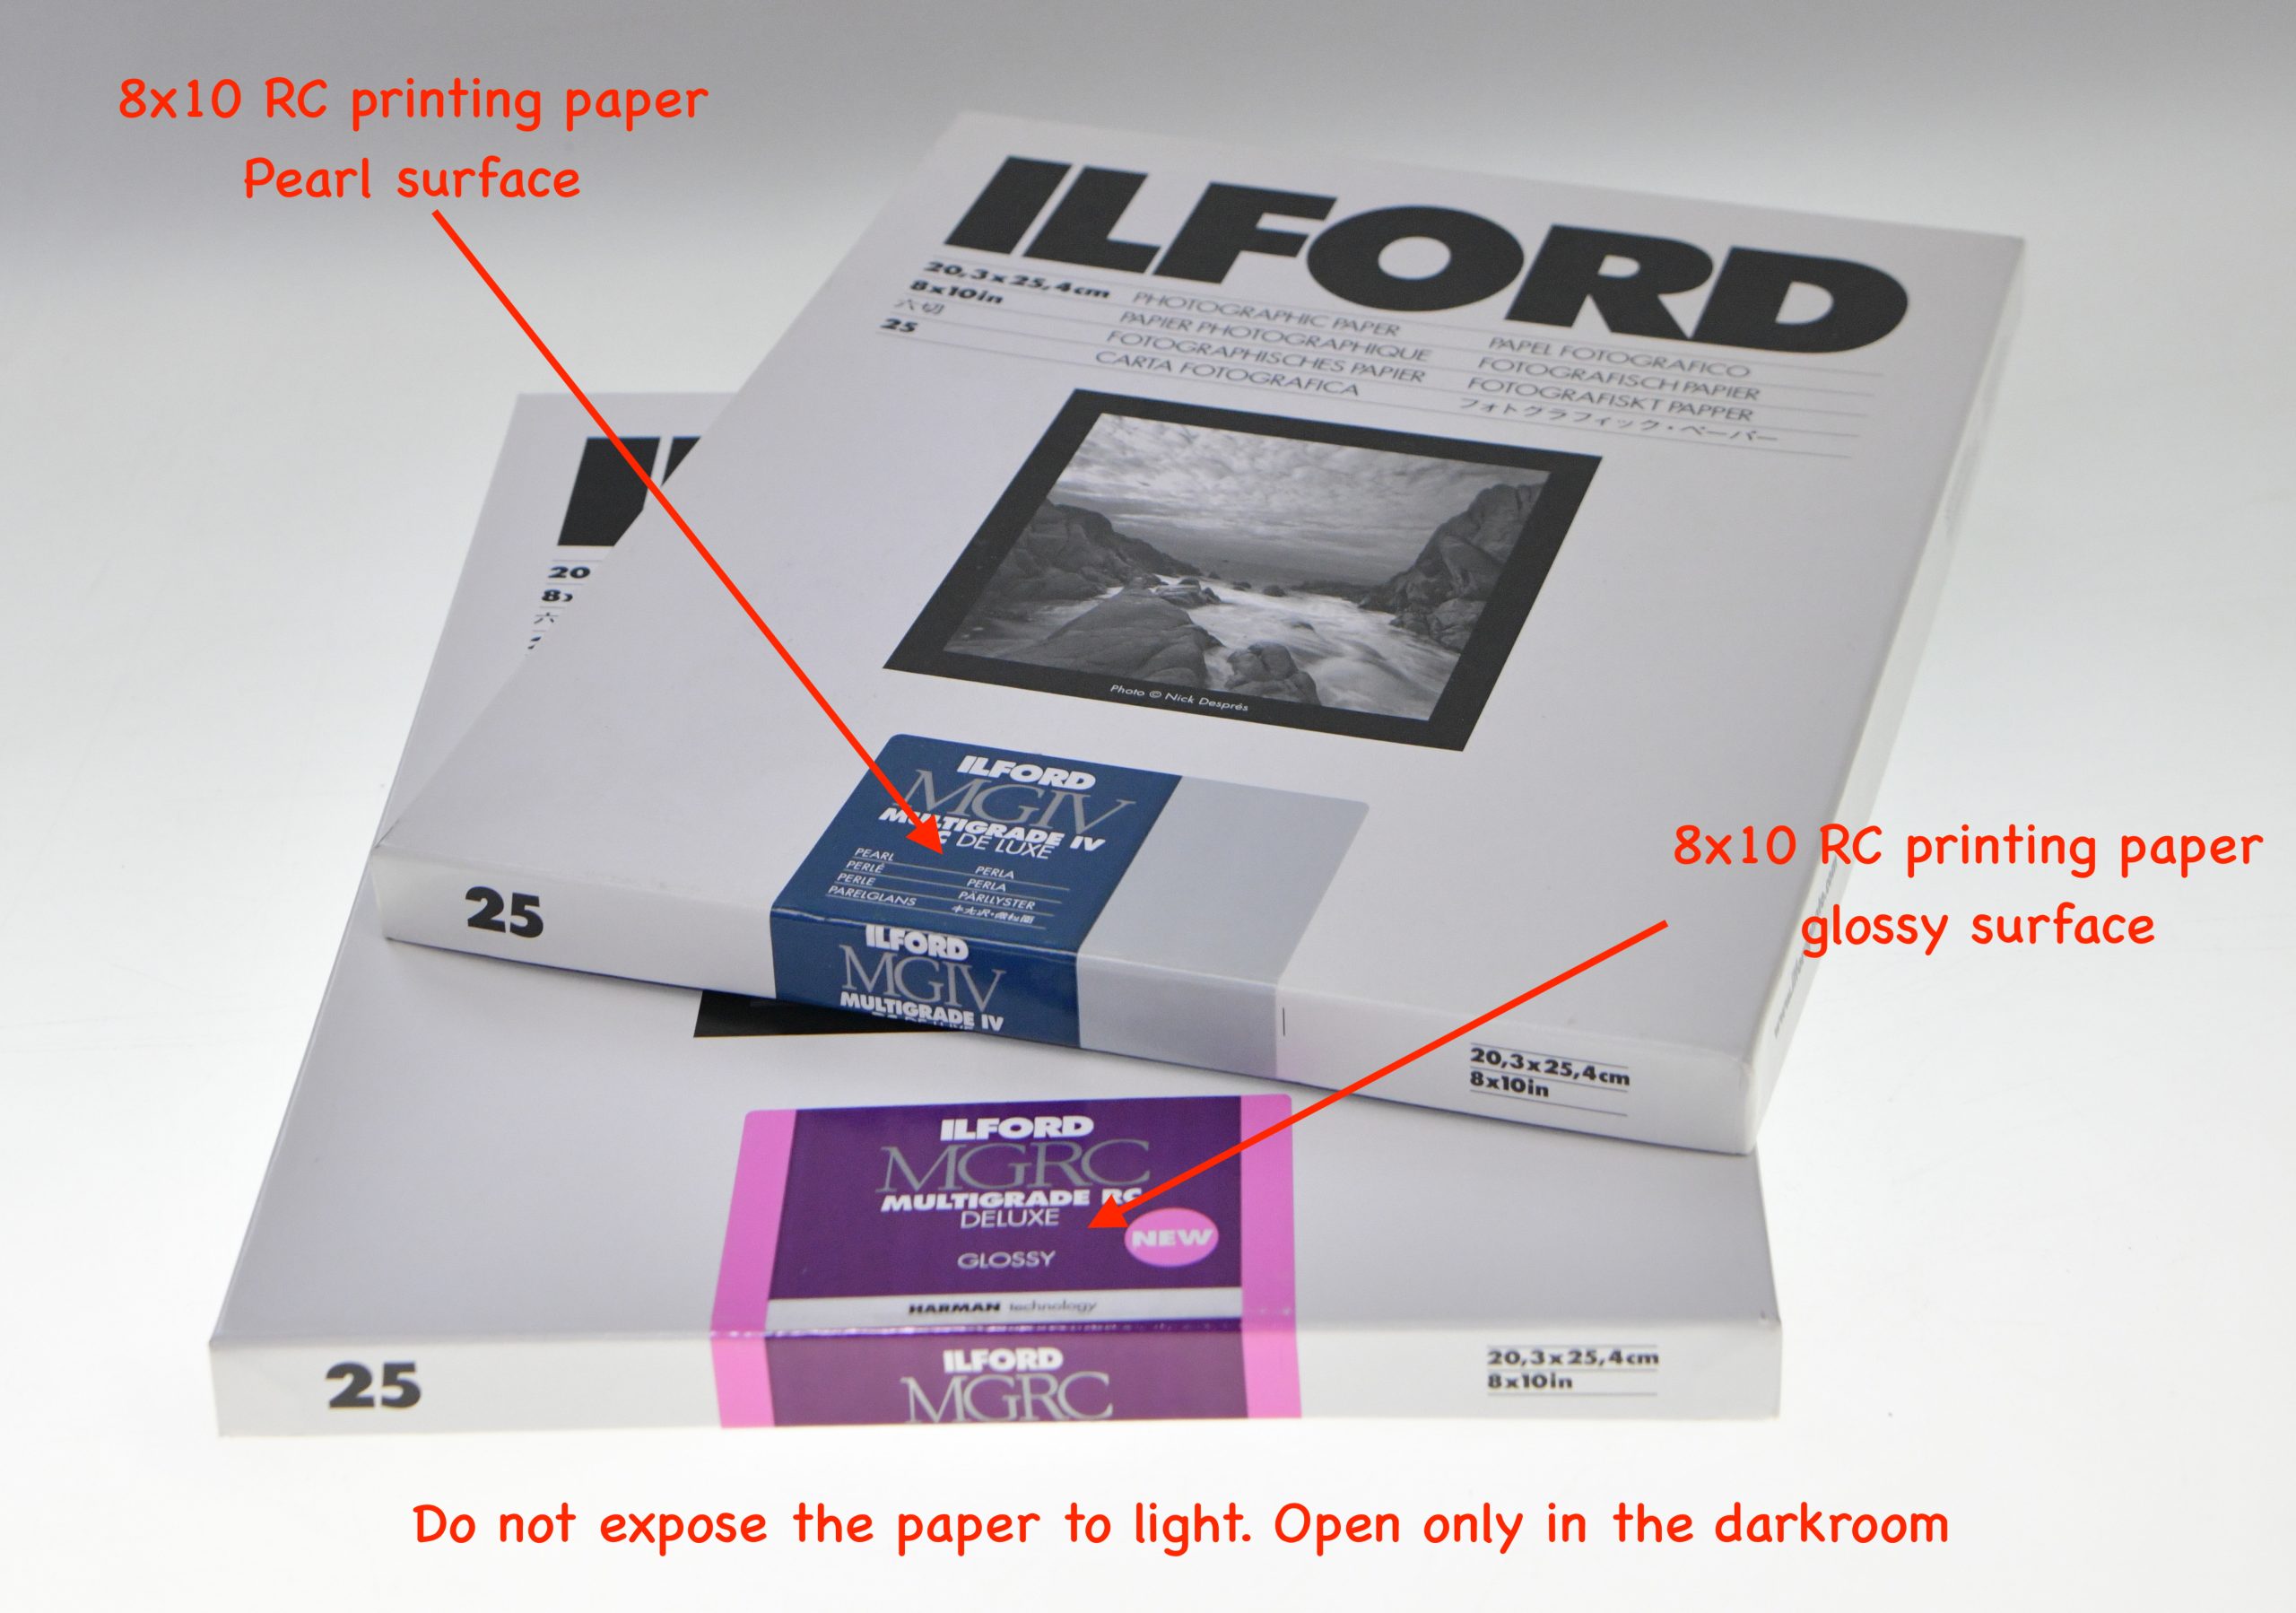
Photographic Printing Paper – (we suggest for beginners use Resin coated glossy or pearl surface, size 8×10)
Film cleaner and antistatic cloth
Compressed air can or dust blower to clean the negative when needed
Towel and apron protect clothing and keep hands dry while handling paper
Photographic Printing Paper
There are two basic types of photo printing paper, RC or resin coated and FB or fiber base paper.
Both types come in different sizes a different surface finishes
The most popular sizes are 5×7, 8×10, 11×14 and 16×20 inches.
The most popular surface finishes are glossy, and pearl.
Both RC and FB papers come as Variable Contrast VC or different contrast grades 0-12 (more info https://en.wikipedia.org/wiki/Photographic_paper).
8X10 RC (resin- coated) variable contrast glossy paper is easier to process and recommended for beginners.

In a similar way to film, photographic paper is also sensitive to light. The light-sensitive layer applied on the paper is called emulsion and it creates a latent image when exposed to light. The image becomes visible when the paper is developed with chemistry. The process and the steps are very similar to film developing. A major difference is that film has to be developed in total darkness while paper can be developed under red or amber-safe lights. Below is a chart explanation of why this happens.
- Film is sensitive to the whole spectrum of white light (panchromatic) and that is why we have to be in a totally dark room to develop it.
- Paper is sensitive to part of the spectrum blue and green (orthochromatic) and it is fine to work with it under an orange or red light.
How do you start printing
This is a brief introduction to printing bringing attention to the basics a beginner will need to start exploring the never-ending process and magic of analog printing. Hands-on experience and the guidance of the instructor are necessary.
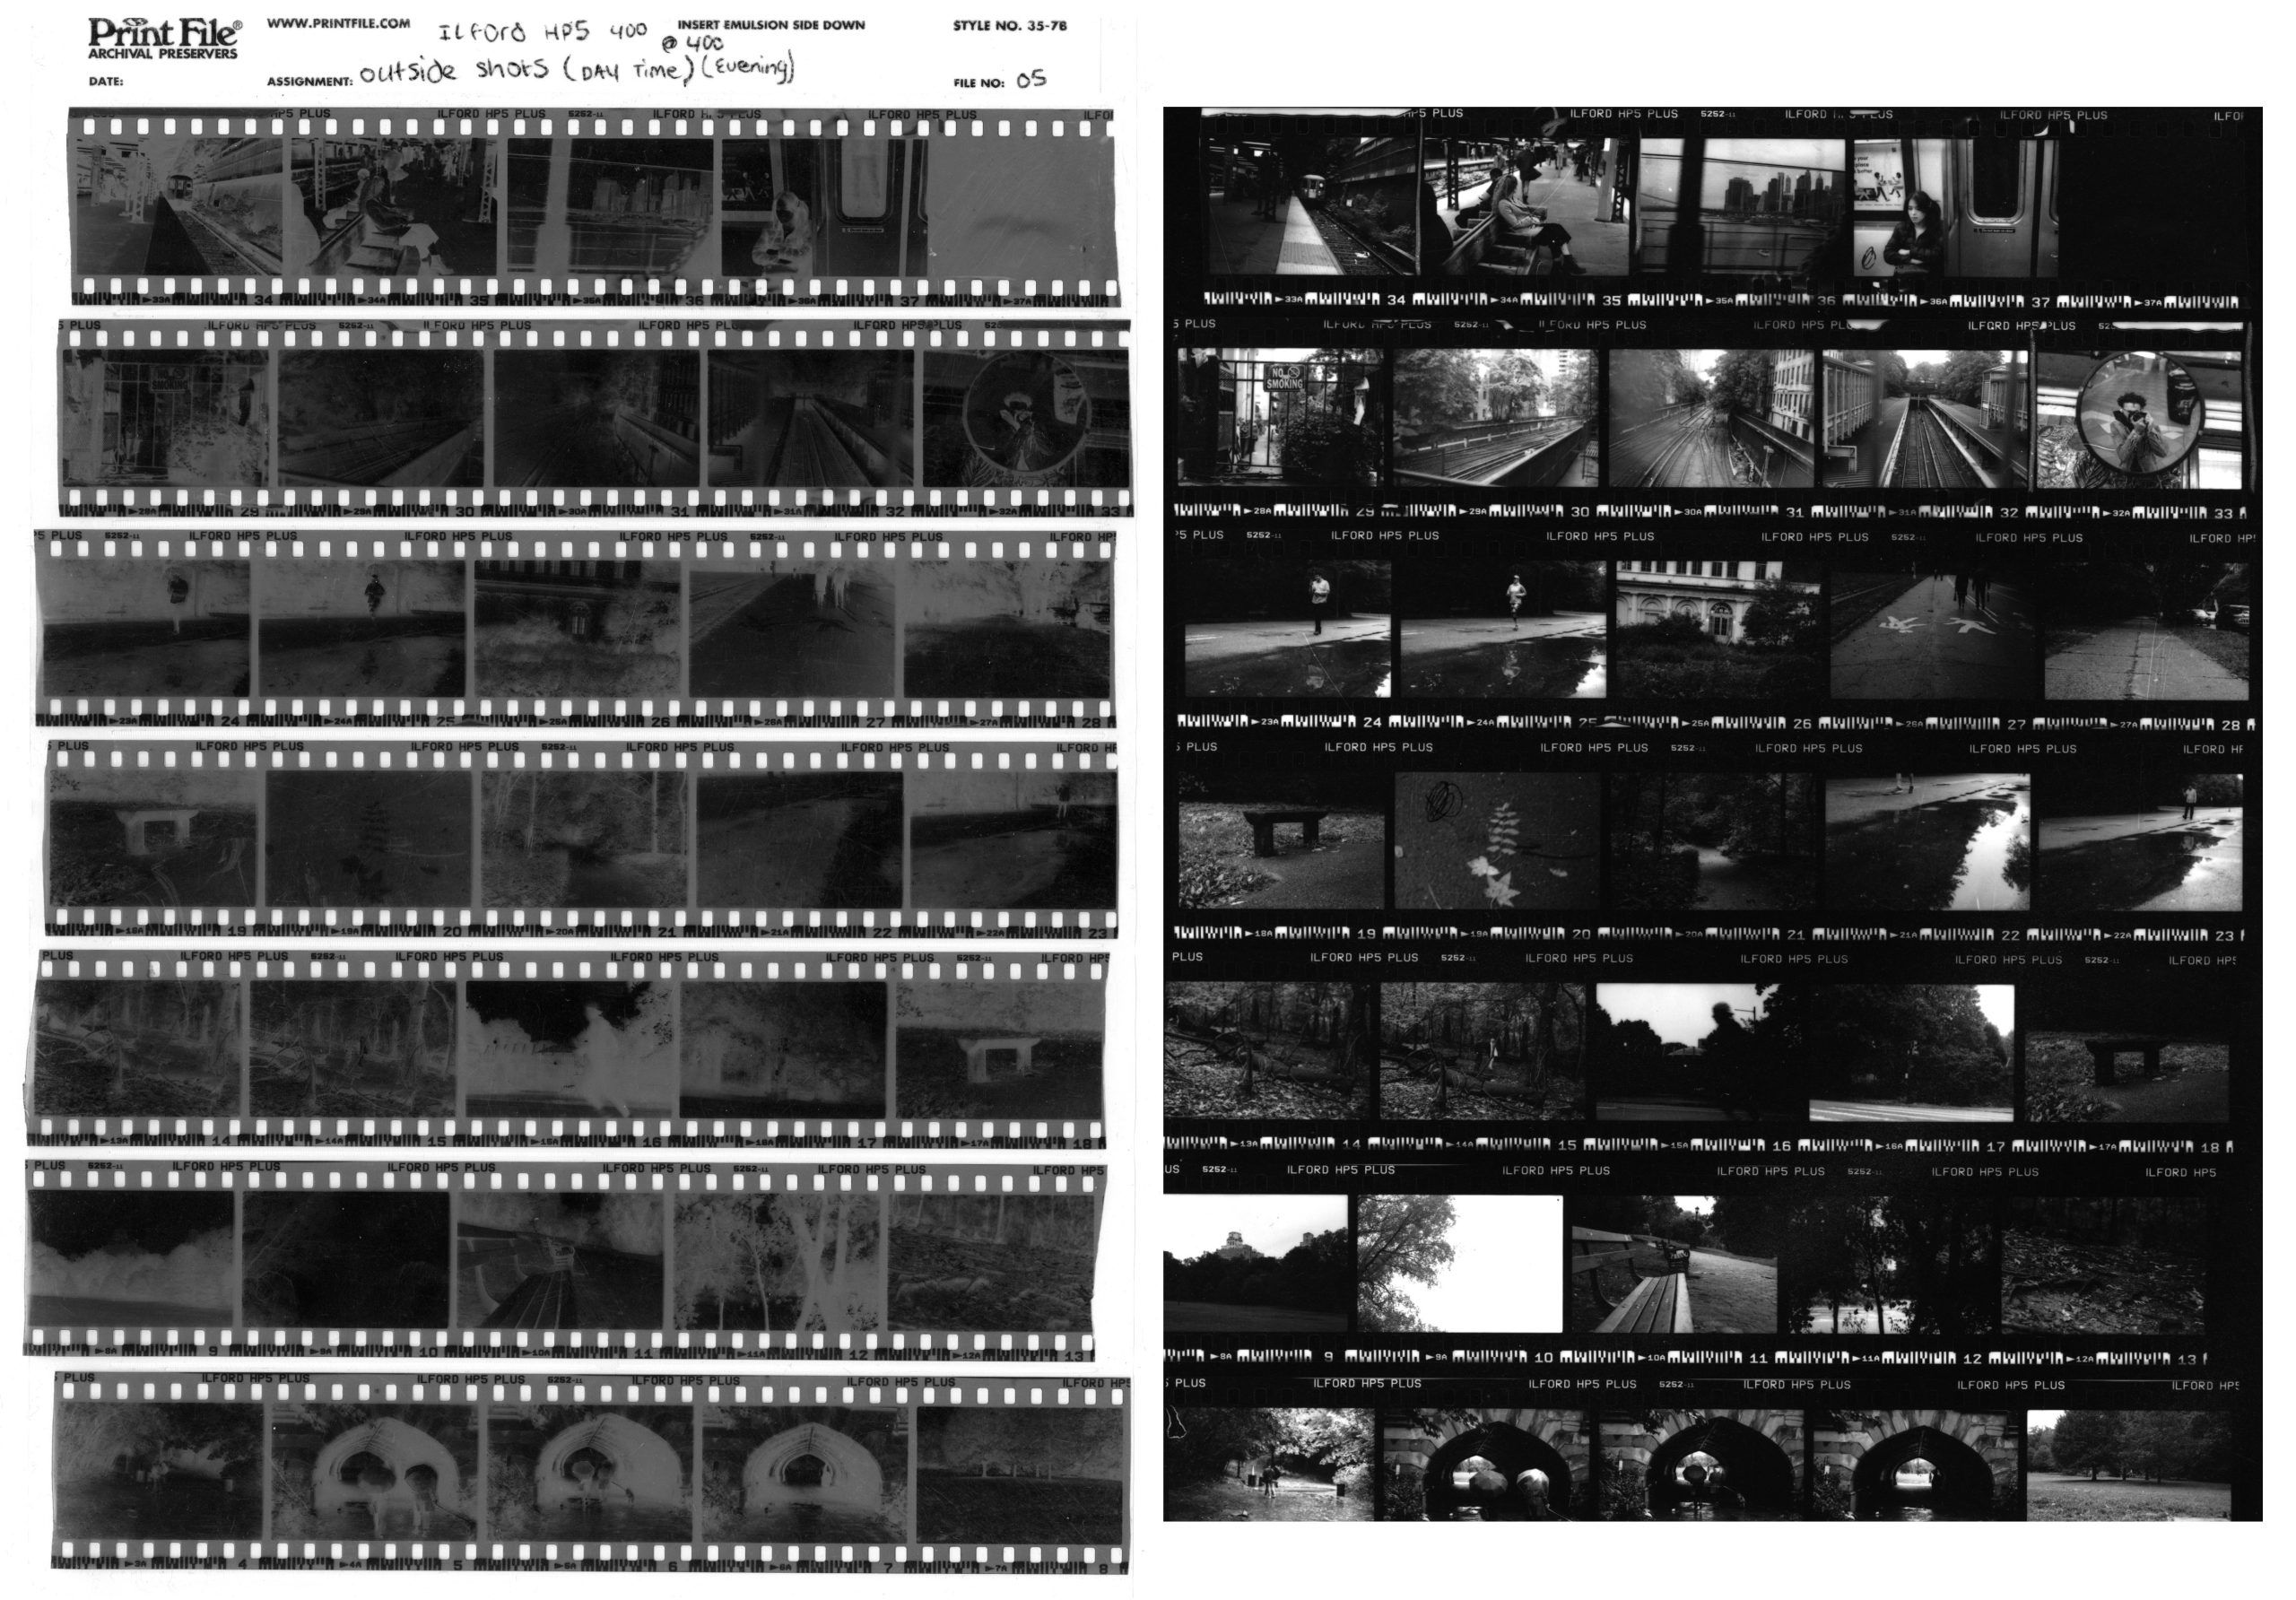
Contact proof or contact sheet
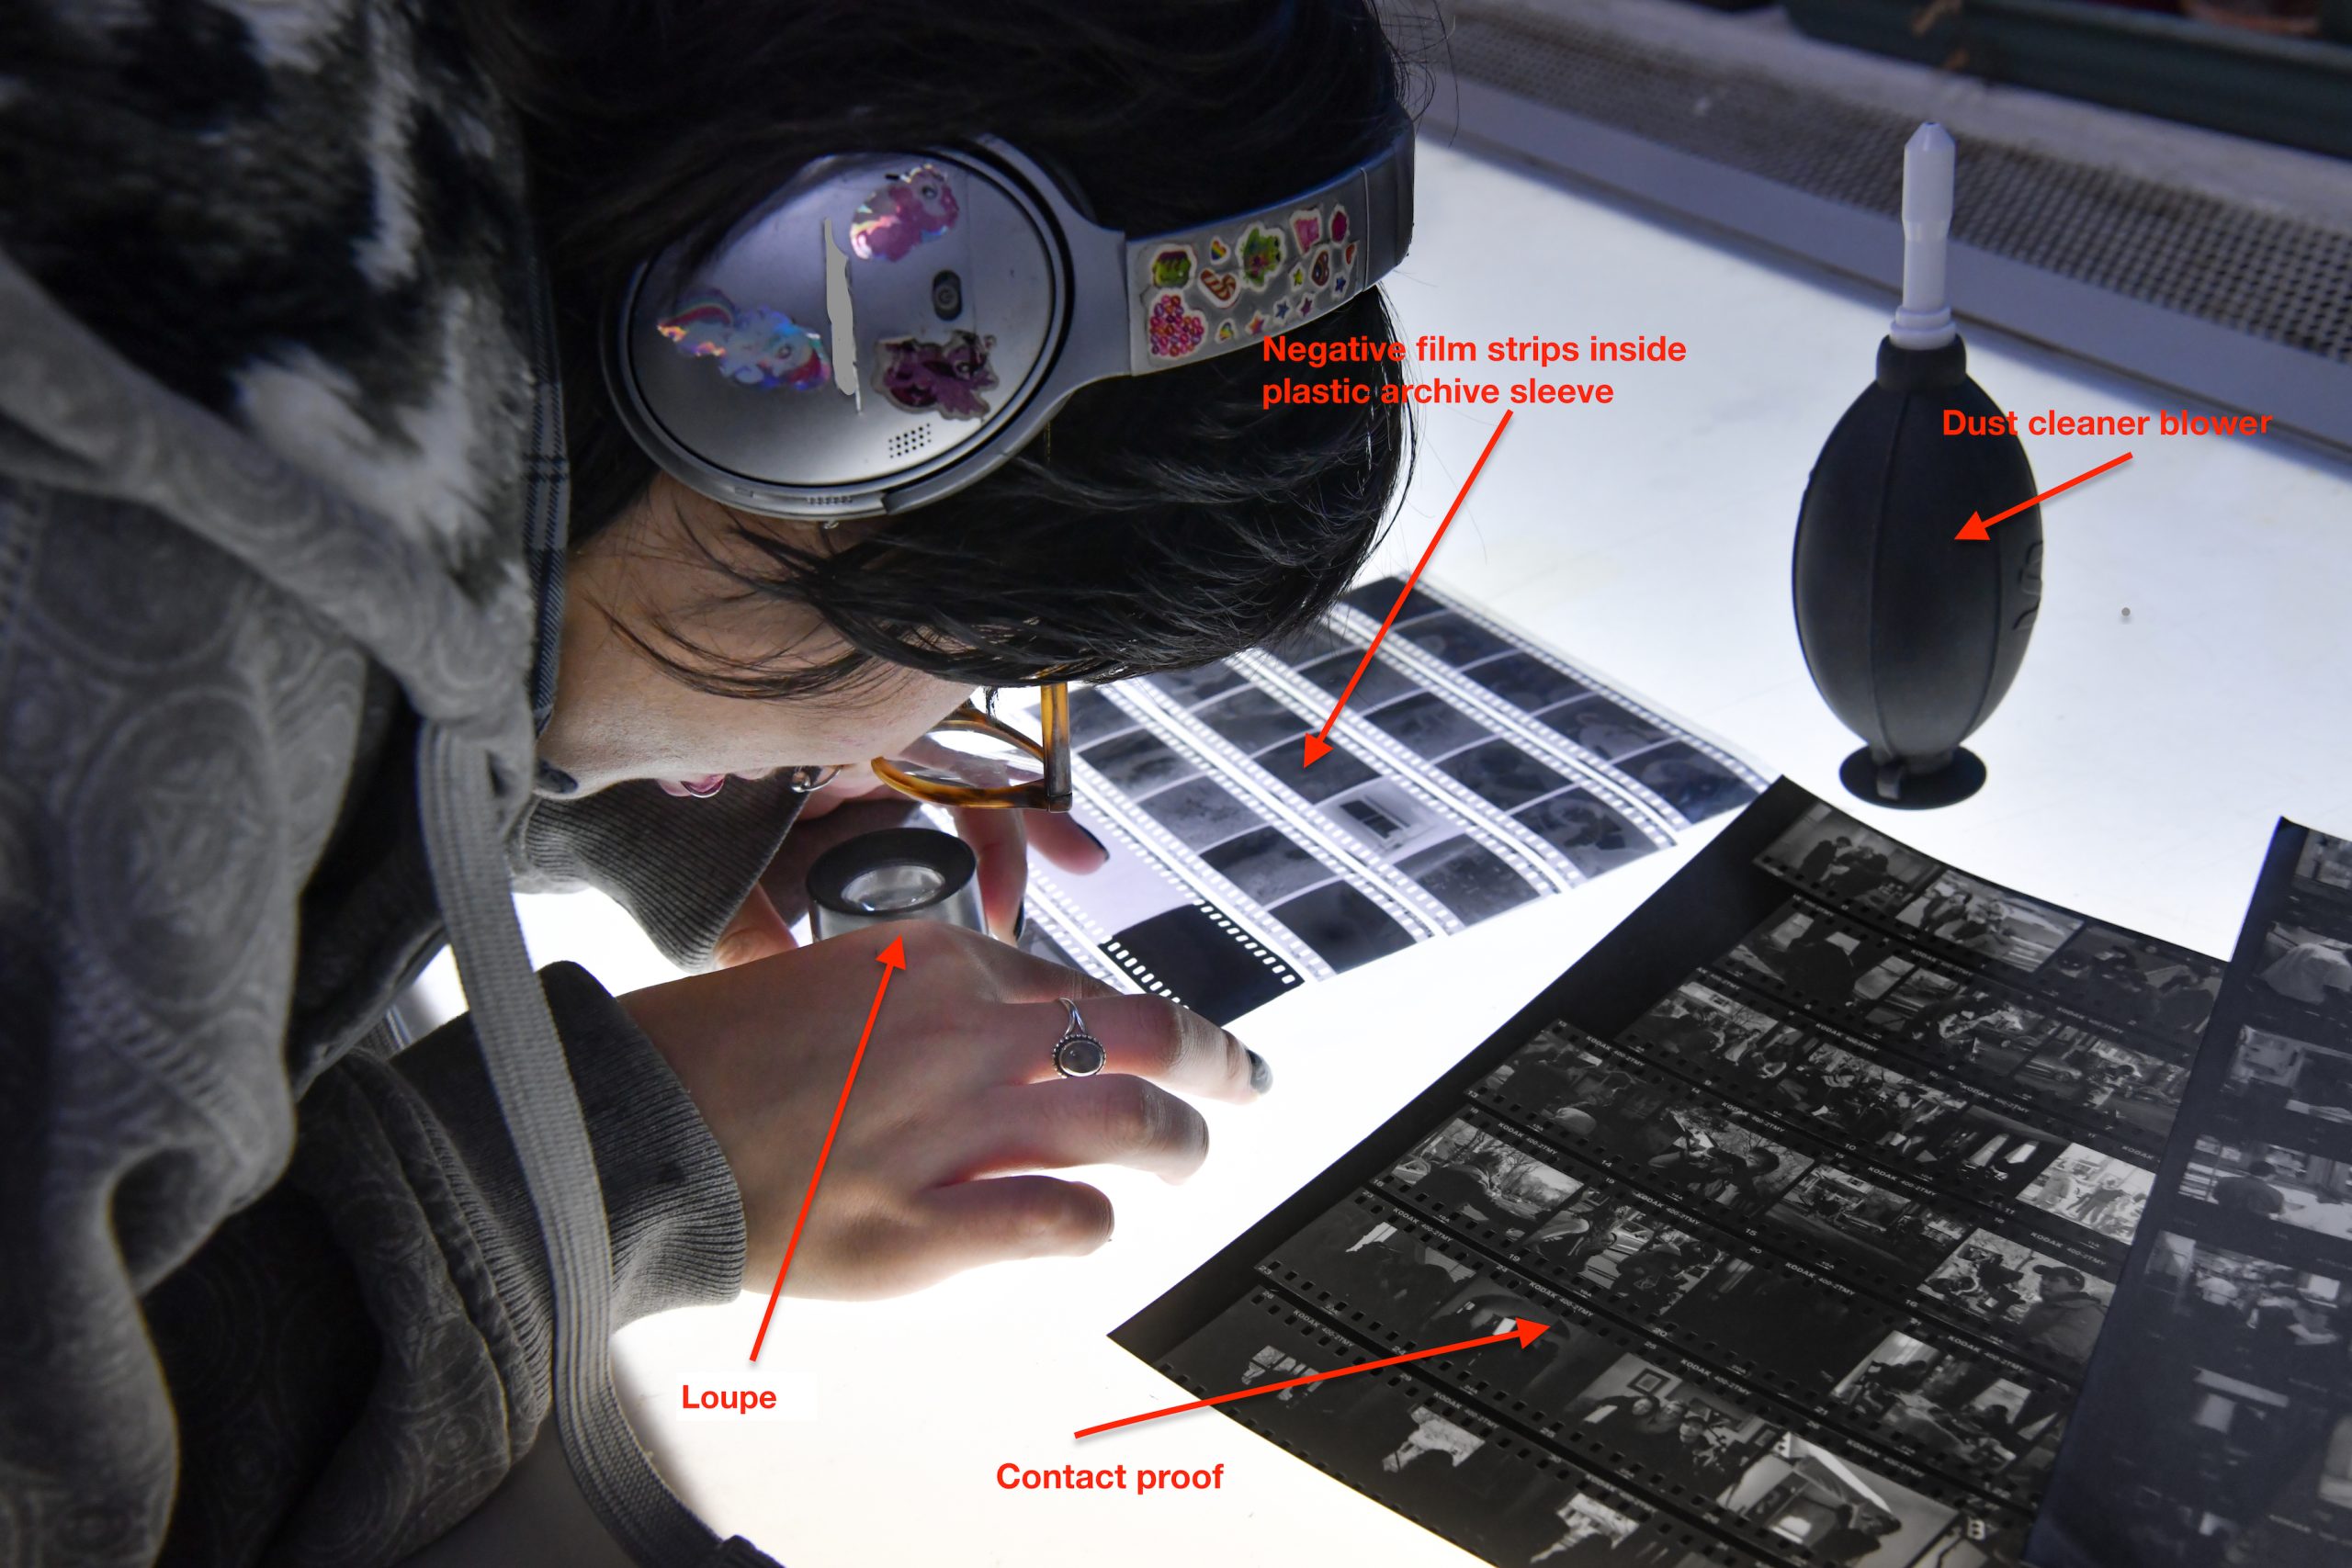
A contact-proof is an image representing contact prints of the whole roll of film. Practically you are turning the negatives into positives at the actual size of the negatives.
A contact-proof is important not only to see, edit and choose the images you will enlarge, but also to evaluate at a glance the exposures you took.
Making a proper contact proof
- On a clean dust free preferably glass surface (lightbox) lay your completely dry film and cut your negatives in strips of five. Start cutting from the end of the roll, frame 36 or 37. You may need to save the exposed leader to extend the last strip. Three or fewer frame strips do not fit well on the negative carrier. Hold the film from its edges and avoid touching the emulsion side or the top, then insert them in the plastic sleeves. Keeping your negatives clean and free of dust, lint or scratches is very important.
- Choose a filing system and write the info with a permanent marker (name, date, location) on the designated area on the film sleeves.
- Evaluate the negatives and make notes regarding exposure.
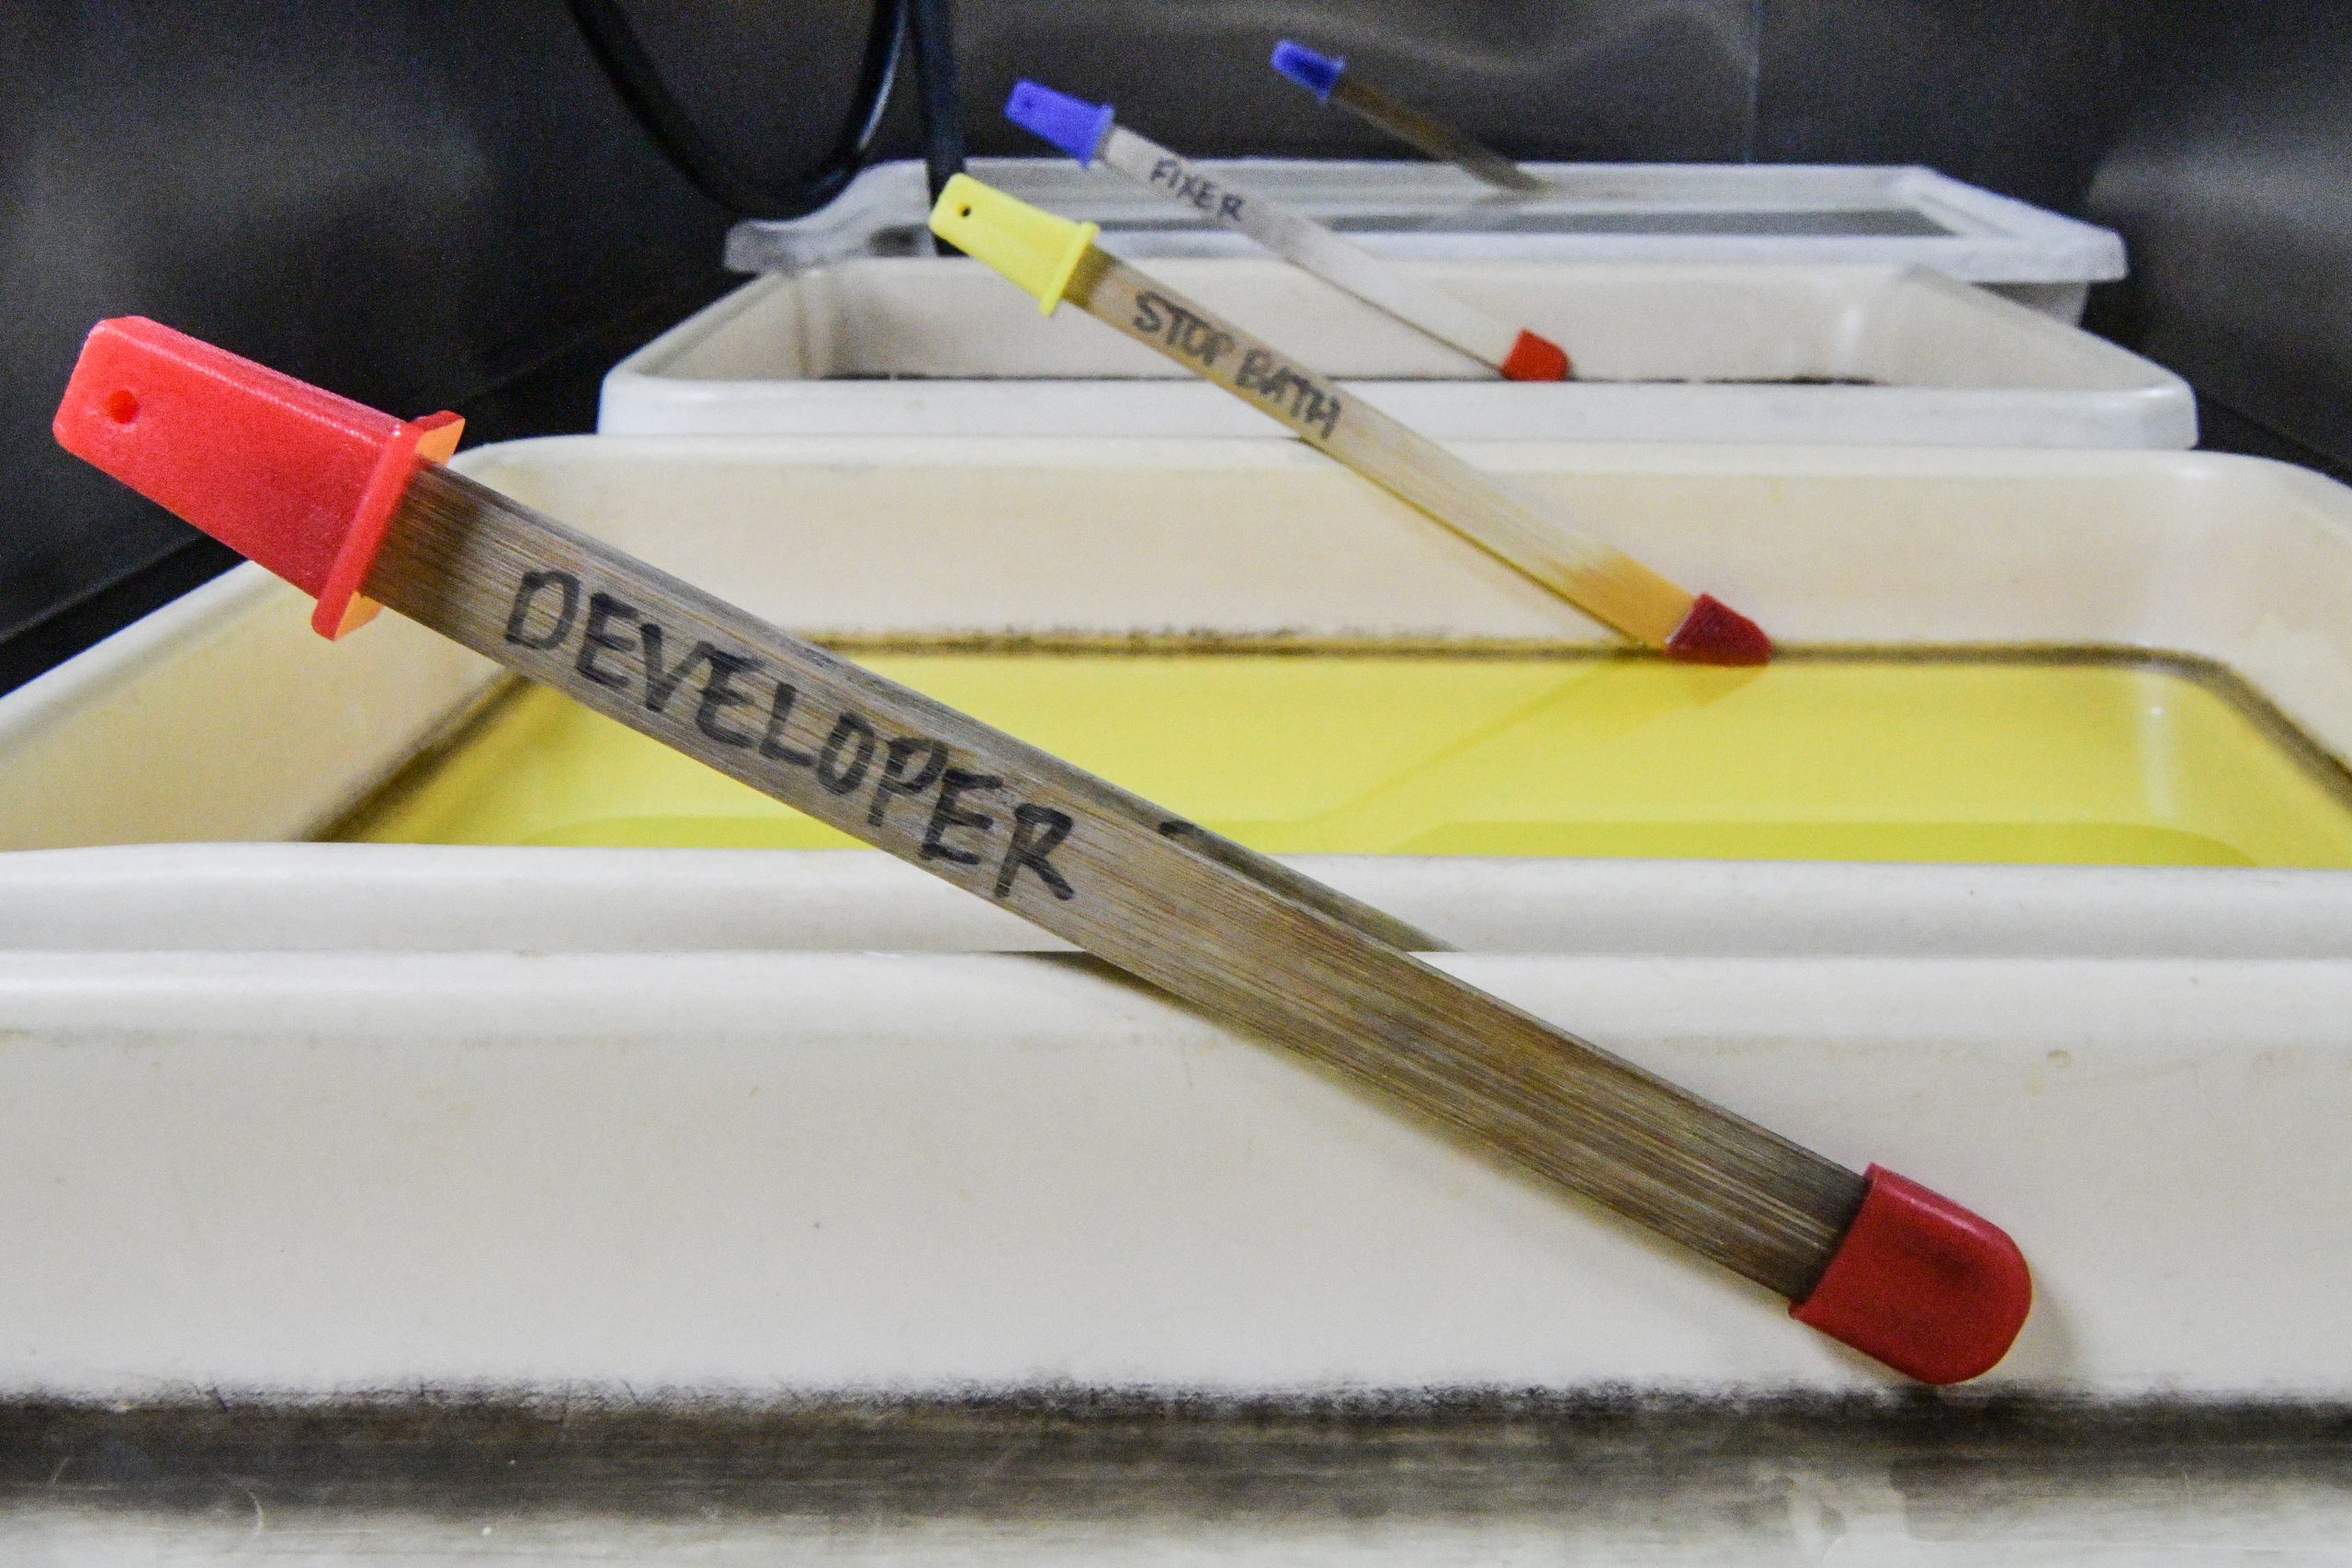
- In the darkroom with the lights on set the chemicals into the trays (see chart below).
- Turn off the white lights. Room safe lights will stay on.
- Turn on your enlarger station and set it to about 22 inches high.
- Turn timer ON
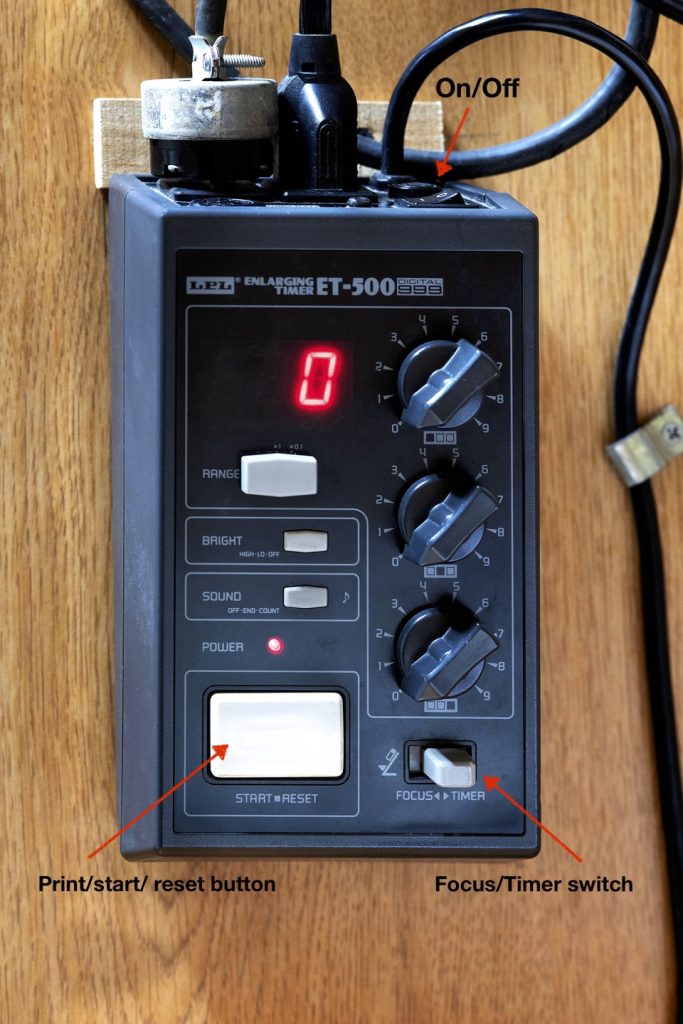
Enlarger Timer - Set the timer to Focus. Observe the light falling onto the base and make sure it is illuminating the base evenly. (enlarger light will be off)
- Place the empty negative carrier into the negative carrier slot. Focus the enlarger with the focusing knob so you see the edges of the negative carrier relatively sharply.
- Set the enlarger aperture at F 11 and the timer for three seconds
- Switch the timer from Focus toTimer (the safe light will come on)
- Open your box of paper and take out one piece of 8×10 paper. Cut it into several stripes of about 2×8 inches. You will use these pieces for testing the exposure. Place the test strip on the enlarger base. Make sure the paper is emulsion up (emulsion or glossy side up).
- Place the negative sleeves on top of the test strip paper with the emulsion side down (dull side). It doesn’t matter which section of the negatives will be tested. Place the contact proofer glass on top of the negative sleeve. The proofer will keep the negatives and the test paper flat and in close contact.
- Use cardboard and cover about 2 inches of the test paper and expose it for 3 sec. by pressing the Print/Start/Reset white button on the timer. The enlarger light will come on for three seconds, and the safe light will go off. Move the board about an inch and expose it for 3 sec. Repeat this until the end of the test strip.
- When time is up develop the strip by following the tray printing schedule below.
- After fixing the test, rinse it briefly, place it in an 8×10 tray, bring the tray with the test outside the darkroom, and evaluate the exposures under daylight. When the print is fixed it is not light-sensitive anymore. You refrain to choose the strip where the image looks best since all of them have not been photographed with the same exposure. You choose the strip where the area around the images showing the clear part of the film is deep black. If that is for example at 9 sec. you return to the darkroom, you use a whole sheet of paper and expose it at 9 sec. Do not change the f-stop and do not forget to use the contact proofer on top to keep it flat and in contact with the base.

There are contact proofers in the market which hold the negatives and paper in place but a clean piece of glass or plexiglass will also work.
Watch the video above and follow the chart below to further understand how to test for correct exposure while printing
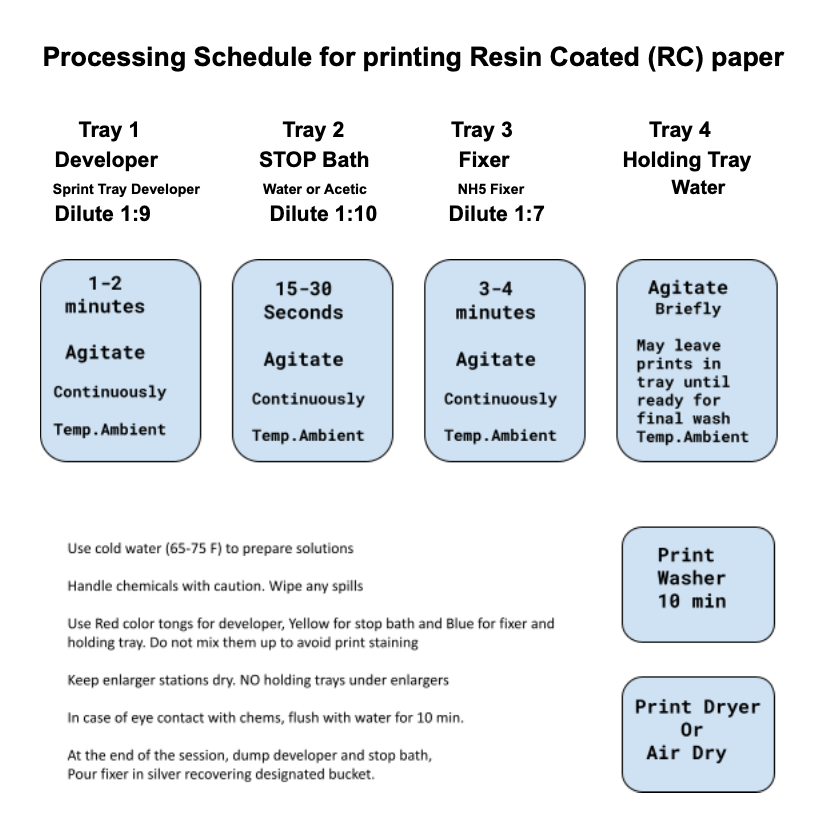
Tray processing schedule for printing images on Resin Coated (RC) paper
Feel free to print the above PDF link and use it until you remember how to set up chemicals.
Watch the video and follow the drawing above to further understand how to test for correct exposure.
Evaluating the contact proof
A properly made contact proof sheet is an invaluable aid to you, as it contains all the information about the quality of the negatives regarding exposure, contrast, and composition.
Look at the contact sheet under bright white light outside the darkroom.
If your photographs look the way you want them, clear, readable, and with good contrast, you correctly exposed and developed your film.
If some frames look dark, then you either underexposed those frames while shooting.
If some of your photos are too light, you overexposed those frames while shooting.
Studying the contact-proof results will help you improve your exposure selections the next time you take photos. Learning to use the light meter and choosing the correct aperture and shutter speed takes time.
Check out Chapter 5 on Film Exposure. It has all the information for beginners and beyond.
Now that you know how to evaluate your exposures it is time to choose your first negative and print. Using a loupe choose a well-exposed negative with the composition you like best.
We suggest you leave negatives you may like but they are not exposed well for later. As you gain experience you will be able to make prints from most negatives.
Printing the negative
Before you begin printing check if the enlarger light is illuminating the base of the enlarger evenly. Make adjustments as needed.
Set the trays in the sink and prepare the chemicals.
Tray processing schedule for printing images on Resin Coated (RC) paper
- Take the negative carrier outside the darkroom. Hold by its edges the strip including the negative you are about the print.
- Dust off the negative stip if needed and insert it on the negative carrier. Emulsion side down.
- Make sure the chosen negative shows through the open window of the carrier correctly. Hold the negative carrier tight, so the negative stays in position, and walk back to the darkroom.
- Open the negative carrier tray and insert the negative carrier inside correctly. Close the negative carrier tray.
- Turn the enlarger light on. Turn the timer on and set it on Focus. The enlarger is now projecting the image onto the base. The safe light is off
- Open the enlarger lens to its largest opening (i.e f 2.8). The projection will appear on the easel you already placed in the center of the base of the enlarger.
- Make all needed adjustments regarding size and sharpness using the enlarger’s knobs.
- Close down the enlarger lens to the f-stop you plan to print. A well-exposed 35mm negative enlarged for an 8×10 print will require f-stop 8 or 11.
Make a test print
- Under the safe lights cut an 8×10 photo paper into several strips approximately 2×8 inches.
- Place them back inside the black bag and the paper box.
- Switch the timer from Focus to Timer. The safe light will turn off
- Take one strip and place it on the middle of the easel emulsion side up and preferably in the area most important. For example, if you are printing a portrait make sure the test strip covers the eyes. Use a piece of cardboard and cover about 2 inches of the test paper and expose it for 3 sec. by pressing the Print /start reset white button on the timer. The enlarger light will stay on for 3 sec. and the safe light will be off. Move the board about an inch and repeat this until the end of the test strip.
- When time is up develop the strip by following the tray printing schedule below. This is very similar to making the test print for the contact proof.
- Evaluate the test outside the darkroom under bright light
- Decide which segment looks better in terms of clarity, and details in both shadow and highlight areas. If nothing satisfies you go back and make another test print until you are satisfied with the results. You may need to test other areas of the negative. Patience during this phase of the process will save time and paper both cost a lot nowadays.
- While evaluating the exposure also pay attention to the contrast. If the test looks flat increase the contrast by choosing to use contrast filter #3 If it looks too contrasty use a low contrast filter # 1.5 Every time you change a filter you need to make a new test. More on contrast in a later segment of this chapter.
- When exposure, sharpness, contrast, and composition are as you prefer go ahead and make a full print. Your full print should match the test. If it doesn’t something has gone wrong. Either you changed enlarger settings, or you used new chemicals, or used a different paper box, or changed the enlarger bulb, or used a filter and didn’t test again. In order for the test to guide you in making a good print nothing can change. If it does a new test is needed.
Tray processing schedule for printing images on Resin Coated (RC) paper
Controlling the image contrast using filters
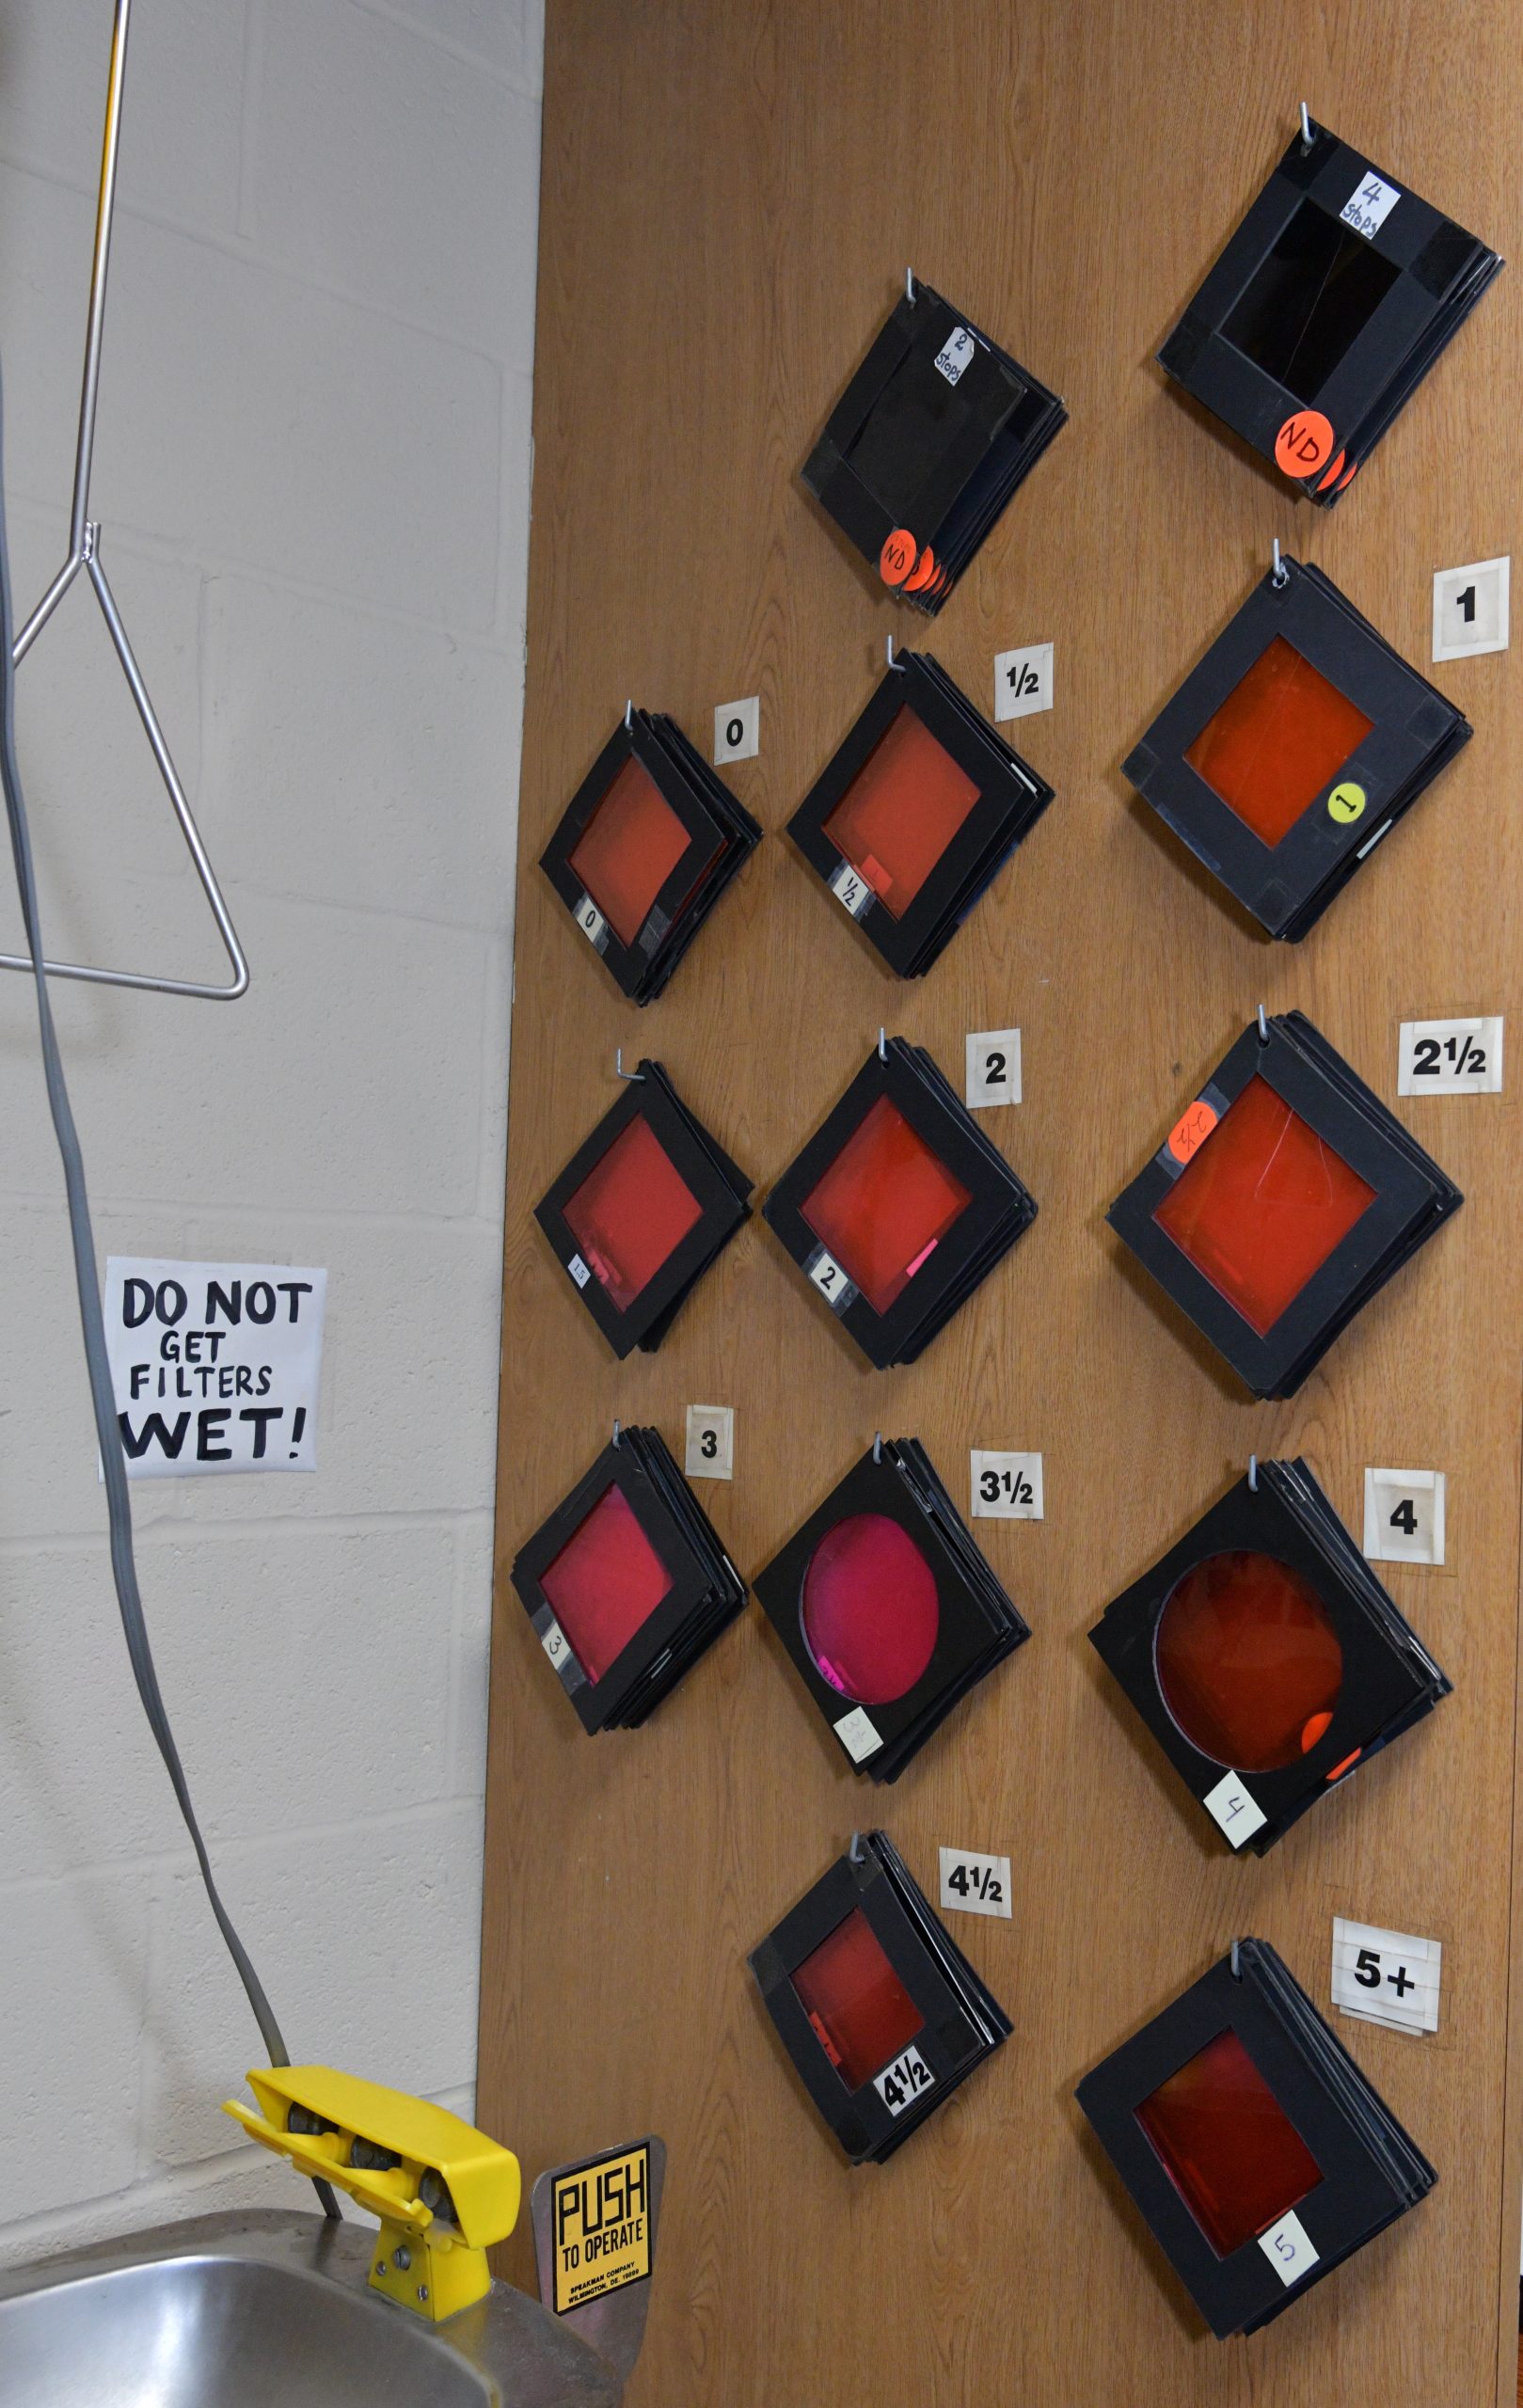
As a beginner, you are using resin-coated variable contrast paper RC/VC. You can control the contrast of your print by using different contrast filters while printing.
Filters come in different ranges from #0 to #5. A #0 is the lowest contrast and a #5 is the highest. They all have a magenta color which changes in density from grade to grade.
Every time you change from one filter to the next you need to do a new test.
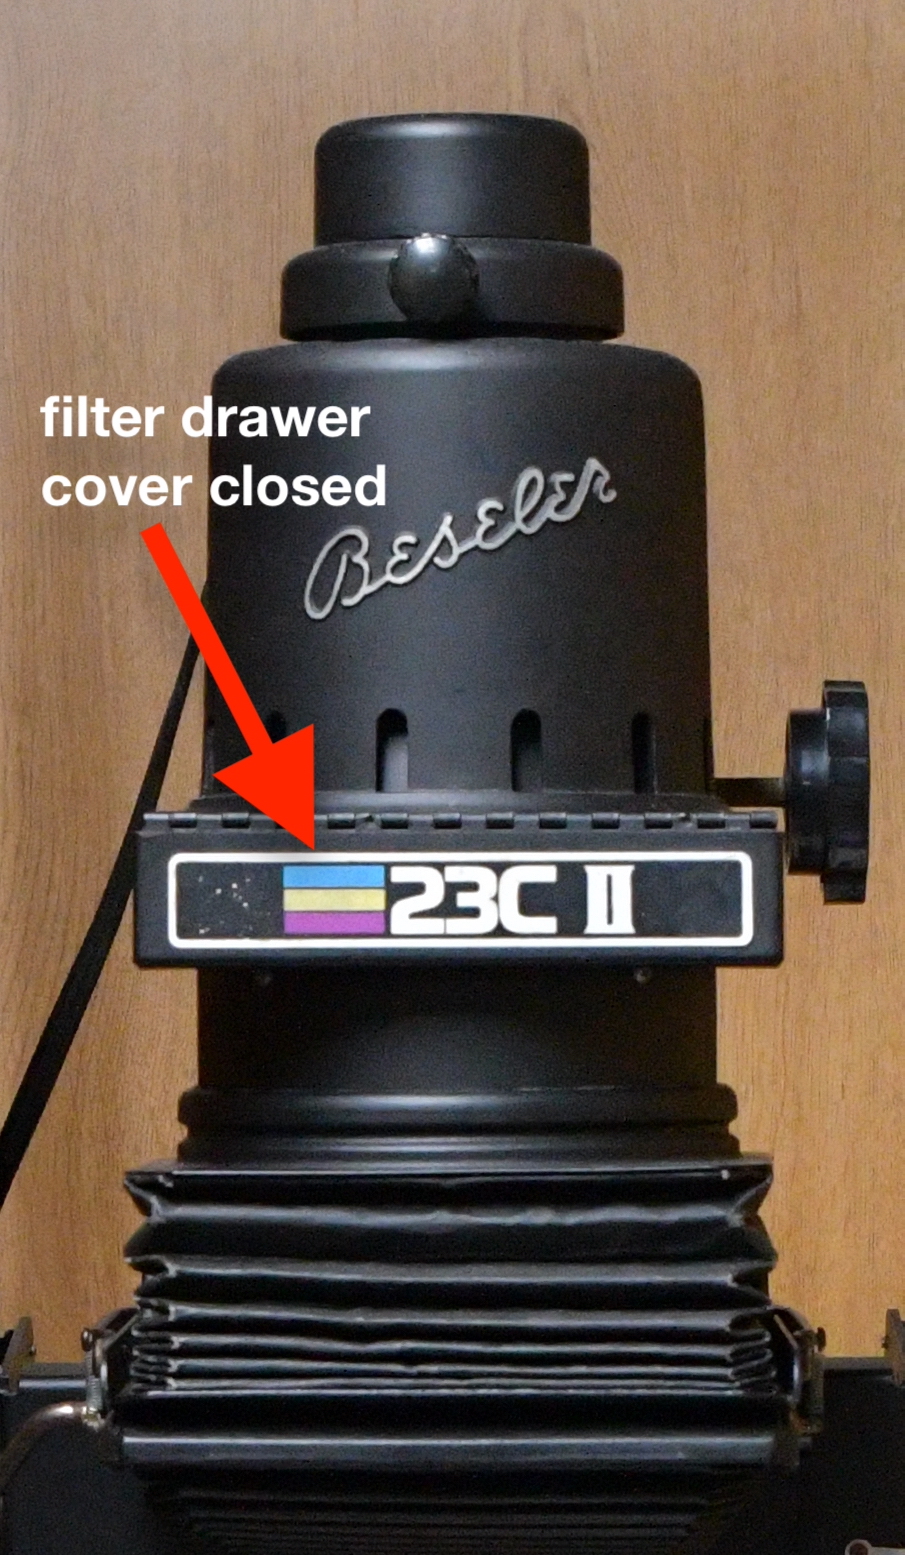
The filter drawer is above the lens and has a door. Make sure the enlarger light is off when you open the door to insert a filter. If it is on you will be exposing your paper to white light and ruin it.
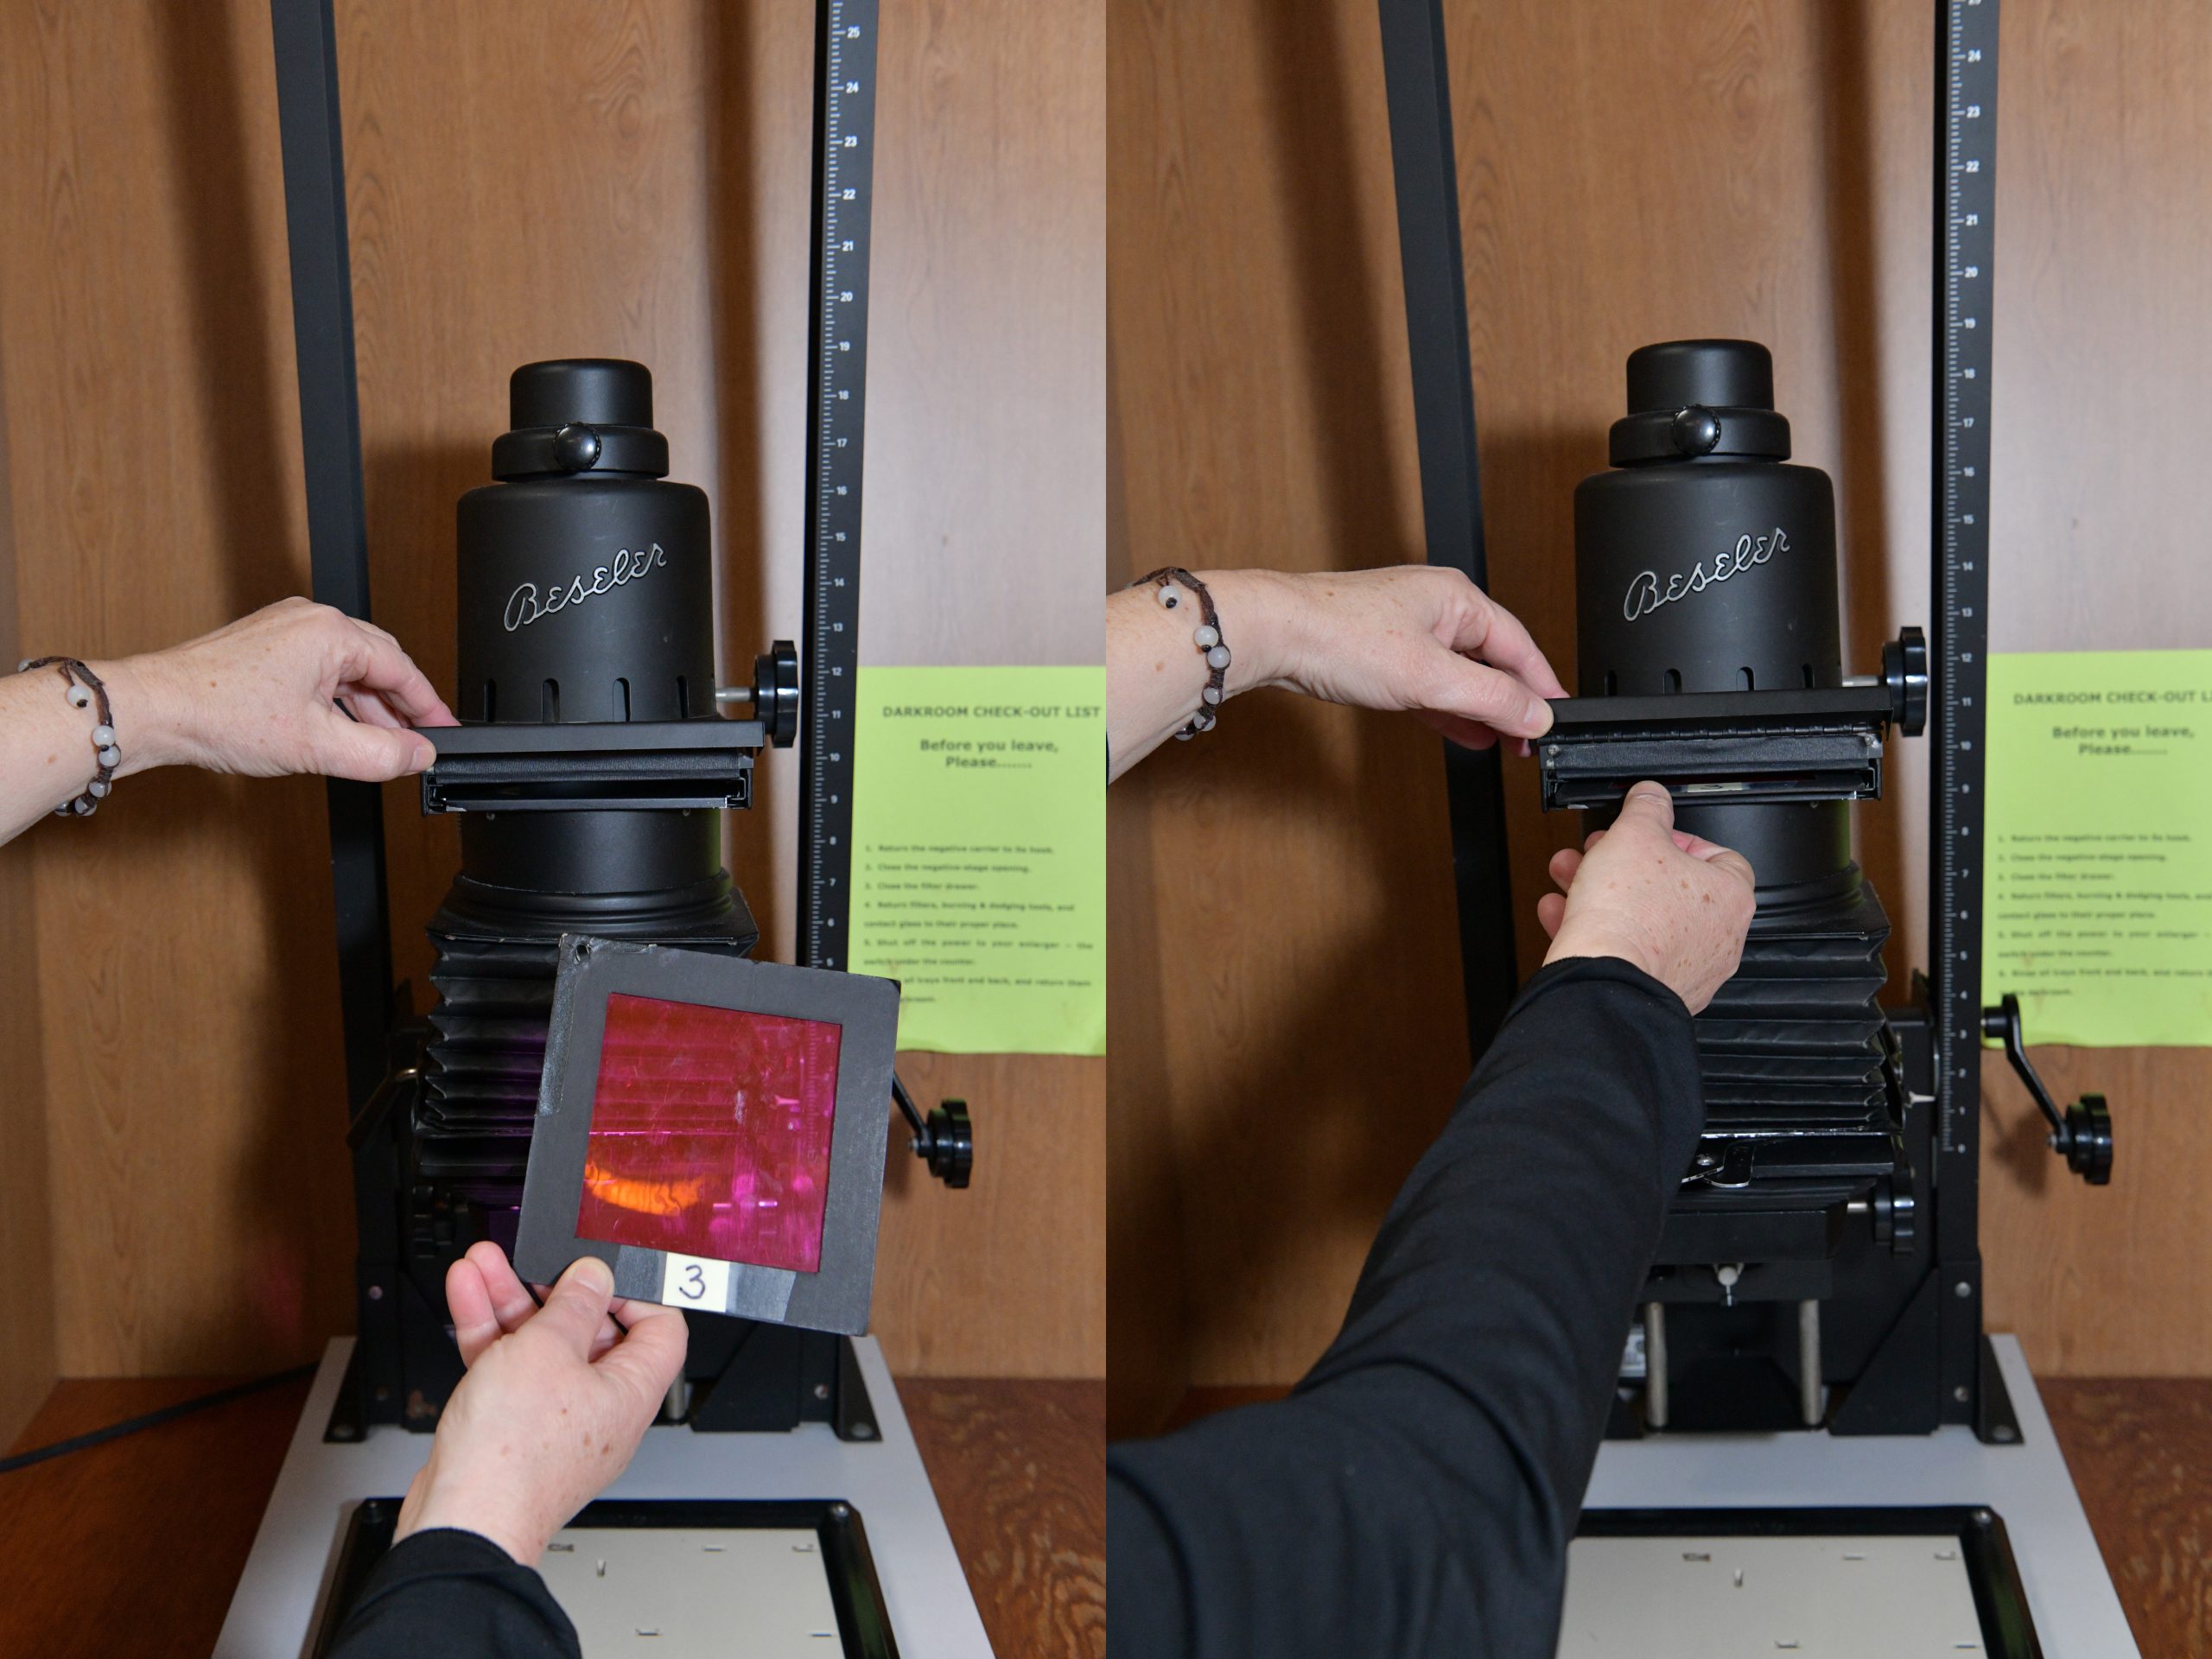
Your contact proof should give you a good idea regarding the need to increase or decrease the contrast. As a rule of thumb, you may start with the #3 filter, evaluate the results and decide if you will stick with #3, decrease the contrast or increase it.
Evaluating first print
Evaluate the overall image quality. Do you like the contrast? If you make an area darker, will you be able to see more details? If some areas were a bit darker, do you think the overall mood could change and more attention will be placed on the important elements? If so try contrast adjustments and/or burning and dodging.
Dodging and burning
Dodging and burning are photographic techniques used during the printing process to adjust and manipulate the exposure of selected parts of the image to appear darker (burning) or lighter (dodging).
Final print
Before you remove the negative from the enlarger take a moment and carefully look at the print you just made under bright light. Are there any dust marks? Any hair or lint lines. Are all the corners well-exposed? Is there a way you can improve it? If everything looks good, you are ready to make at least a couple more identical prints from the same negative. You may need an extra print for your portfolio or one to frame for you or gift to a friend. There is always a possibility something may happen to one print. A stain, something wrong while drying it, dropping and/or stepping on it. 🙂 Photography has no language of its own. One learns to read photographs as one learns to read footprints or cardiograms. John Berger
You will need a box to keep all your prints dry dust free. Keep those empty photo paper boxes. they come in handy to hold your finished prints.
Make sure you mark the box with your name and label it as final prints. All boxes look identical. It will be sad to open and expose to light your unused paper thinking it contains printed images. Keep finished images organized and come up with a filling system. It will help you locate your images.
Clean up darkroom sink and enlarger booth
At the end of each darkroom session, you will need to clean up sinks and trays and properly dispose of the chemicals used. Follow the darkroom rules and procedures. It will help you and your classmates.
Bring the enlarger to the original setting, and return the filters. Don’t forget your negative in the negative holder and pick up your photo paper. Clean up the enlarger area. Never use tape or any adhesive on easels or negative carriers.
An image on an exposed film or print that has not yet been made visible. Only after development in chemicals, it becomes visible
Thin, light negative. An underexposed negative has very low contrast, overall low density, lacks detail in the shadow, and weak highlights.
Dense, dark negative. An overexposed negative has low contrast, overall high density, is too dark in the shadows, and too dense in the highlights
Component of the enlarger. It holds the film by its edges and keeps it flat and parallel to the lens plane. A negative carrier is necessary for the correct projection of the enlarged image onto the enlarger base
A negative is an image, usually on a strip of transparent plastic film, in which the lightest areas of the photographed subject appear darkest and the darkest areas appear lightest, in other words, it is the exact opposite of the print.
Part of the enlarger above the lens where the negative carrier is inserted.
Part of the enlarger holding the contrast filters. Usually above the lens and below the light source. It may also be found below the lens.
